
GIGABYTE X870 AORUS INFINITY Motherboard Unboxing and Review: DDR5-10400 Overclocking and Performance Testing
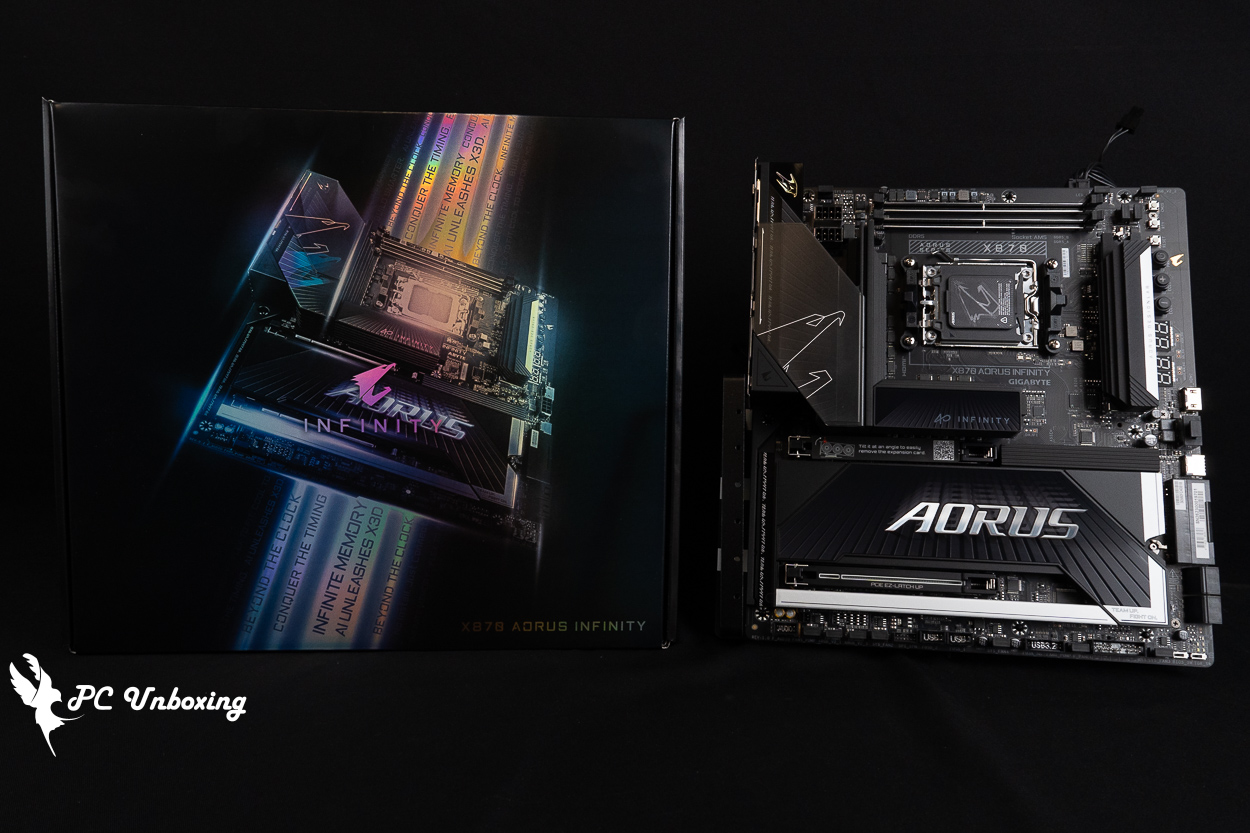
In this unboxing, we’re taking a look at the X870 AORUS INFINITY overclocking motherboard, mass-produced by Gigabyte to celebrate the brand’s 40th anniversary. It supports overclocking features such as X3D Turbo Mode 2.0 and DDR5 overclocking up to 11,400 MT/s, It features an AMD AM5 socket compatible with AMD Ryzen 9000, 8000, and 7000 series processors. It features a digital parallel 18+2+2-phase power delivery system and comes with three native M.2 slots, including two PCIe 5.0 x4 interfaces.
GIGABYTE X870 AORUS INFINITY Motherboard Specifications:
Size: E-ATX 30.5 x 27.5 cm
Processor Support: AMD Ryzen 9000 / 8000 / 7000
Processor Socket: AM5 LGA 1718
CPU Power Phases: 18 (110A) + 2 (110A) + 2 (60A)
Chipset: AMD X870
Memory Expansion: 2x DDR5 DIMM slots, 11,400 (O.C.) MT/s, maximum capacity 128 GB (single slot supports up to 64 GB)
Memory Certification: AMD EXPO (Extended Profiles for Overclocking), Intel XMP 3.0 (Extreme Memory Profile)
Integrated Graphics Output Ports: HDMI 2.1 (4K at 60 Hz), USB 4 Type-C (4K at 240 Hz), Front-Facing Internal HDMI 1.4 (1080p at 30 Hz)
Graphics expansion slots: 2x PCIe 5.0 x16 (two slots share x16 bandwidth: single card x16 bandwidth, dual card x8/x8 bandwidth)
Storage Expansion Slots: 4x SATA 6 Gb/s, M2A_CPU 25110/22110/2580/2280 PCIe Gen5 x4, M2B_CPU 22110/2280 PCIe Gen5 x4, M2D_SB 22110/2280 PCIe Gen4 x4
Wired Network: Realtek 5 Gbps
Wireless Connectivity: Qualcomm Wi-Fi 7 QCNCM865, Bluetooth 5.4
Audio chip: Realtek ALC1220
USB Ports (Front Expansion): 1x USB 20Gbps Type-C, 1x USB 5Gbps (supports two USB 5Gbps Type-A ports on front), 2x USB 2.0 Type-A (supports four USB 2.0 ports on front)
USB Ports (Rear I/O): 1x USB 4 Type-C (40Gbps), 3x USB 10Gbps Type-A (Red), 4x USB 5Gbps Type-A (Blue)
RGB Power Connectors: 3x ARGB 5V 3-Pin, 1x RGB 12V 4-Pin
Fan power supply slots: 1x 4-Pin CPU Fan, 1x 4-Pin CPU OPT, 4x 4-Pin SYS FAN, 2x 4-Pin SYS FAN/PUMP
GIGABYTE X870 AORUS INFINITY Unboxing: A Look at the X870 Motherboard’s Design and Features
GIGABYTE celebrated its 40th anniversary at this year’s Taipei International Computer Show, where they showcased the GIGABYTE X870 AORUS INFINITY motherboard, based on the “TIME FORGED INFINITY” concept. I really wanted to see it for myself at the time, but I happened to run into Jensen Huang on his way to the GIGABYTE booth, and the area was cordoned off for so long that I ended up missing my chance to see the motherboard.
The X870 AORUS INFINITY is positioned as an AMD AM5 socket, E-ATX, 2-DIMM memory overclocking-optimized motherboard. To be honest, most of its key features are actually the same as those of the model I unboxed last year. X870 AORUS TACHYON ICE They are the same; the differences between the two will be summarized later.
This motherboard is GIGABYTE’s third mass-produced 1DPC (1 DIMM per channel) memory overclocking model for the AMD AM5 socket. This generation, which uses the X870 chipset, actually has the same total number of channels as the previous-generation B650E chipset; however, the X870 allocates some of those channels for USB 4.
The TACHYON and INFINITY series are motherboard lines specifically designed for overclockers—ideal for gamers who constantly push the limits of performance and strive to break world records. With their meticulously engineered VRM design, specially optimized memory trace layout, and multiple overclocking control buttons, this motherboard enables overclockers to fully unlock the maximum potential of the latest-generation AMD AM5 Ryzen processors.
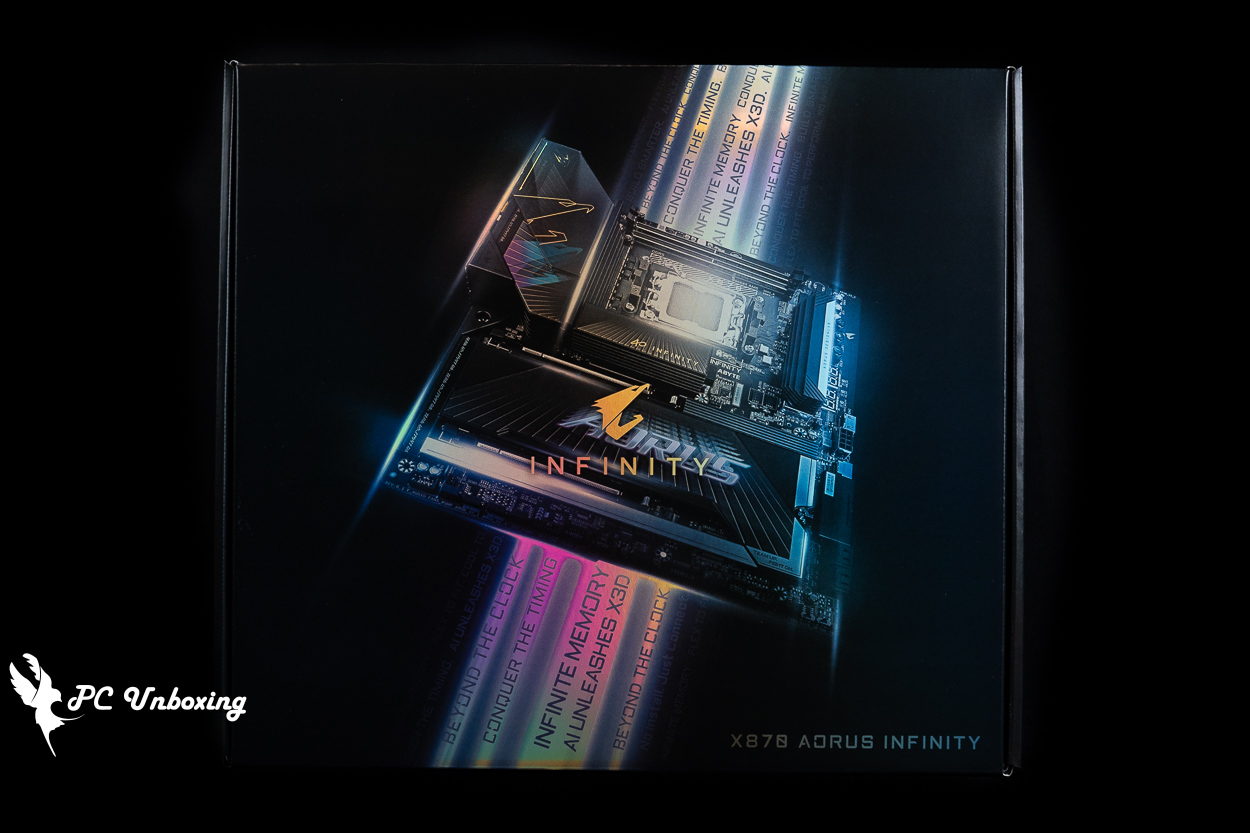
△ The X870 AORUS INFINITY 40th Anniversary Edition motherboard is in mass production; the 3D-printed metal version, however, will likely not be available for purchase.
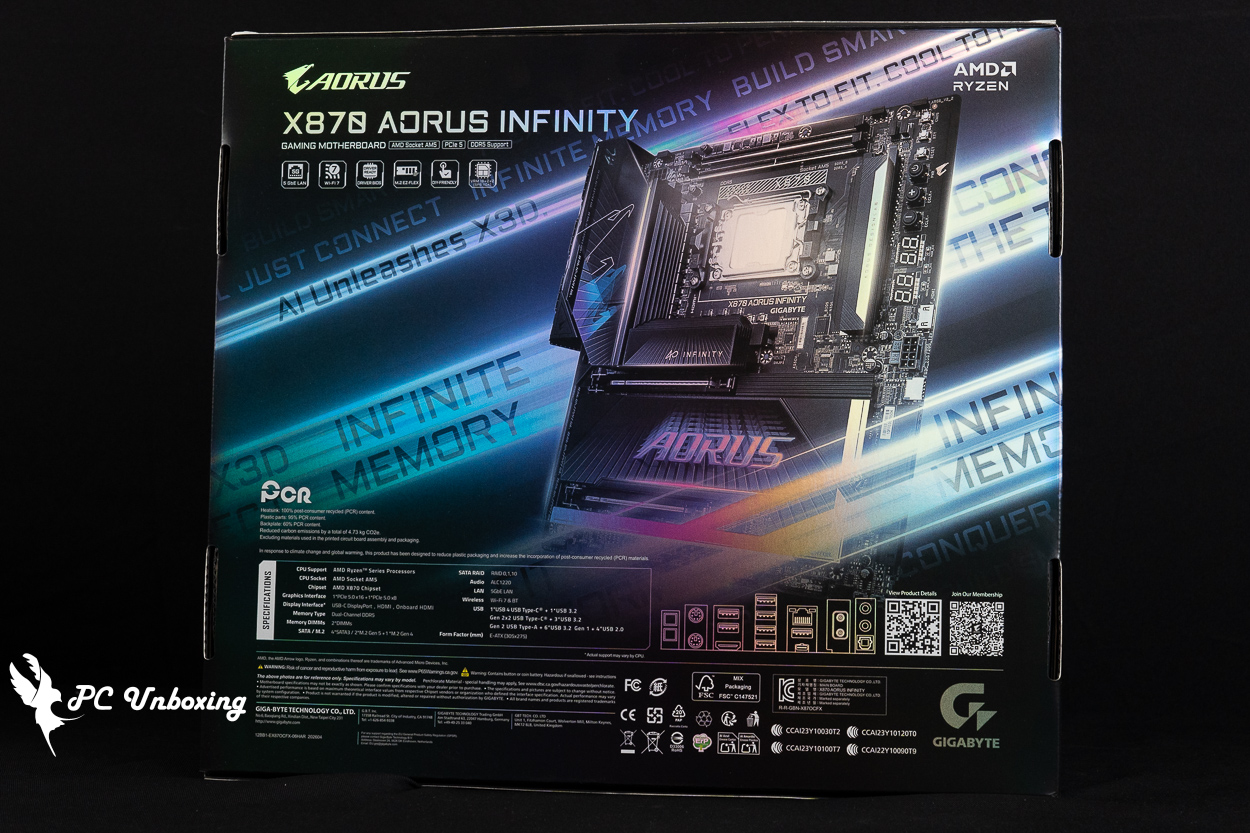
△ Basic features and specifications of the motherboard.
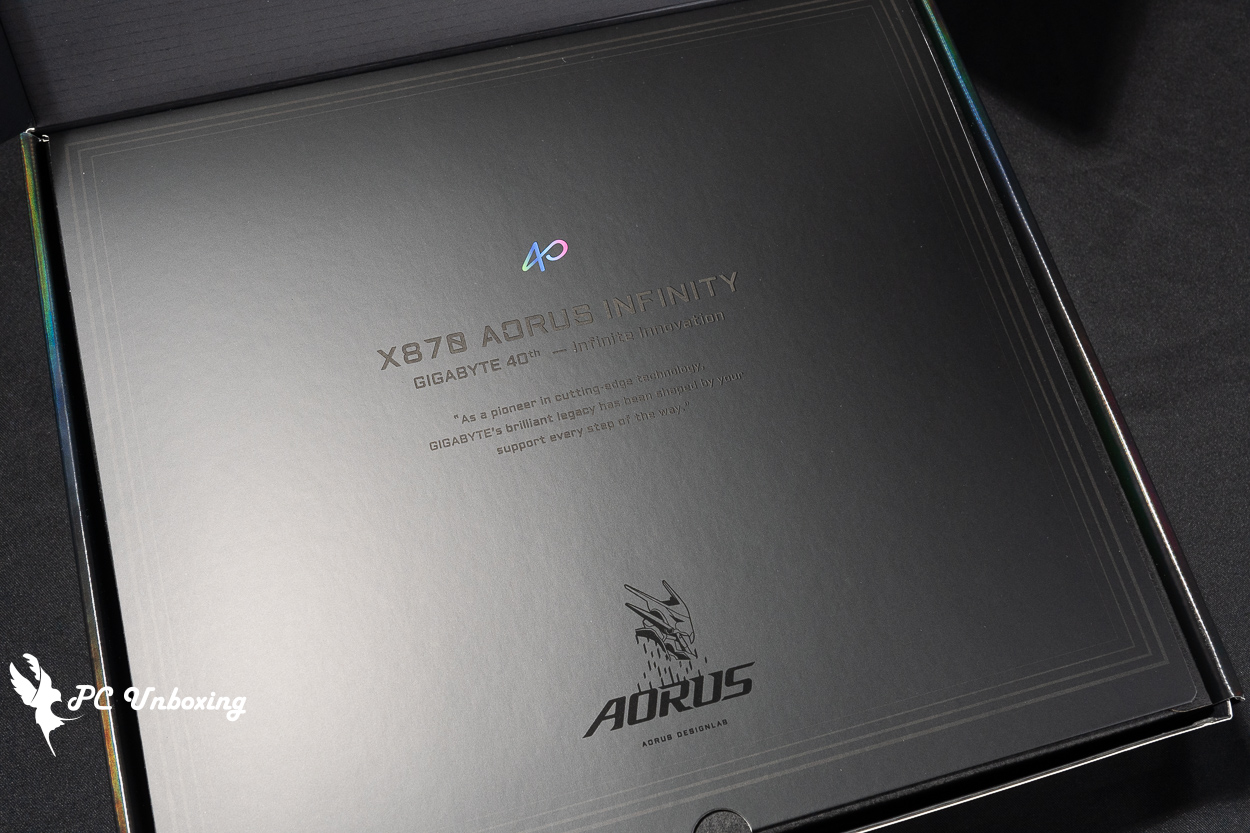
△ Text inside the thank-you card in the box.
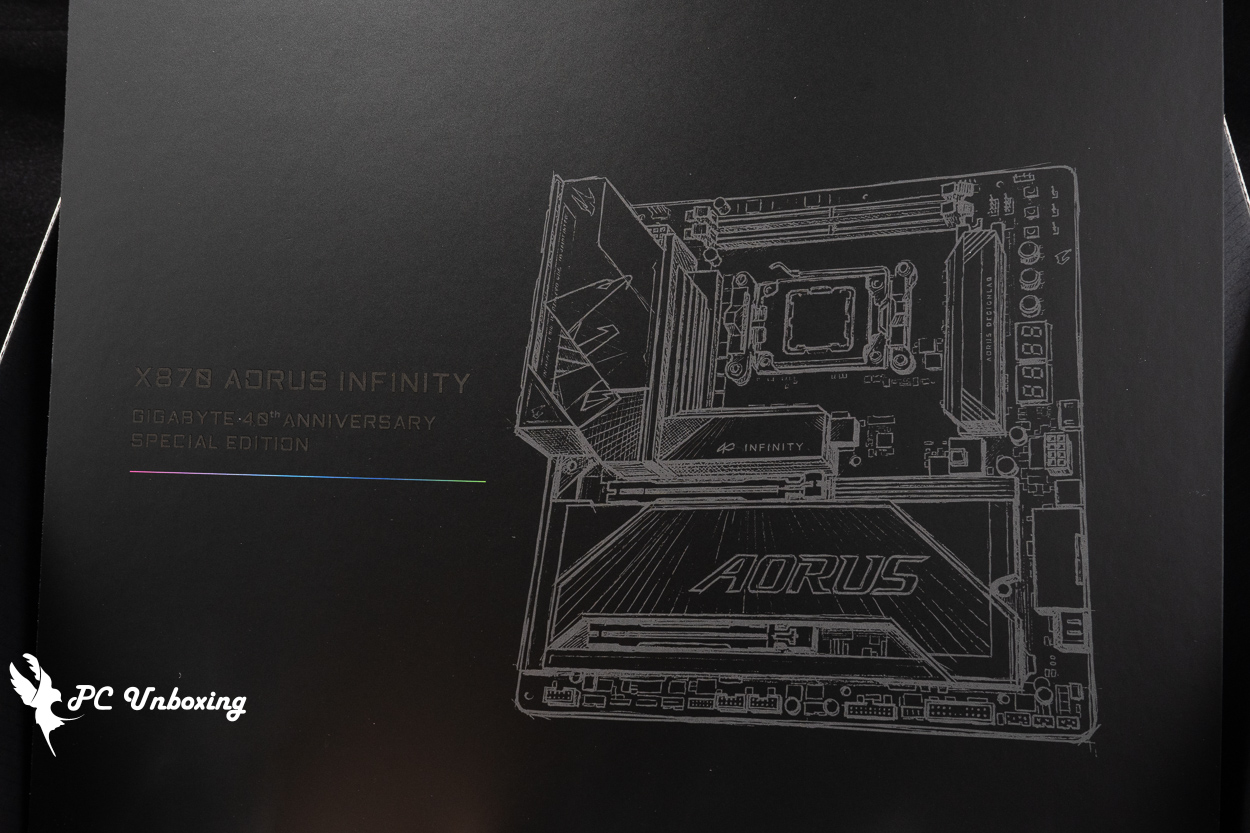
△ Line drawing of the motherboard.
The motherboard includes the following accessories: 2 SATA cables, a Wi-Fi 7 antenna, 2 temperature sensors, a G Connector, 2 Velcro cable ties, a CPU overclocking backplate, and a CPU Thermal Matrix.
CPU Thermal Matrix is officially claimed to reduce VRM temperatures by up to 8.5 °C and DDR temperatures by 6 °C. Visually, it closely resembles the “Thermal Grizzly Contact Sealing Frame / AM5 CPU Protective Cover” we’ve been seeing on the market lately, but this small accessory has compatibility requirements with the cooler mounting brackets. For more details, please refer to our previous X870E AORUS XTREME X3D AI TOP Unboxing Review.
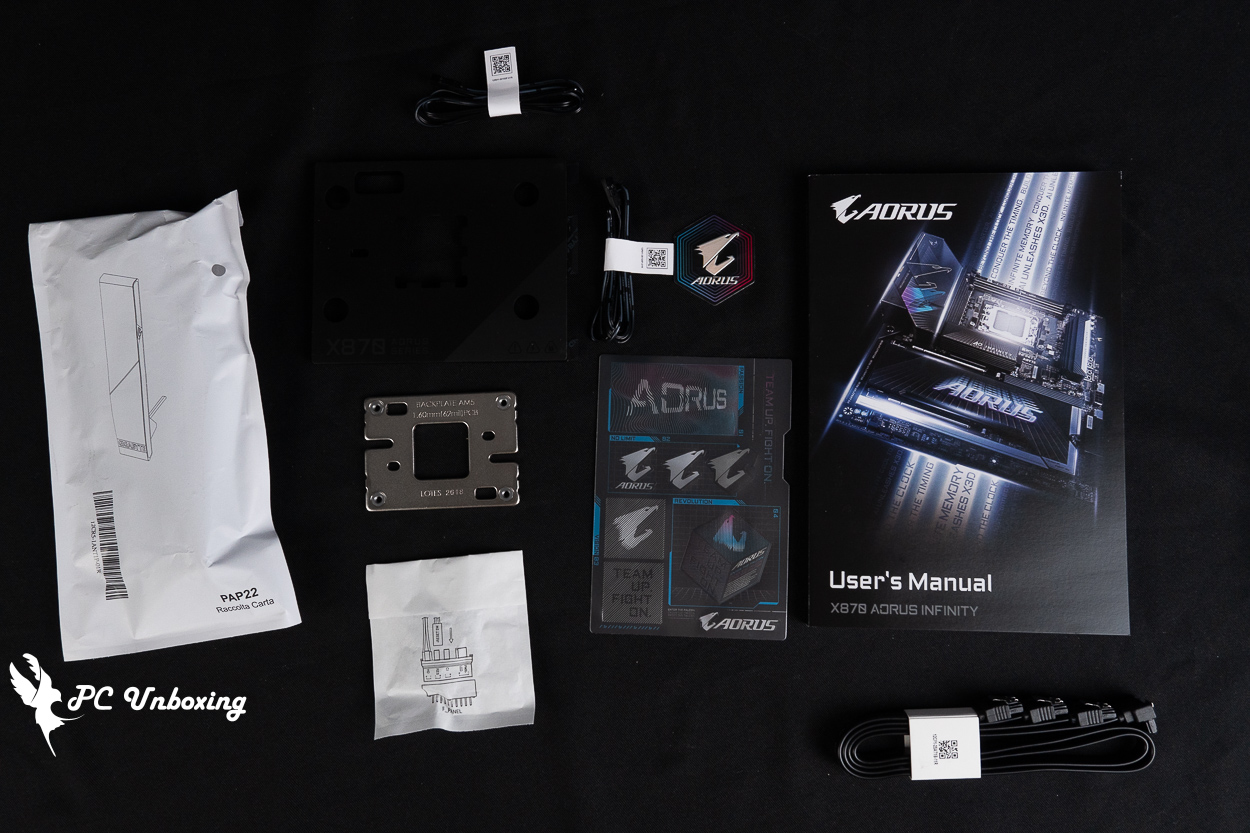
∆ Accessories at a glance.
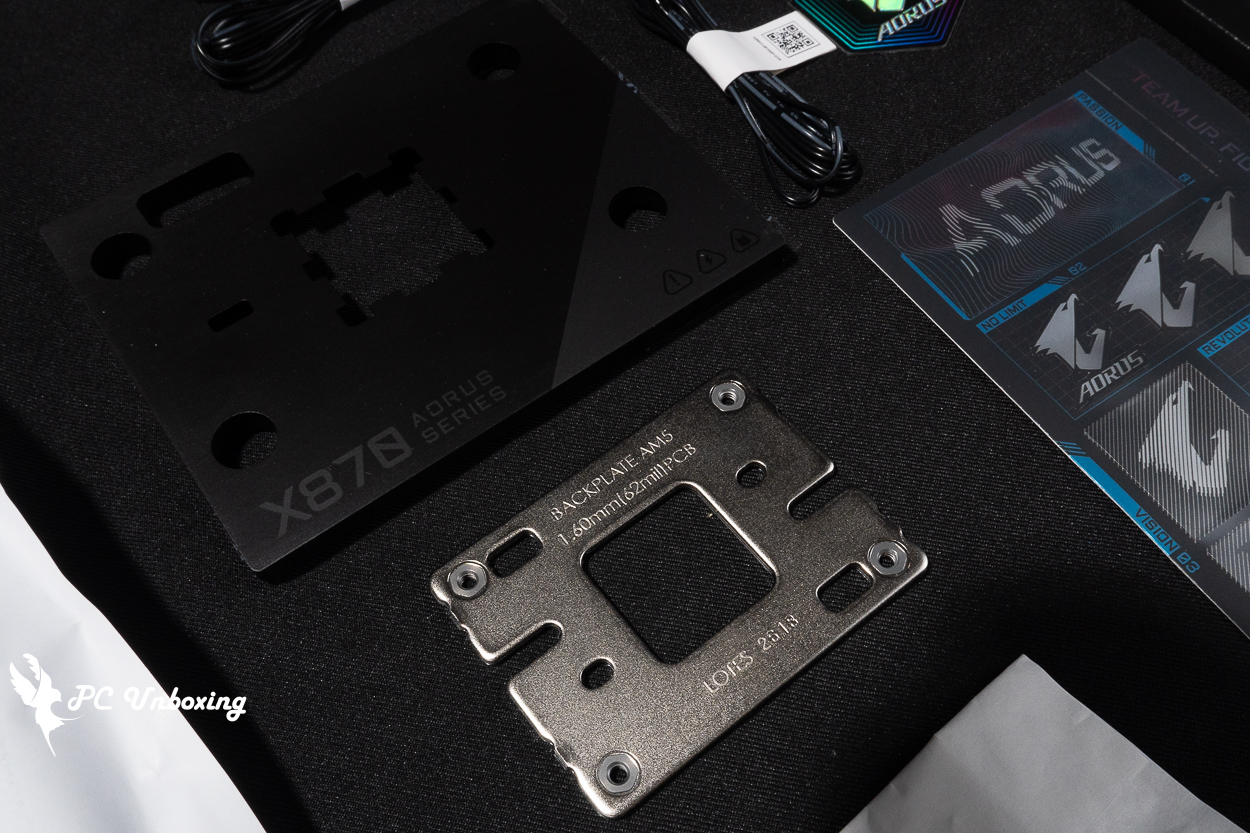
△ The additional reinforced backplate included in the accessories is designed for use with liquid nitrogen (LN2) overclocking equipment and should be used to secure the heat pipe.
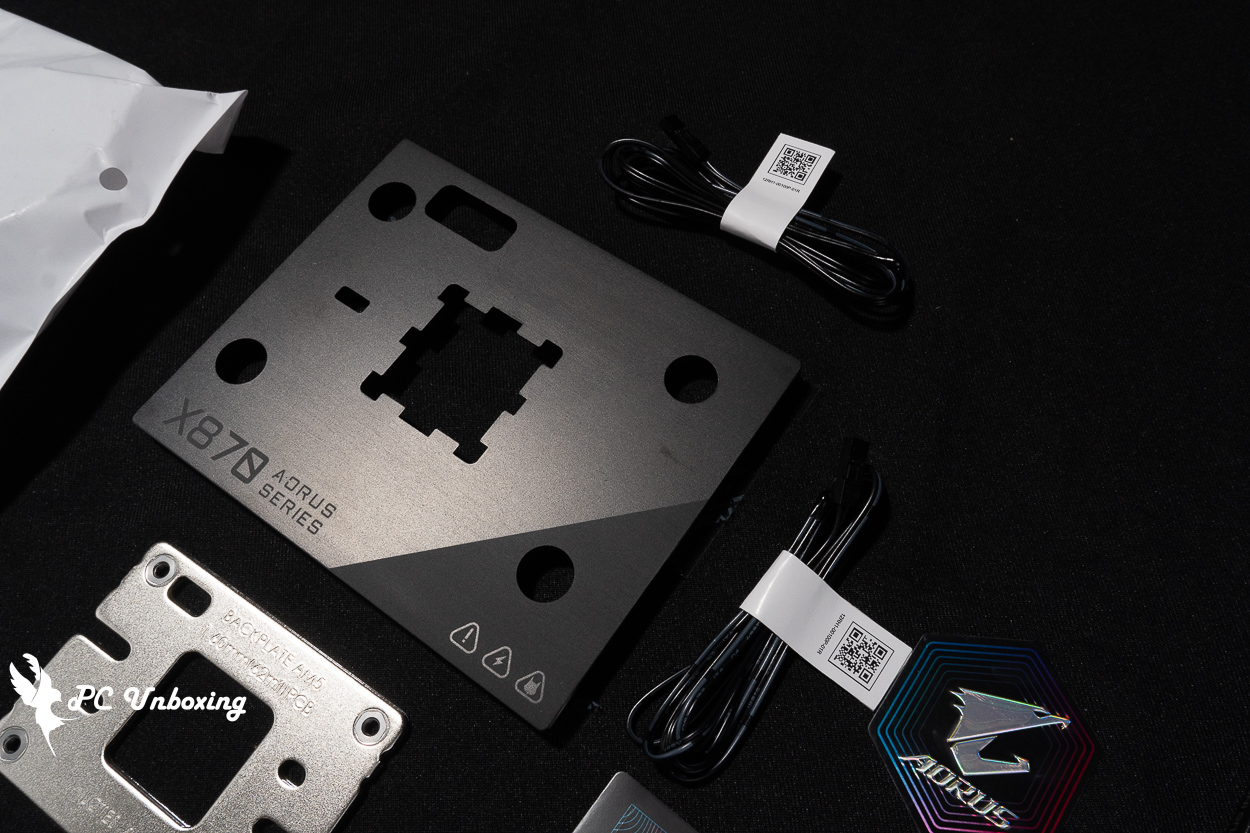
△ GIGABYTE CPU Thermal Matrix.
The X870 AORUS INFINITY motherboard features an 18+2+2 digital power delivery design, with 18 SPS 110A VCORE phases powered by a 9+9-phase parallel configuration, and a 10-layer PCB.
Consumers looking for a black Gigabyte overclocking motherboard are finally in luck—after all, the previous generation of AORUS TACHYON ICE motherboards all featured a white design.
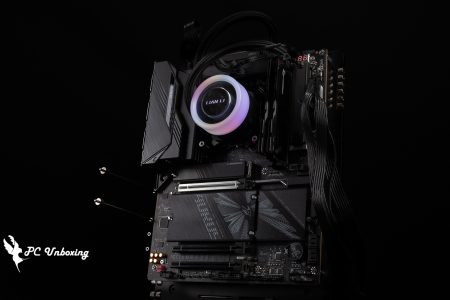
One of the most noticeable features of Gigabyte’s current-generation AORUS TACHYON ICE / INFINITY overclocking series motherboards is that the CPU socket area, memory slots, and and the VRM power delivery area rotated 90° to the left—a concept identical to that of the earlier EVGA Kingpin series motherboards. As for whether this facilitates LN2 use, that’s something one would have to experience firsthand to truly appreciate; so I won’t elaborate further. However, the design certainly improves heat dissipation for the memory modules, though installing an all-in-one liquid cooling system and routing the tubing will be more complicated than on a standard motherboard.
The motherboard size is 30.5 x 27.5 cm for E-ATX, so if you want to put it into a chassis, just pay attention to whether or not the chassis supports E-ATX motherboards. However, the people who bought this board should use it with a bare test stand or put it on their desktops, so they shouldn't need to worry about the chassis compatibility issue.
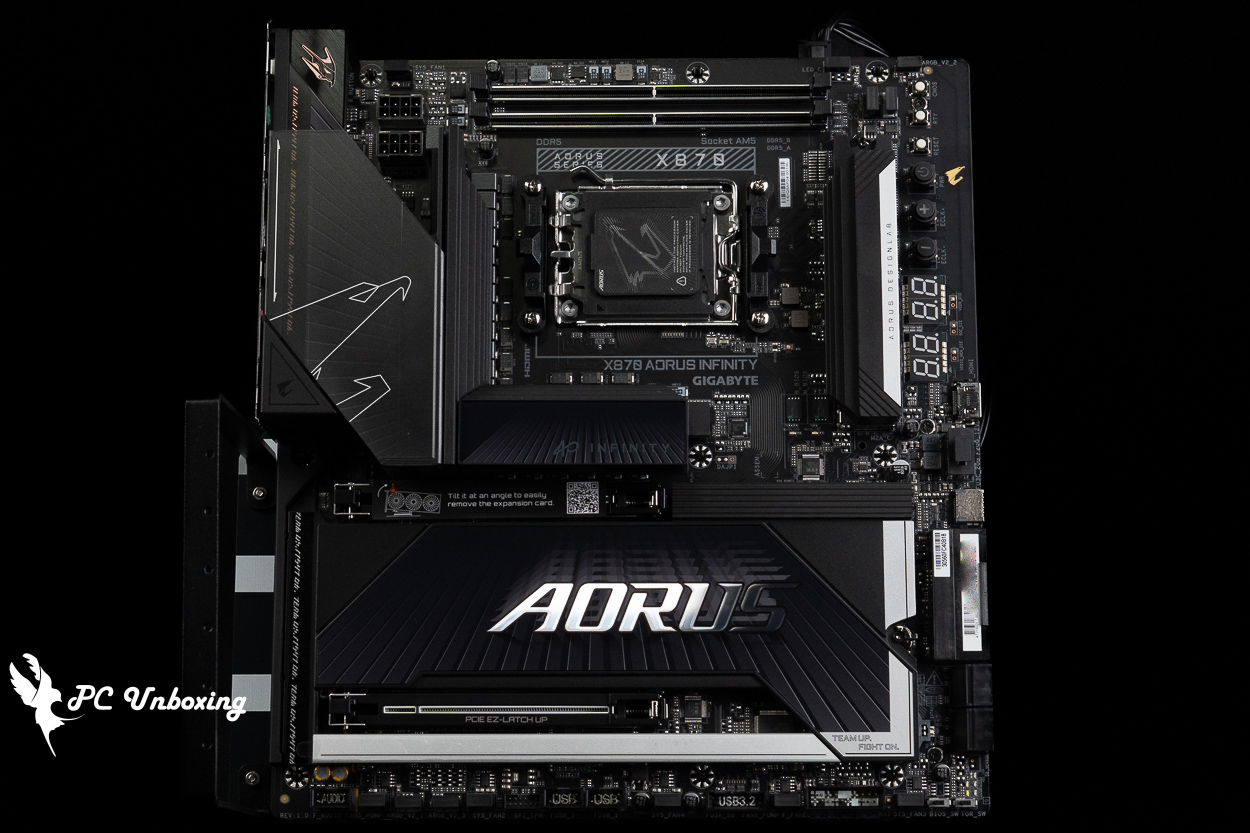
△ The E-ATX-sized X870 AORUS INFINITY.
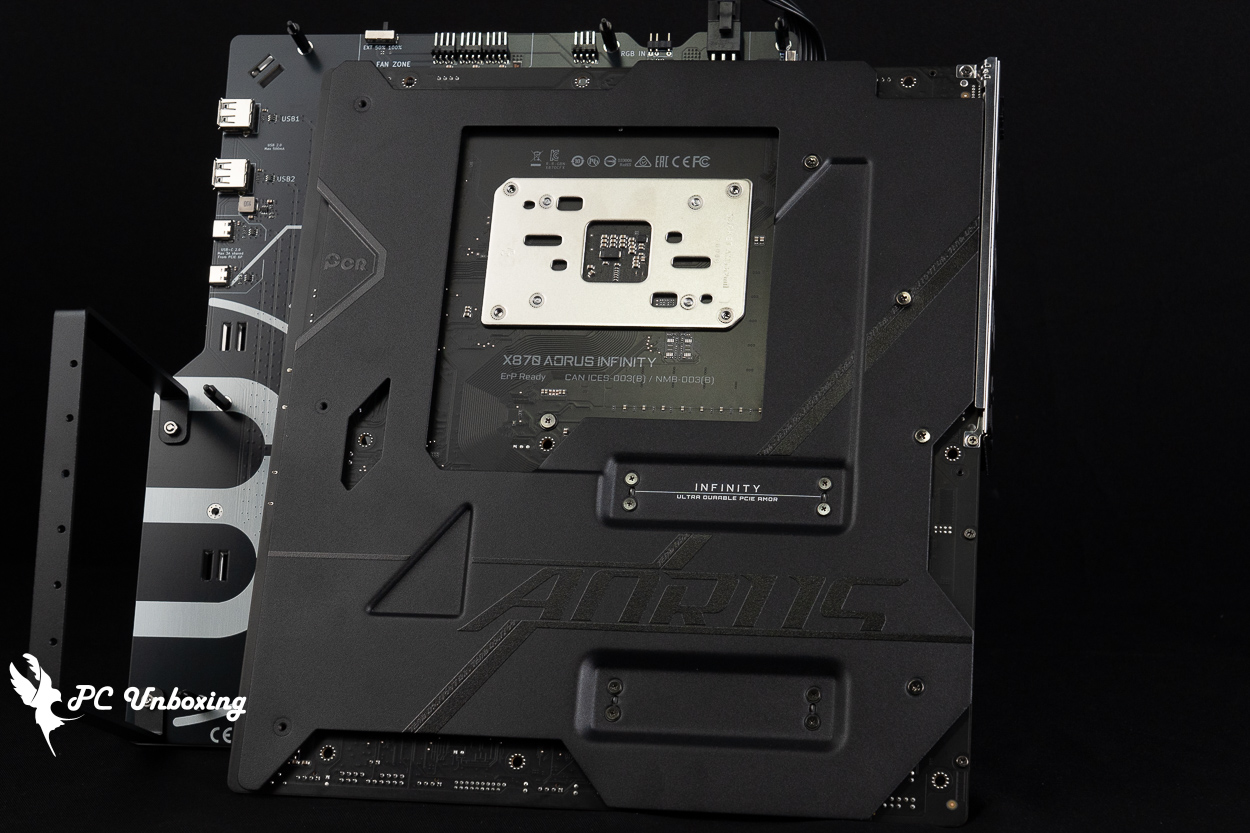
△ The black X870 AORUS INFINITY comes with a reinforced backplate!
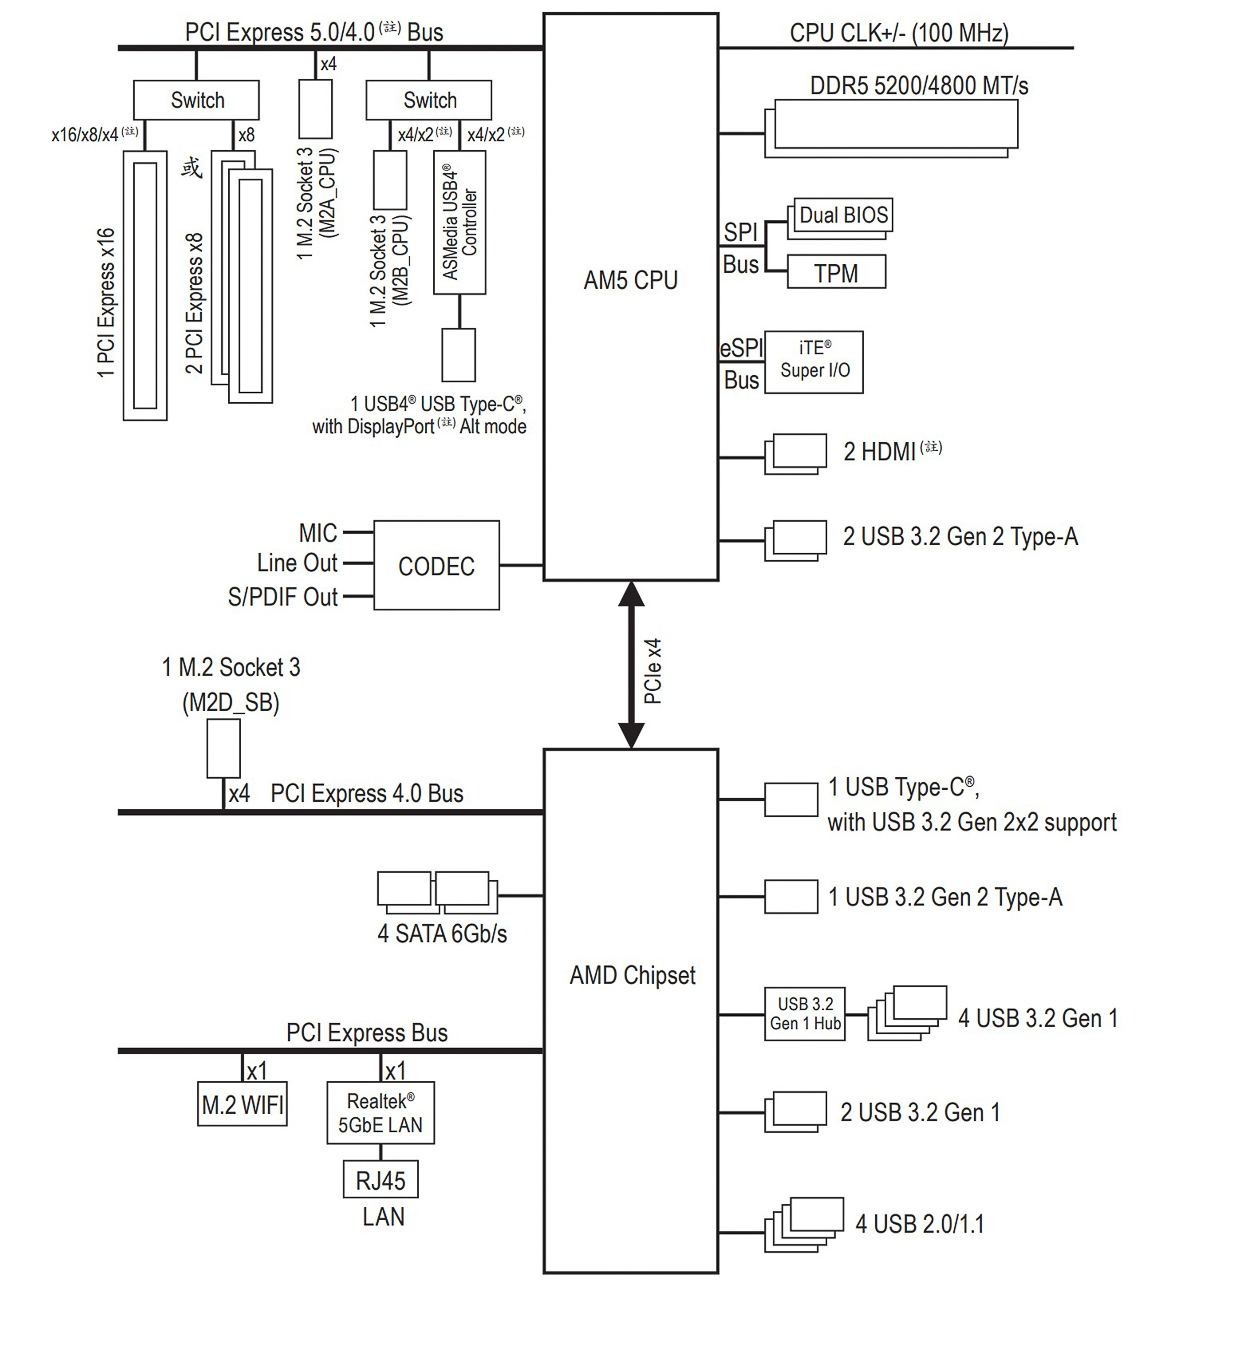
△ Motherboard channel configuration diagram.
The VRM cooling block on the motherboard features an L-shaped heatsink that dissipates heat from the power delivery components beneath it. A high-performance thermal pad with a thermal conductivity of 7 W/mK makes direct contact with the MOSFETs to maintain system stability. The cooling armor features a sliding cover; lifting it reveals the CPU’s dual 8-pin power connectors.
This time, the X870 AORUS INFINITY features a redesigned VRM cooling block, and hands-on testing confirms that it’s no longer easy to get injured during installation and removal. The grooves in this section align with the CPU’s dual 8-pin power connectors, and since the AORUS TACHYON ICE series has relatively small openings, fingers are prone to rubbing against the adjacent heat sinks when plugging in or unplugging cables.
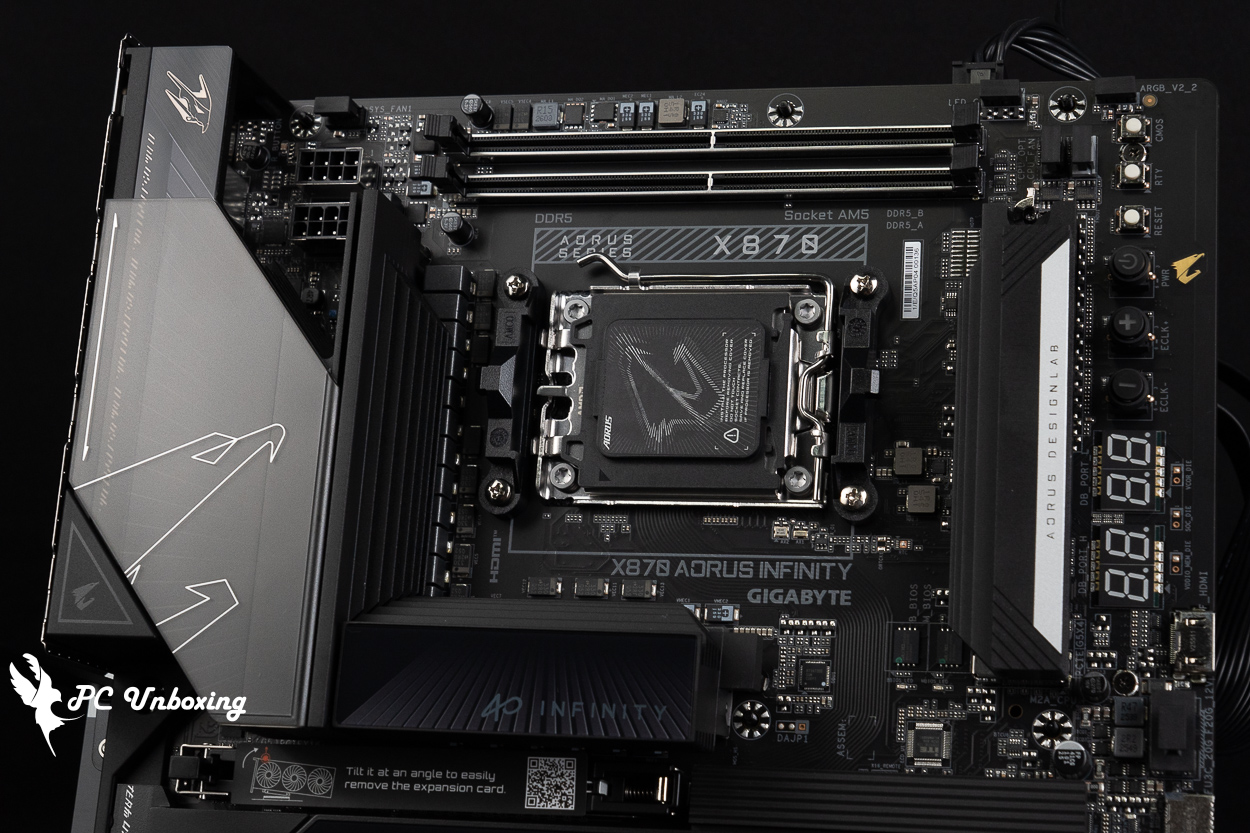
△ VRM Thermal Armor Advanced.
Next, let’s take a look at each of the expansion and power connectors on the X870 AORUS INFINITY motherboard. In the upper-left corner of the motherboard, you’ll find two 8-pin ATX_12V CPU power connectors and a SYS_FAN1 system fan connector.
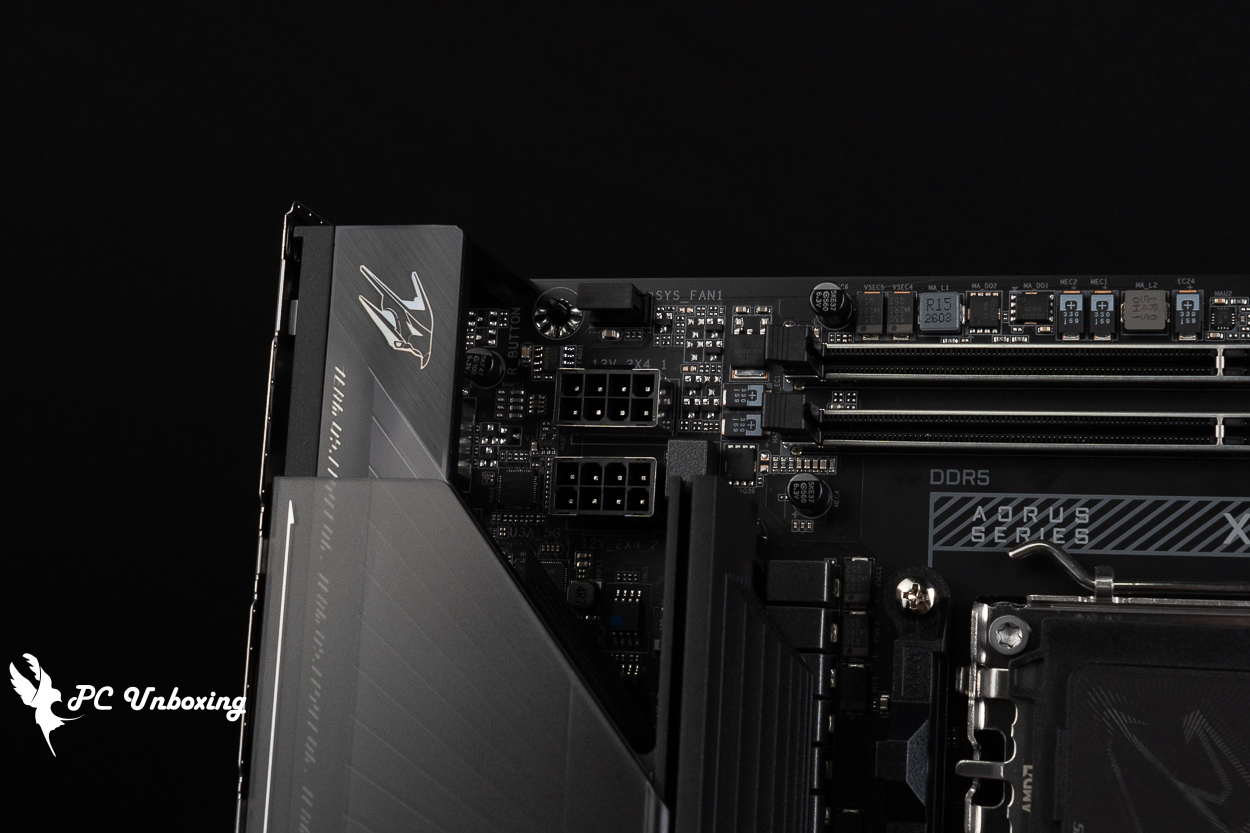
△ The motherboard features dual 8-pin CPU power connectors, along with a case fan header; the orientation of the CPU power connector latches has also been adjusted!
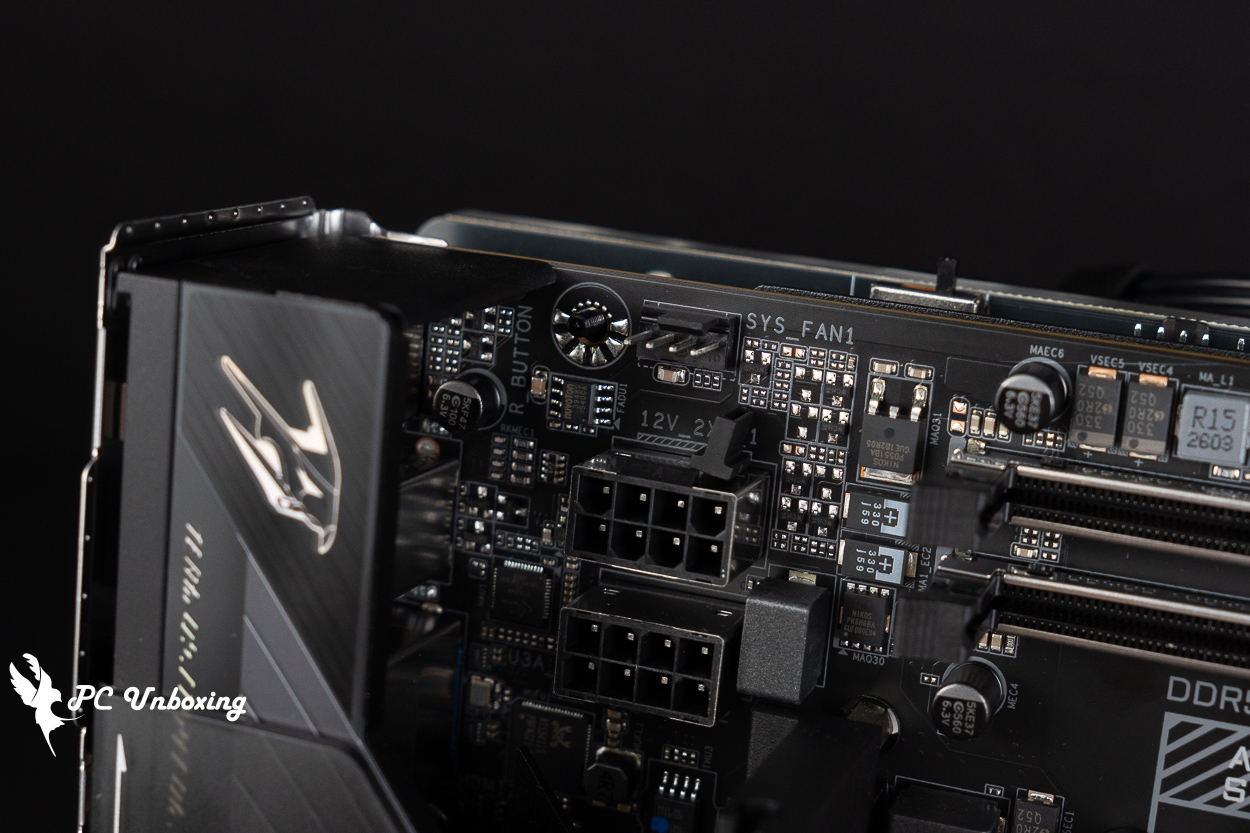
△ All fan power connectors on the motherboard are equipped with protective covers.
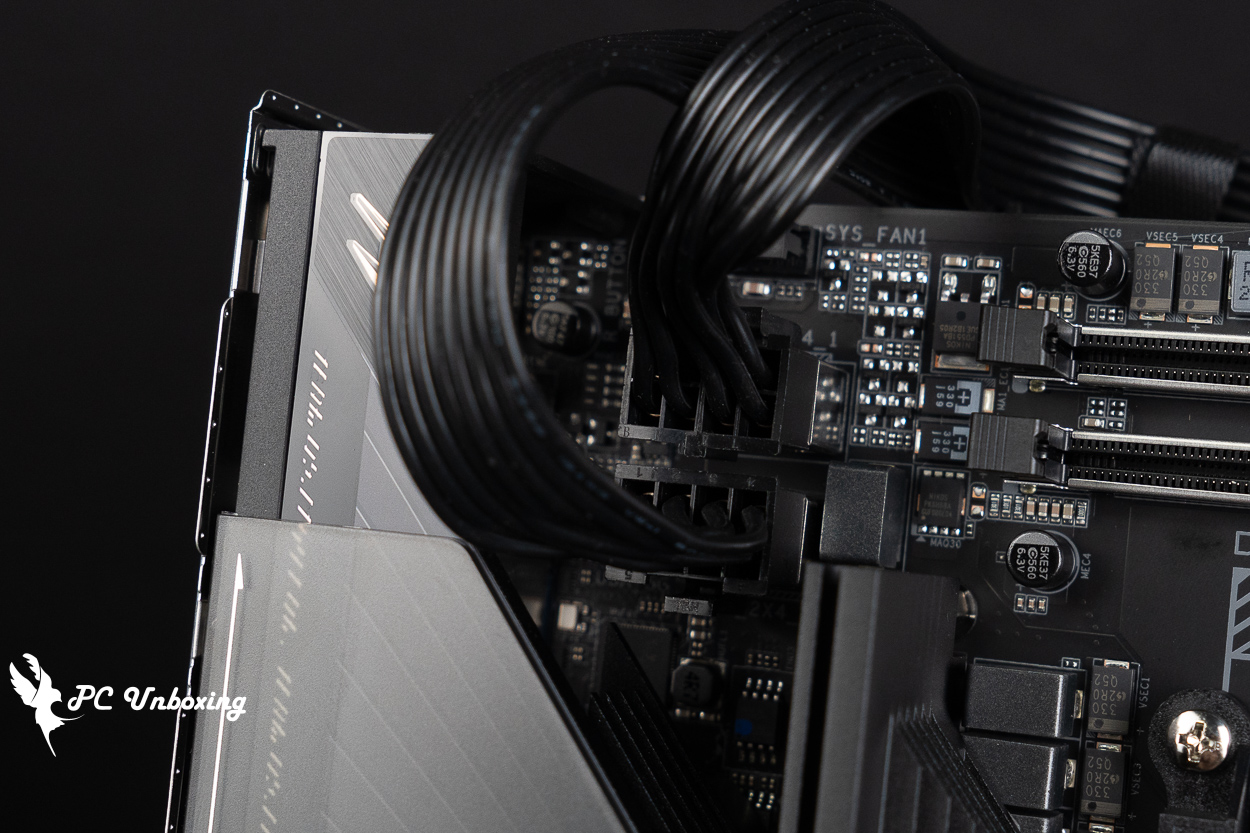
△ Demonstration of a free-form installation of processor power cables; we recommend using black, more flexible cables.
The X870 continues to use the AM5 LGA 1718 socket and supports AMD Ryzen 9000, 8000, and 7000 series processors. Since it retains the same cooler mounting brackets and hole spacing as AM4, users can directly reuse their existing AM4 cooler mounting kits for installation.
However, because the mounting blocks on this motherboard are rotated 90 degrees, if the heatsink’s decorative cover cannot be reoriented, it might trigger a bout of OCD. Additionally, when installing an all-in-one liquid cooling system, since this motherboard differs from standard models, you’ll need to confirm how to adjust and install the cooling tubes.
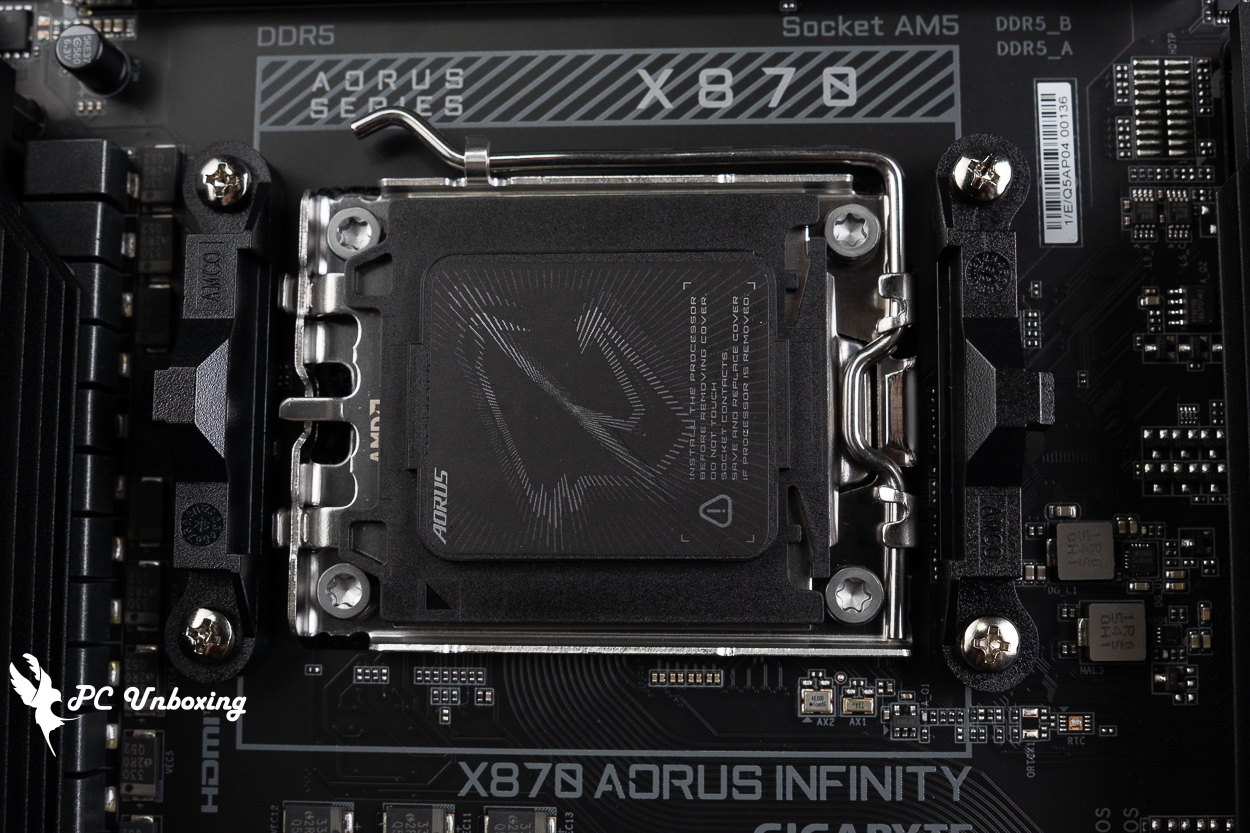
△ Processor pin cover.
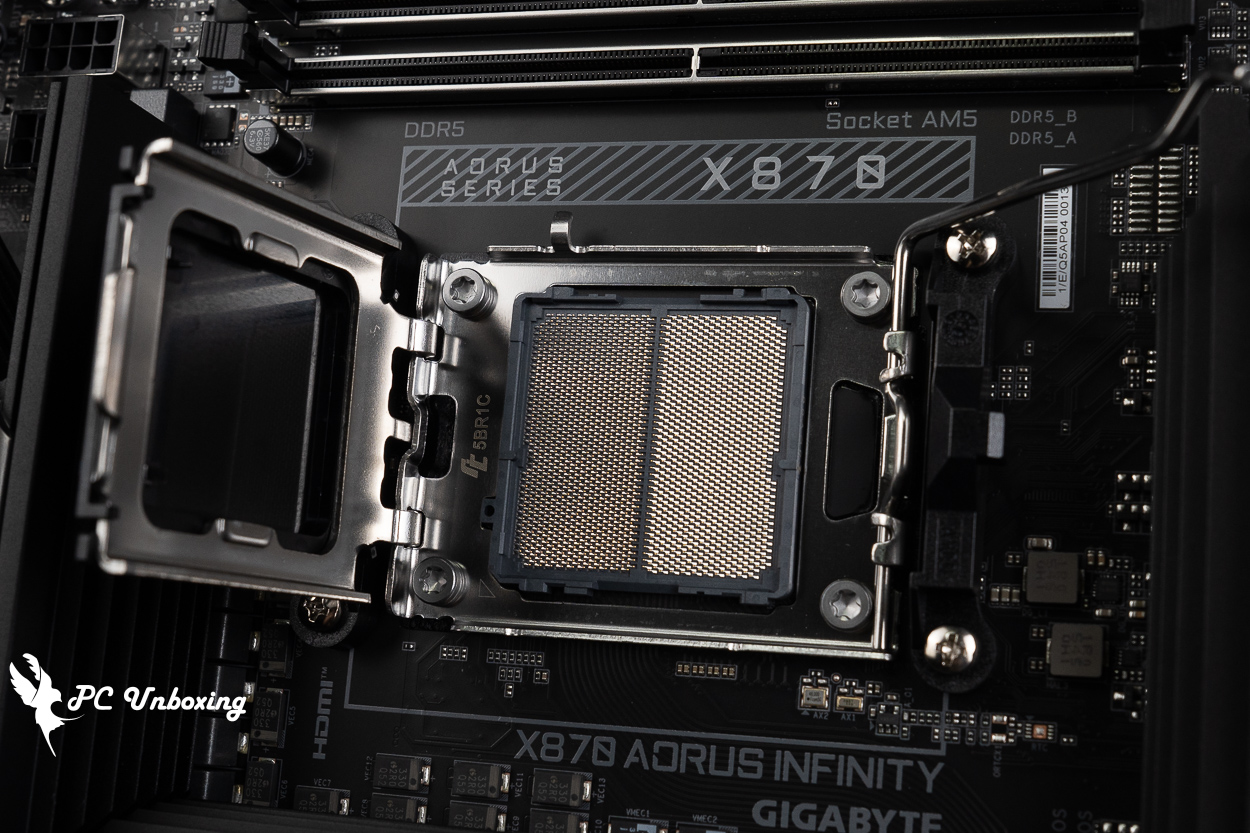
△ AM5 LGA 1718 feet.
The two DDR5 DIMM dual-latch memory slots feature a 1DPC (1 DIMM per channel) configuration and support non-ECC, unbuffered DIMM memory. The maximum total capacity for both slots is 128 GB, meaning the upper limit for a single module is 64 GB. It also supports AMD EXPO (Extended Profiles for Overclocking) and Intel XMP 3.0 (Extreme Memory Profile) one-click overclocking profiles.
The memory overclocking QVL memory support list features dual-channel memory modules that can pass the compatibility stress test at a maximum frequency of 9600 MT/s when used with Ryzen 8000 series processors, reminding you once again to choose your memory model based on the motherboard memory QVL (Qualified Vendor List) compatibility report. Vendor List (QVL) compatibility report.
The official website highlights that it can be overclocked to extreme levels, exceeding DDR5 11,400 MT/s; however, this frequency specification has not gone through the formal Memory QVL (Qualified Vendor List) compatibility verification process and is likely intended as a demonstration of its overclocking capabilities.
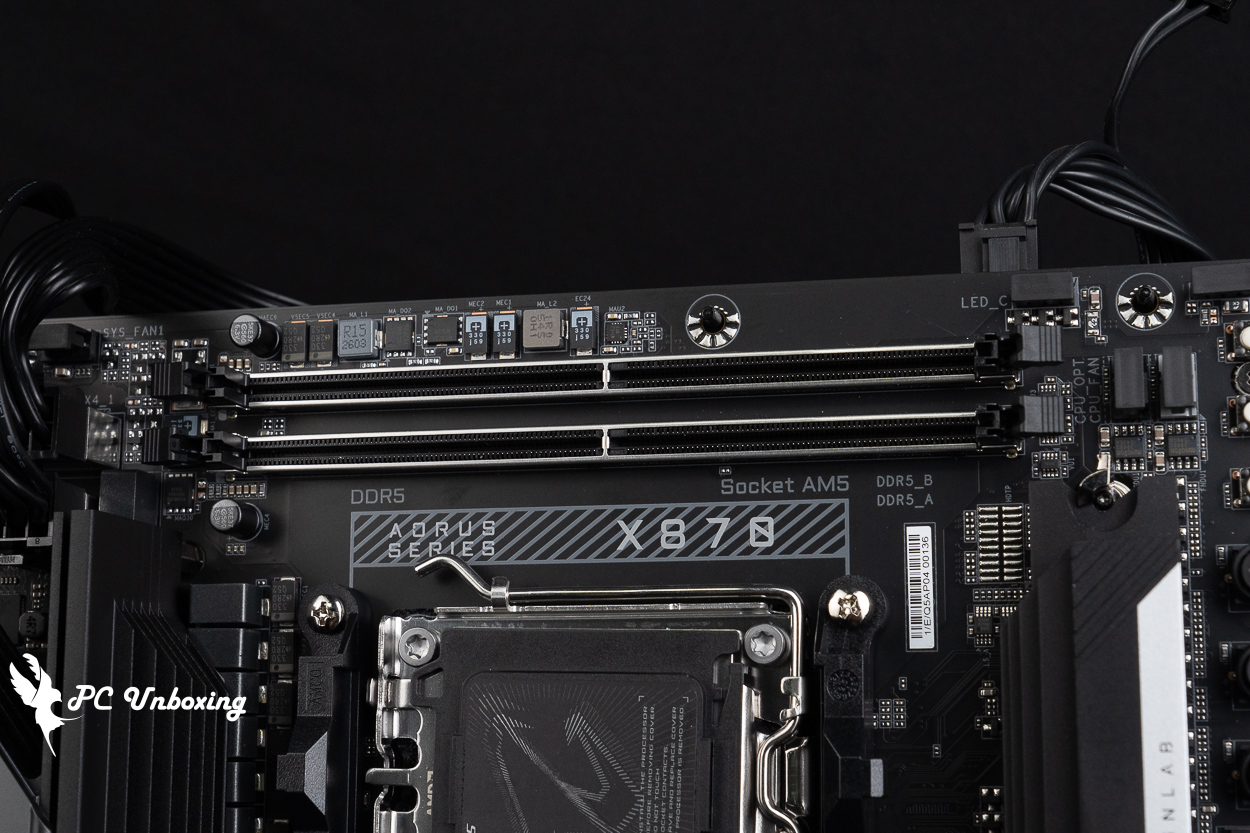
△ 2x Unbuffered DIMM DDR5 memory slots, compatible with UDIMM memory; supporting a maximum capacity of 128 GB; when two modules are installed, the QVL supports up to 9,600 MT/s (O.C.), with an official in-house overclocking record of 11,400 MT/s.
On the top right corner of the motherboard, there are two 4-Pin fan power slots, CPU_OPT and CPU_FAN, and one 12V 4-Pin RGB and one 5V 3-Pin ARGB_V2 slot.
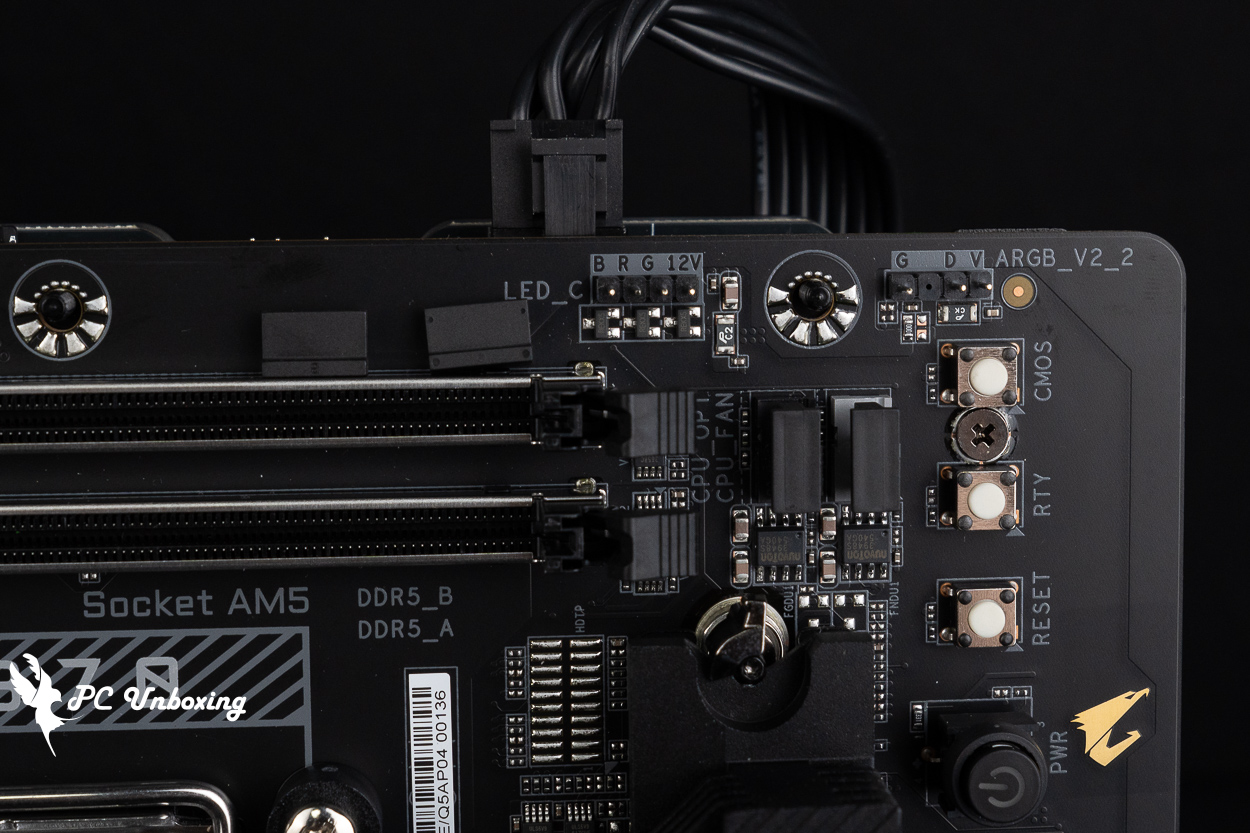
△ CPU_OPT, CPU_FAN, 12V 4-Pin RGB, 5V 3-Pin ARGB_V2.
On the right side of the motherboard are: the CMOS Clear button, the RTY cold reboot retry button, the RESET button, the PWR power button, the ECLK+ external clock overclocking button, an ECLK- external clock down button, a DeBug LED for displaying debug codes, a multimeter voltage measurement point, an HDMI 2.1 integrated graphics output port for the built-in chassis display, F20G_12V (PCIe power connector), and one front-panel USB 20 Gbps Type-C port.
The debugging light code display allows users to quickly check what parts of the motherboard are causing problems during the self-testing process, and users can refer to the motherboard manual for debugging actions.
The F20G_12V slot provides additional power to the USB Type-C port (FU3C_20G) on the front of the chassis, supporting up to 65W PD 3.0/QC 4+ fast charging.
The RTY cold boot retry button is listed on the official website as also serving as an RST (MULTIKEY) multifunction button, which can be reconfigured in the BIOS to perform other functions to meet various needs, such as: an RGB toggle (to turn off all lighting effects on the motherboard) or direct entry into the BIOS (direct entry into BIOS settings without keyboard input) , and Safe Mode (entering BIOS Safe Mode to modify specific options while preserving other BIOS settings). However, “the problem is” that in the official F2c BIOS version, I did not see an RST_SW (MULTIKEY) configuration field under “Settings” > “Miscellaneous,” which means that currently, only the reboot function is available, and there is no way to configure other functions.
- Clear CMOS Data Button: It can be used when the system reboots after an overclocking failure, and then the system is stuck in BIOS. Before using the Clear CMOS Data Button, be sure to power off the computer and unplug the power cord before using it.
- RTY Cold Start Retry Button: When overclocking dies in the middle of overclocking and RESET does not work, you can press this button to force reboot, shut down the forced system and retry booting.
- RESET Reboot button: System reset button.
- PWR Power button: Power button.
- ECLK+ / ECLK- External Clock Clock Down Button: It can be used to upclock or downclock the external clock frequency (ECLK) of the CPU, every time it is pressed, the ECLK will be increased or decreased by 0.1 MHz, and this button supports the function of consecutive clicks.
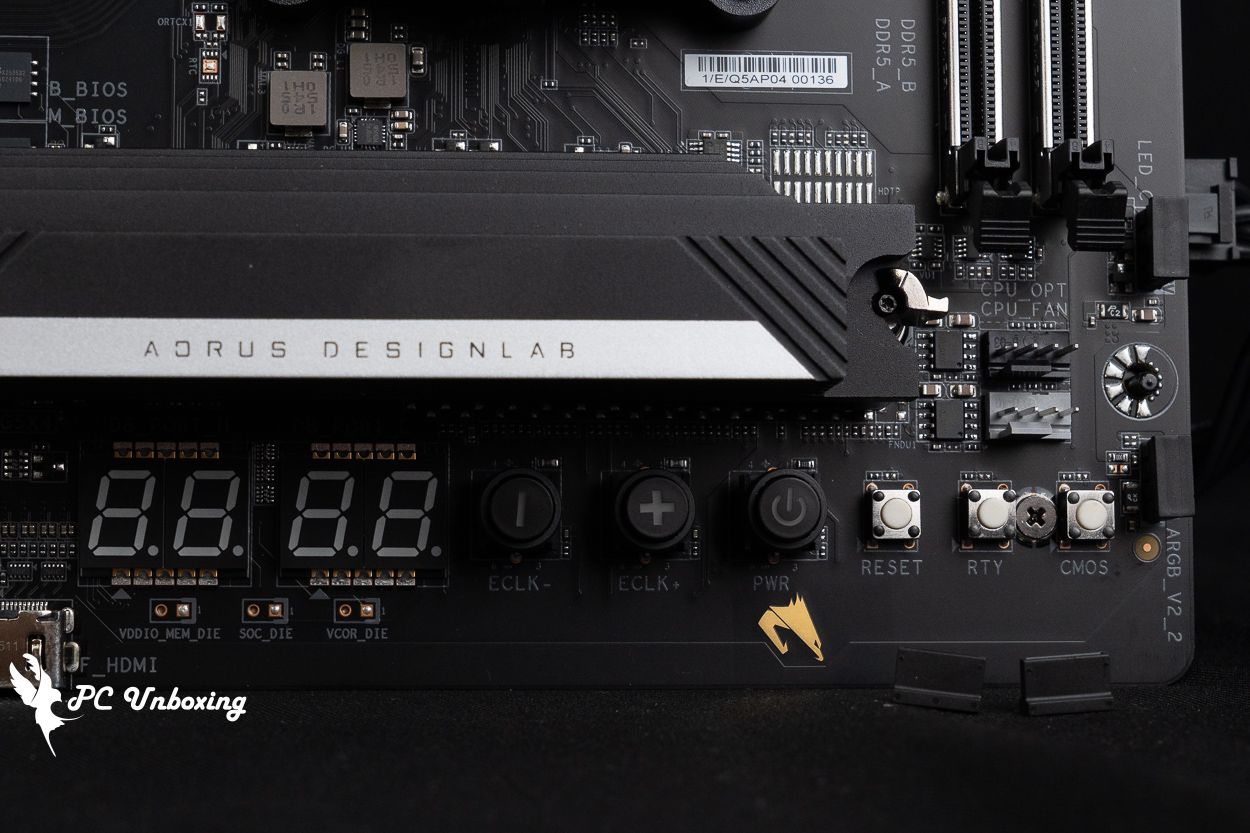
△ CMOS Clear Button, RTY Cold Reboot Retry Button, RESET Reboot Button, PWR Power Button, ECLK+ External Clock Overclock Button, ECLK- External Clock Down Button, DeBug LED for Debug Code Display, Multimeter Voltage Measurement Point.
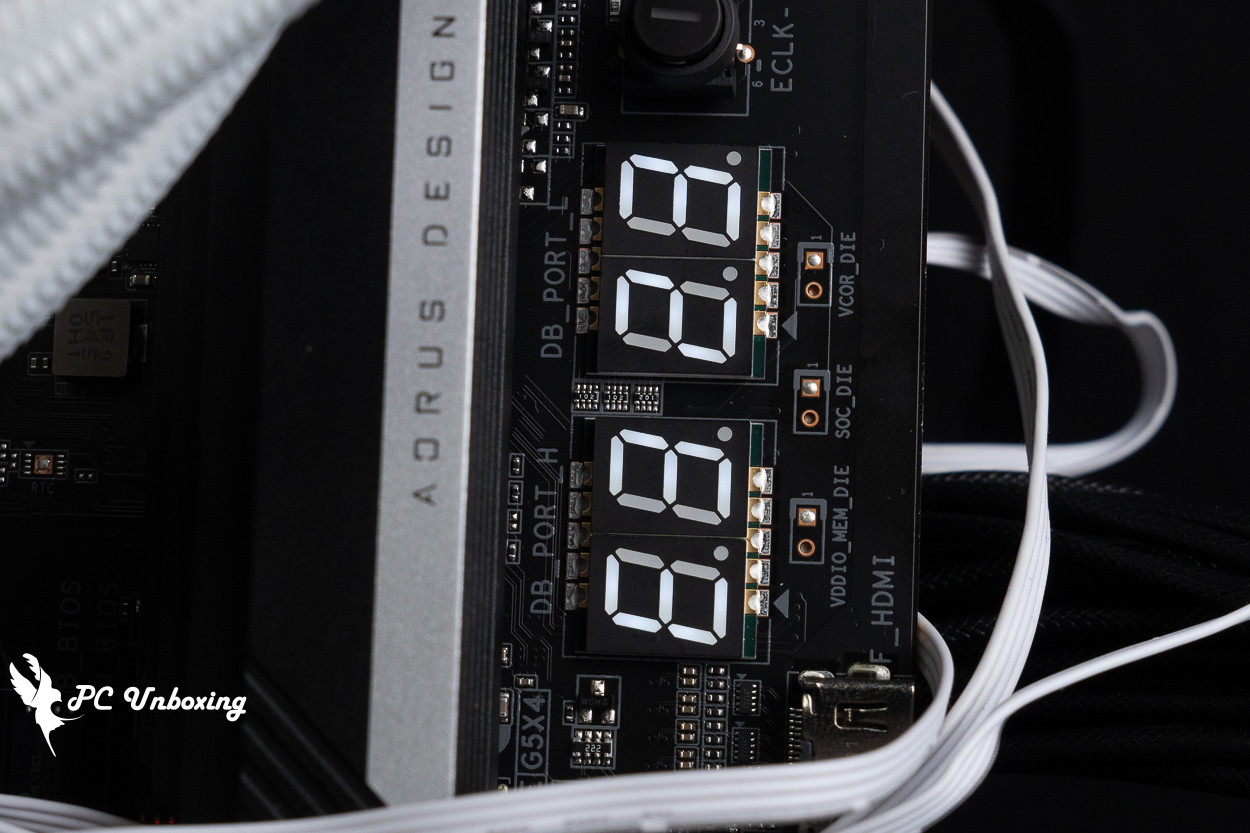
△ The diagnostic light codes help quickly identify the problem, but the light is positioned at a 90-degree angle.
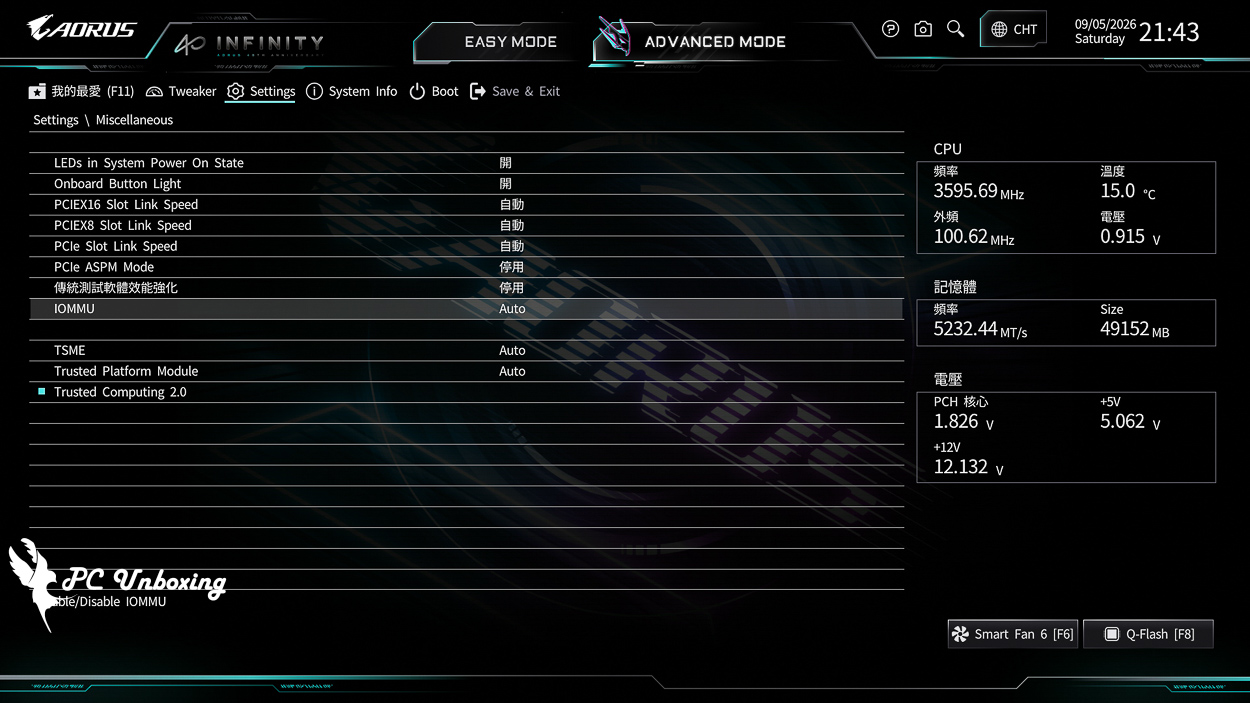
△ Currently, in the official F2c BIOS, I do not see the RST_SW (MULTIKEY) setting under "Miscellaneous" in the "Settings" menu.
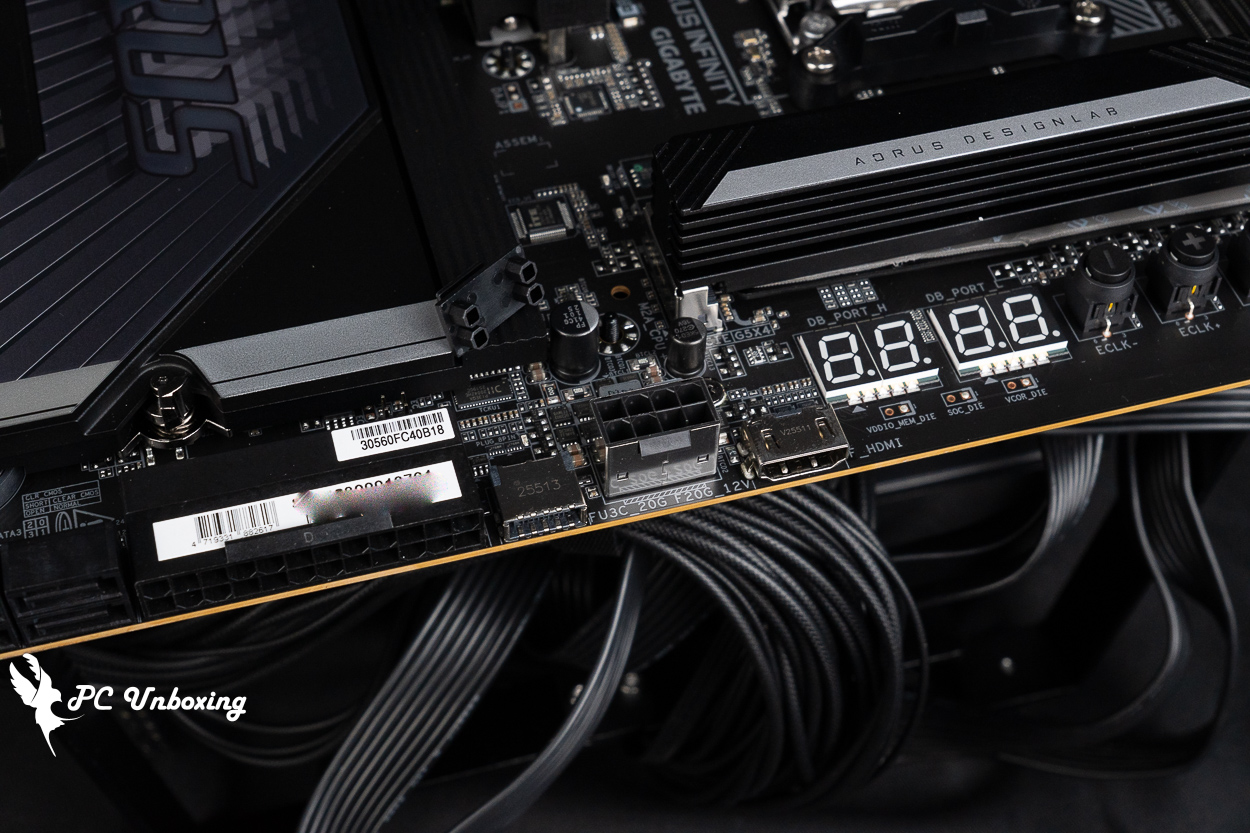
△ The case features a built-in display, an HDMI 2.1 integrated graphics output port, an F20G_12V (PCIe power connector), and one front-panel USB 20 Gbps Type-C port.
In the lower-right corner, there are two EC_TEMP temperature sensor connectors, a 24-pin motherboard power connector, four SATA 6 Gb/s ports, EZ DeBug indicator lights, and more.
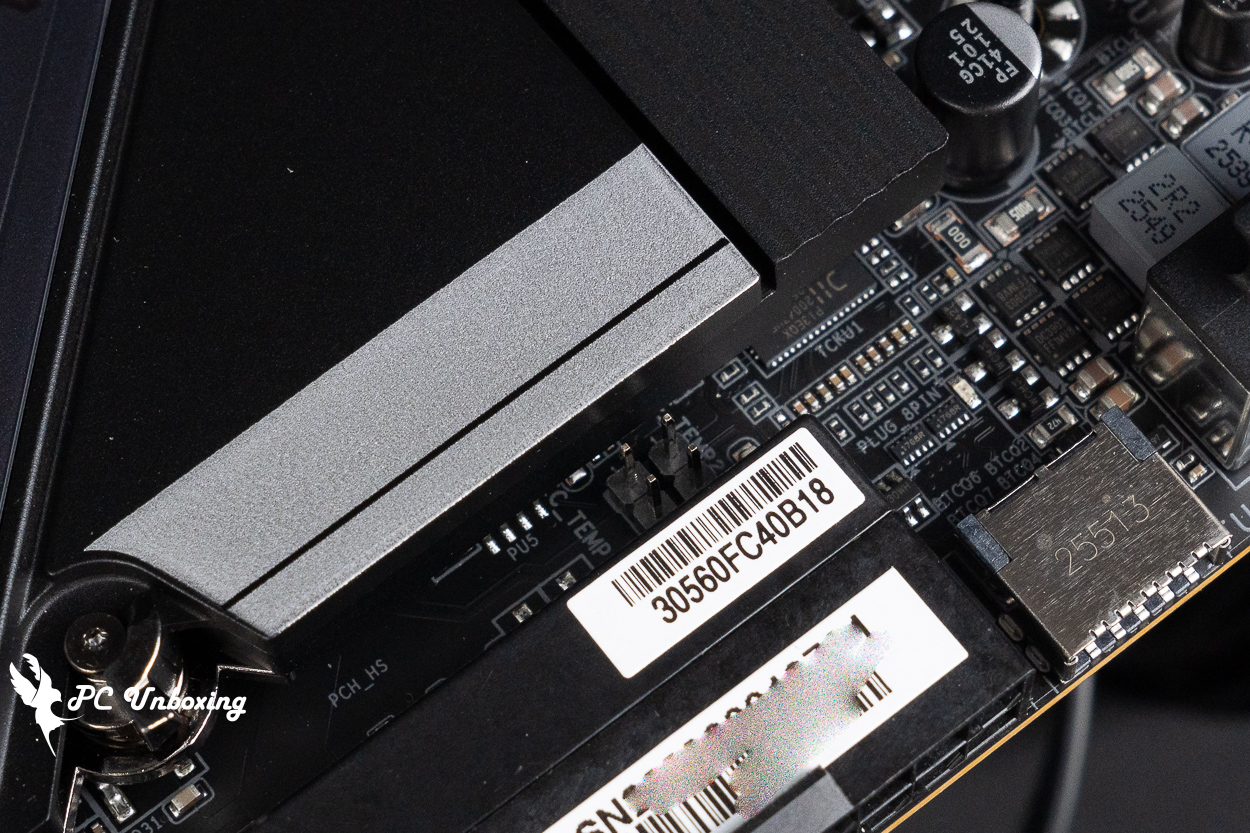
△ Two temperature sensor slots.
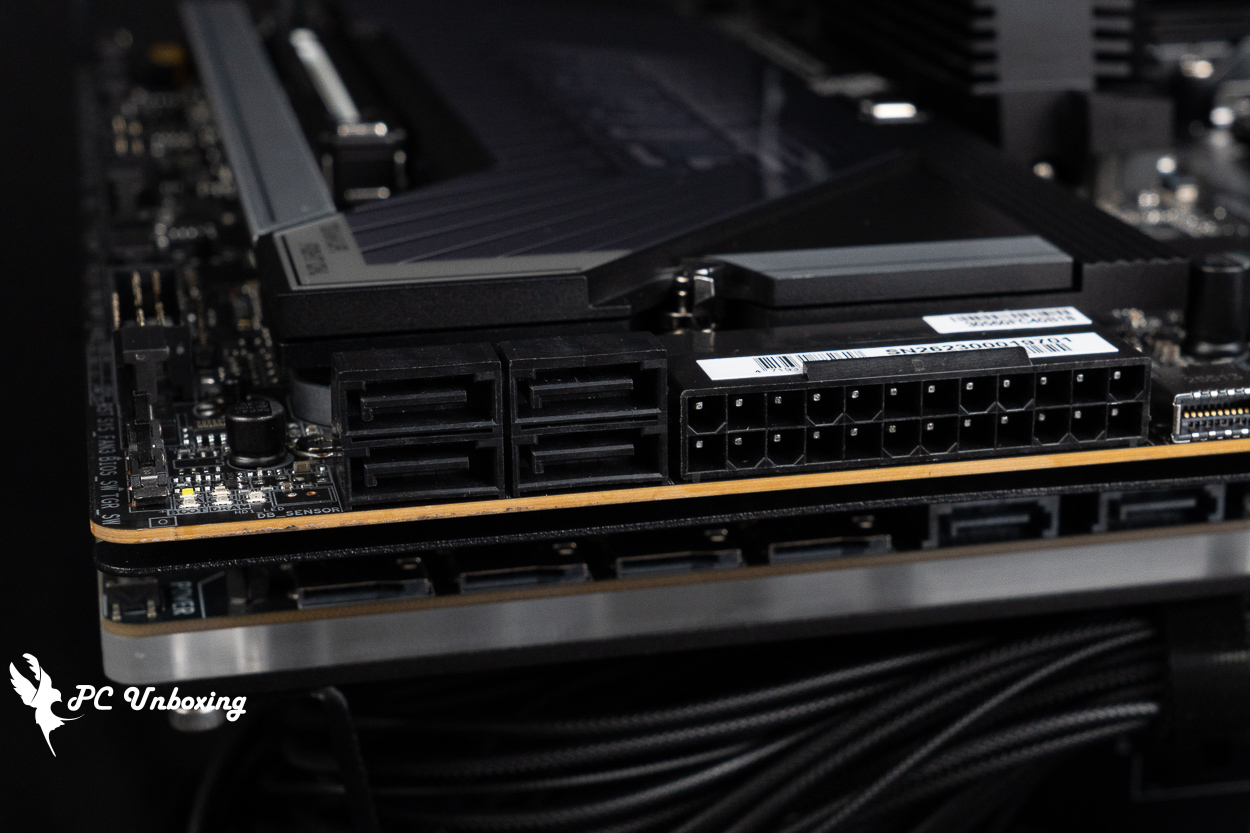
△ Motherboard: 24-pin power connector, four SATA 6 Gb/s ports.
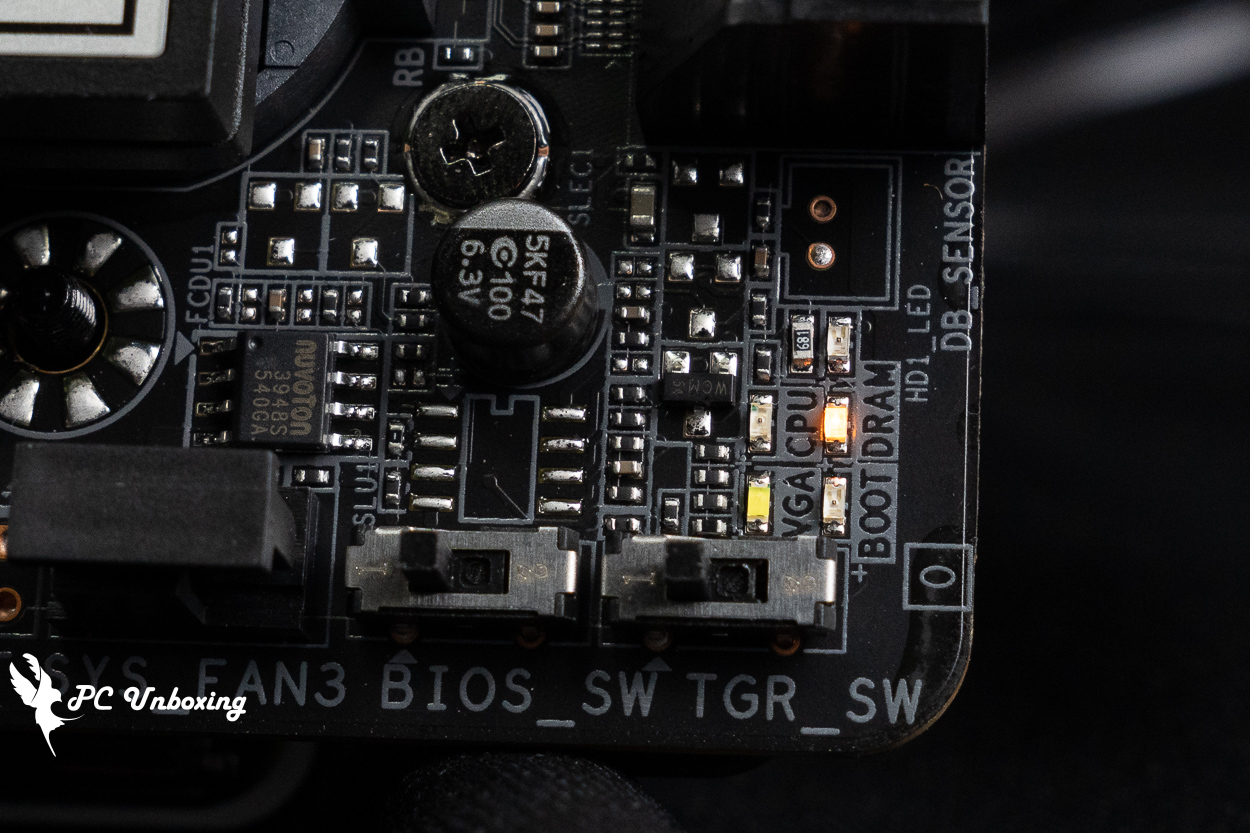
Demonstration of the ∆ EZ DeBug lamp number.
Located beneath the motherboard are: the TGR latch button, the BIOS_SW dual-BIOS switch, five SYS_FAN power connectors, the system front panel connector, a CMOS reset jumper slot, one USB 5Gbps slot (supporting two front-panel USB 5Gbps Type-A ports), two USB 2.0 slots (supporting four front-panel USB 2.0 ports), SPI_TPM (Security Cryptographic Module connector), two 5V 3-pin ARGB_V2 connectors, and an HD_AUDIO audio connector.
- TGR button: Usually used to lower the frequency before running the score to let the temperature of the processor drop, and without changing any software settings, dialing TGR immediately after running the score can restore the frequency immediately.
- BIOS_SW Dual BIOS Switch: The motherboard can store two versions of BIOS, you can switch the versions only when the motherboard is completely powered off during shutdown.
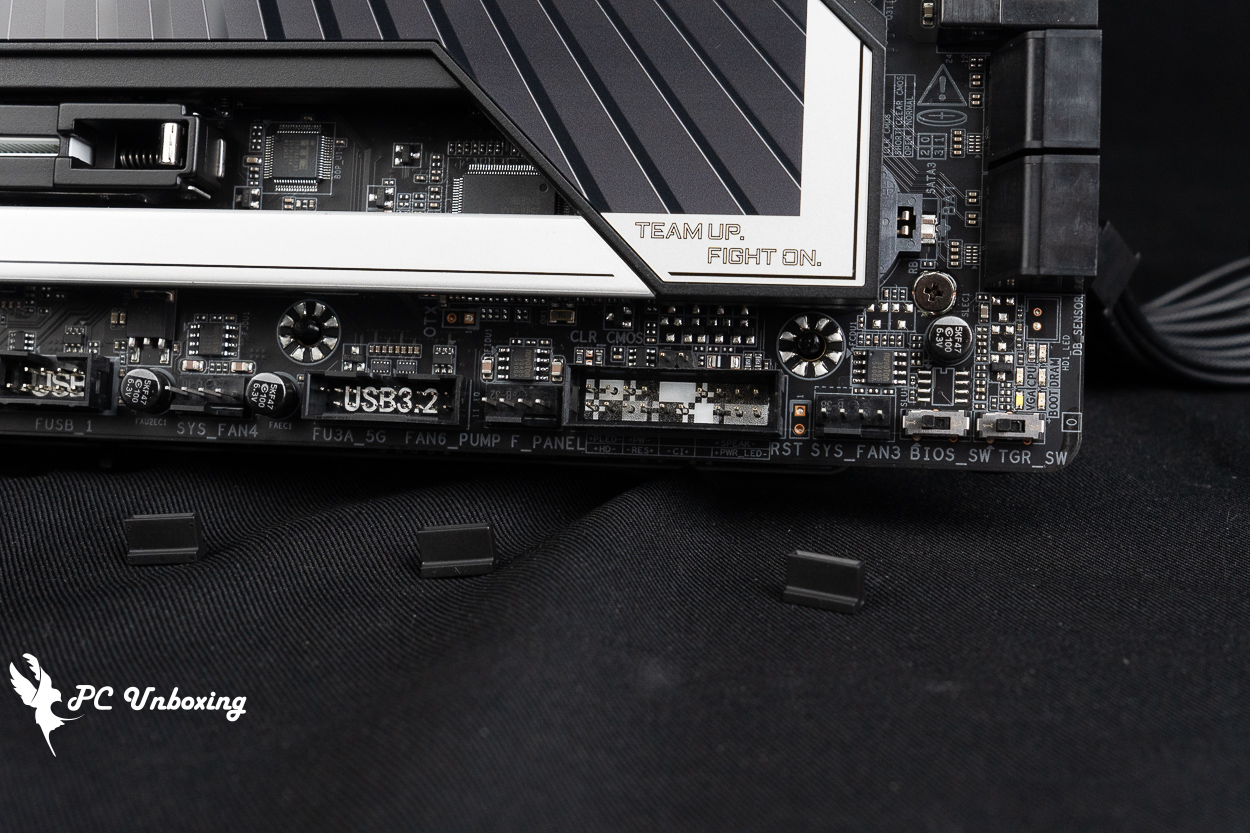
△ TGR board-mounted button, BIOS_SW dual BIOS switch, five SYS_FAN fan power connectors, system front panel connector, CMOS reset jumper slot, and one USB 5Gbps slot (supports two front-panel USB 5Gbps Type-A ports).
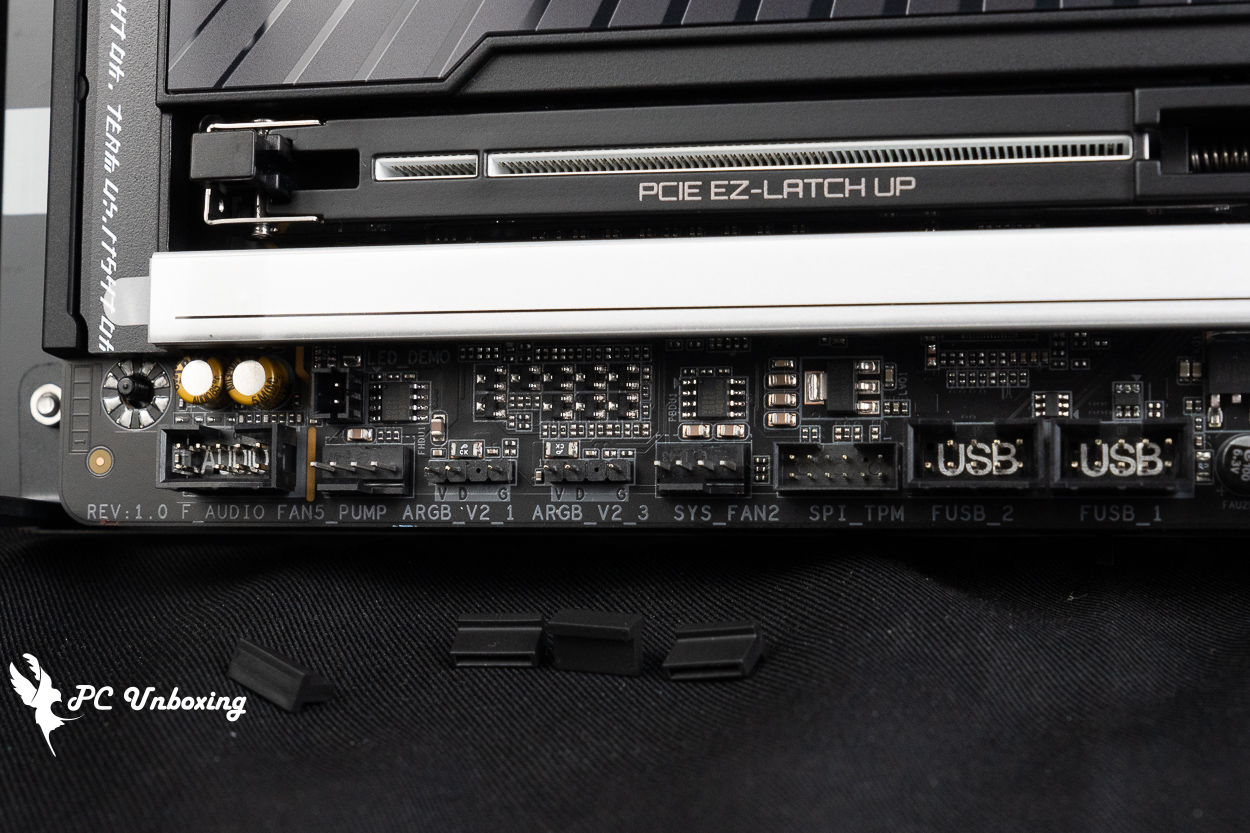
△ Two USB 2.0 ports (supporting four front-panel USB 2.0 headers), SPI_TPM (Security TPM connector), two 5V 3-pin ARGB_V2 connectors, and an HD_AUDIO audio connector.
The motherboard features a total of two x16-length device expansion slots. Both expansion slots are reinforced with PCIe UD Slot X metal brackets and are marked with internal rubber strips, ensuring that the graphics card remains undamaged even when users take advantage of the convenient PCIe EZ-Latch Up feature.
Two x16 slots, both directly connected to the CPU lanes but sharing the PCIe 5.0 x16 bandwidth; When only one graphics card is installed in the first slot, it operates at full PCIe 5.0 x16 bandwidth; when a device is also installed in the second slot, the bandwidth is split equally between the two slots, with each operating at PCIe 5.0 x8 bandwidth.
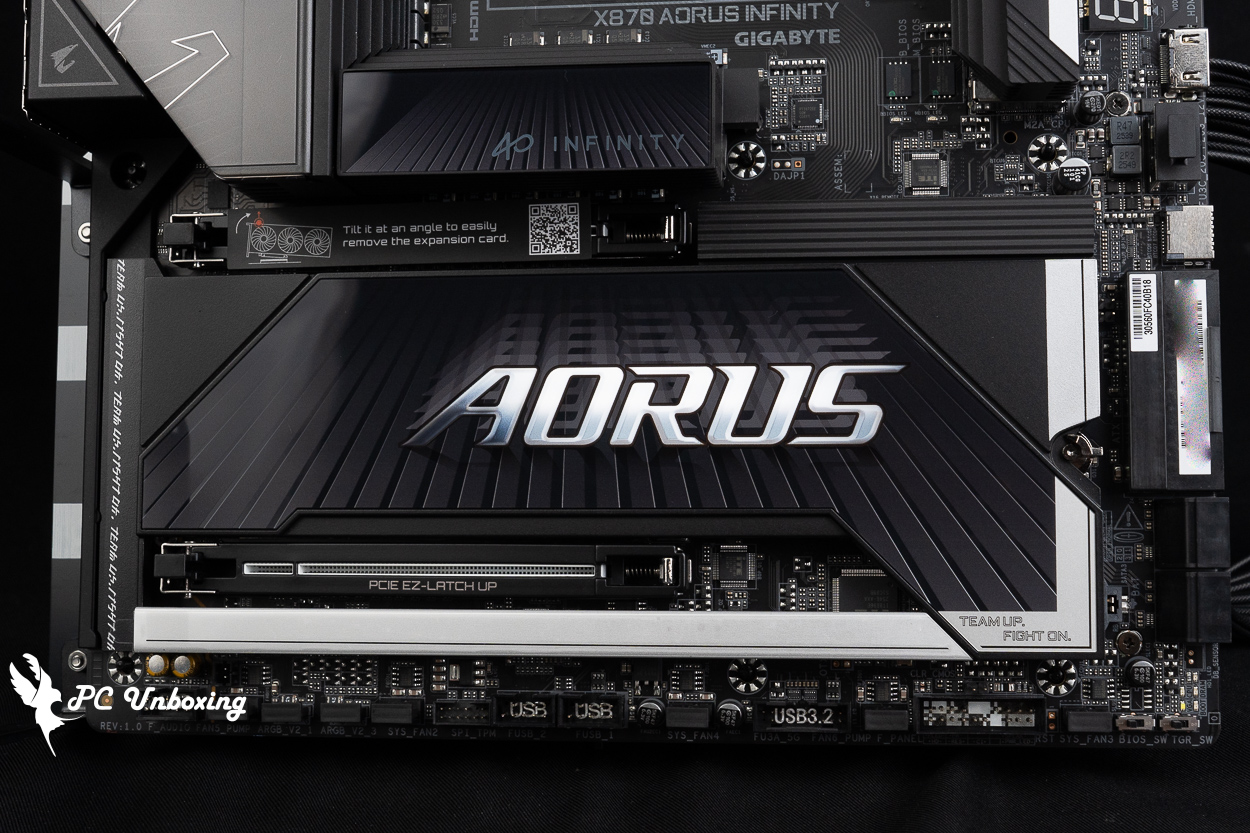
△ Expansion slots from top to bottom: PCIe 5.0_PCIe x16 (CPU), PCIe 5.0_PCIe x8 (CPU); both share the x16 bandwidth.
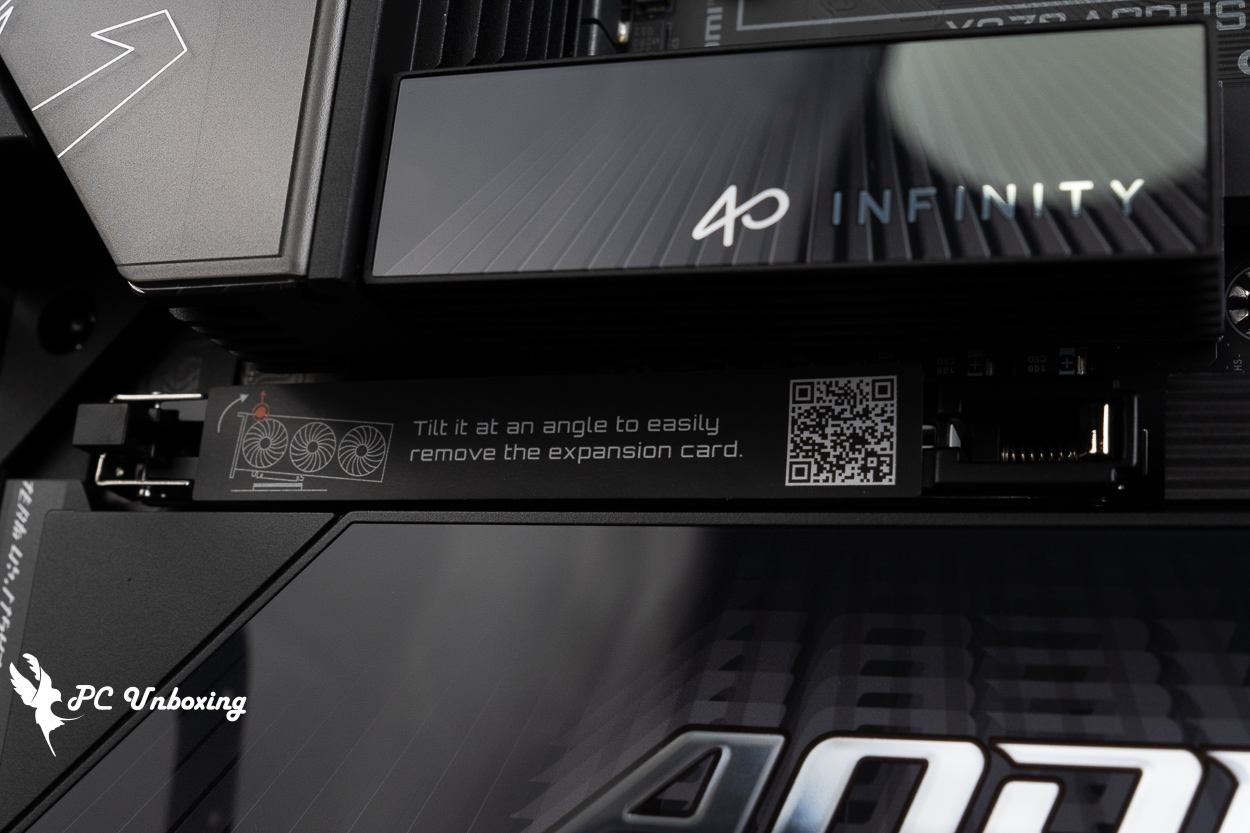
△ Instructions for using the PCIe EZ-Latch Up convenience feature.
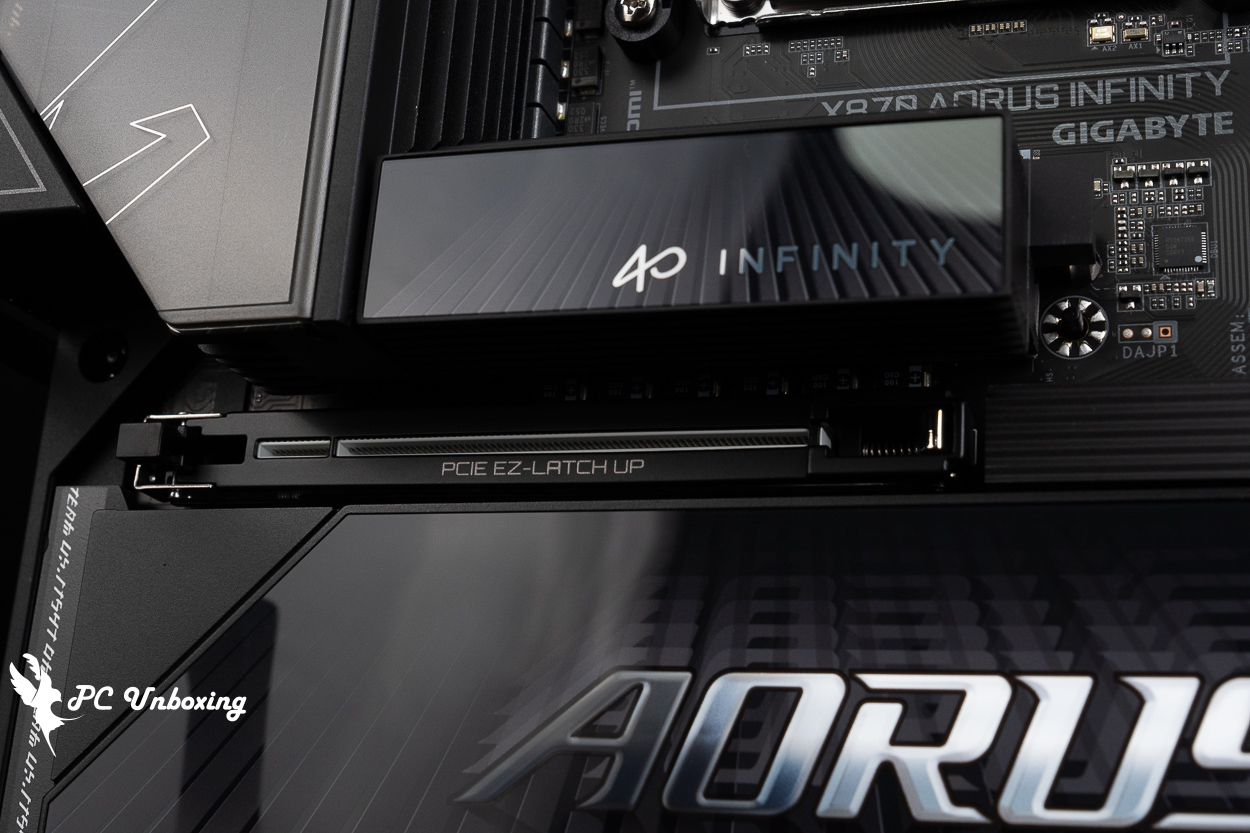
△ Close-up of the graphics card expansion slot.
GIGABYTE includes an M.2 Thermal Guard Ext. heatsink to help dissipate heat from the two M.2 SSDs in the graphics card zone, and the M.2 heatsink is secured using the M.2 EZ-Latch Click mechanism. All M.2 SSD slots feature a dual-sided thermal pad design and M.2 EZ-Latch Plus. The X870 AORUS INFINITY motherboard natively provides three M.2 SSD expansion slots.
The M.2 SSD expansion slot next to the processor socket features a direct connection to the processor and also uses a passive M.2 Thermal Guard heatsink to help dissipate heat from the solid-state drive. The M2A_CPU slot provides PCIe Gen 5 x4 bandwidth and supports M.2 SSDs in the 25110, 22110, 2580, and 2280 form factors.
The second M.2_CPU slot also provides PCIe Gen 5 x4 bandwidth via a direct connection to the processor, supporting M.2 SSD expansion in 22110 and 2280 form factors.
The bottom M.2 D-Sub slot uses the chipset channel and supports 22110 and 2280 solid-state drives with PCIe Gen 4 x4 bandwidth.
This motherboard shares bandwidth between the M2B_CPU slot and the ASMedia USB4 controller, so when a device is installed in the M2B_CPU slot, the USB4 ports supported by both the M2B_CPU slot and the ASMedia USB4 controller operate at a maximum bandwidth of x2. To achieve full x4 bandwidth, you must use one or the other.
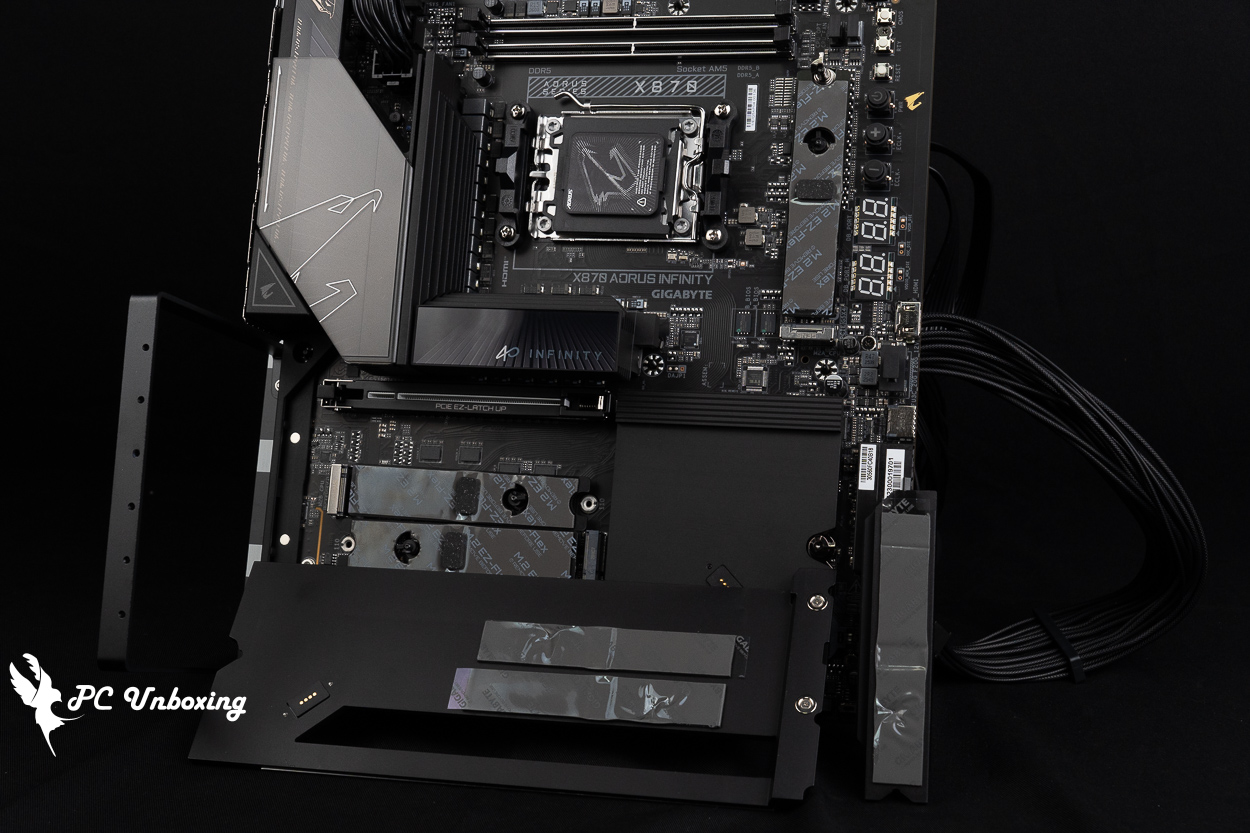
△ The three M.2 SSD expansion slots are all equipped with double-sided thermal pads and heat sinks to aid in heat dissipation.
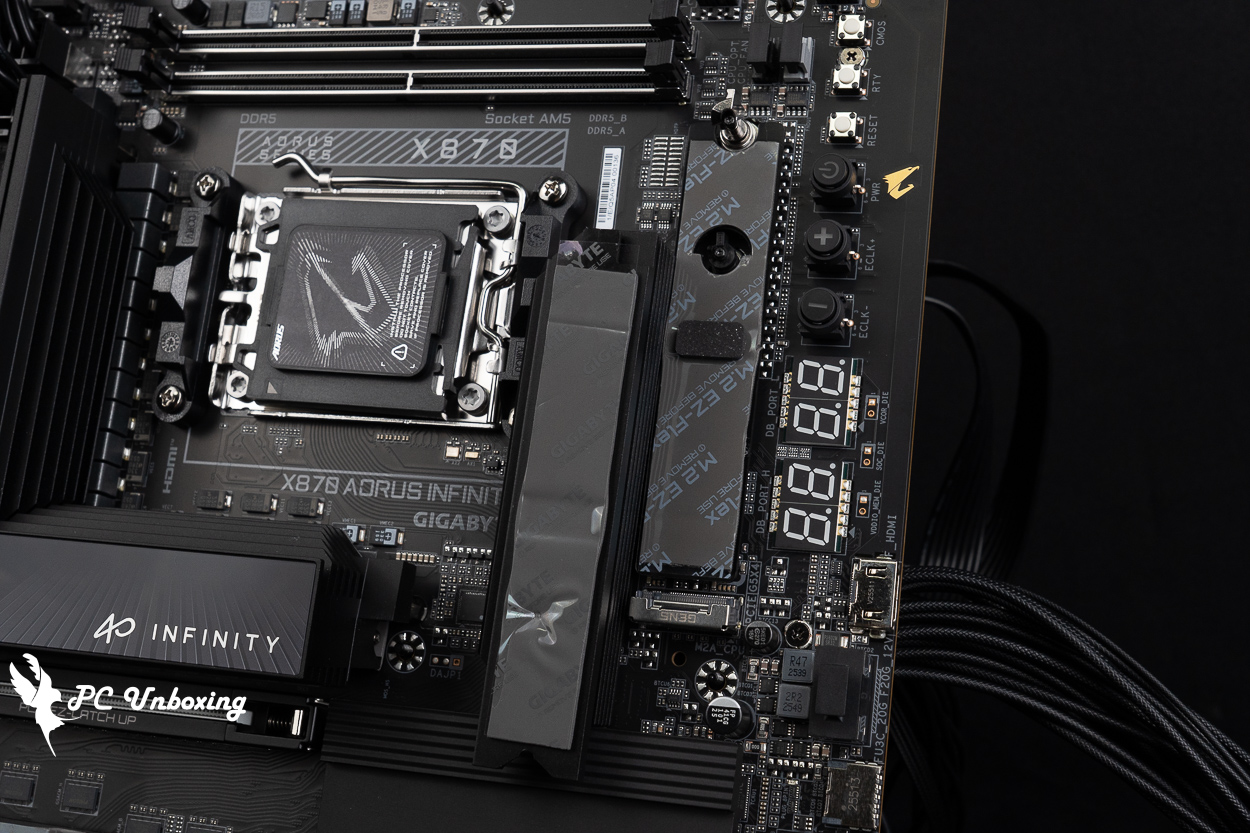
△ M2A_CPU processor-direct-connect PCIe Gen 5 x4 expansion slot.
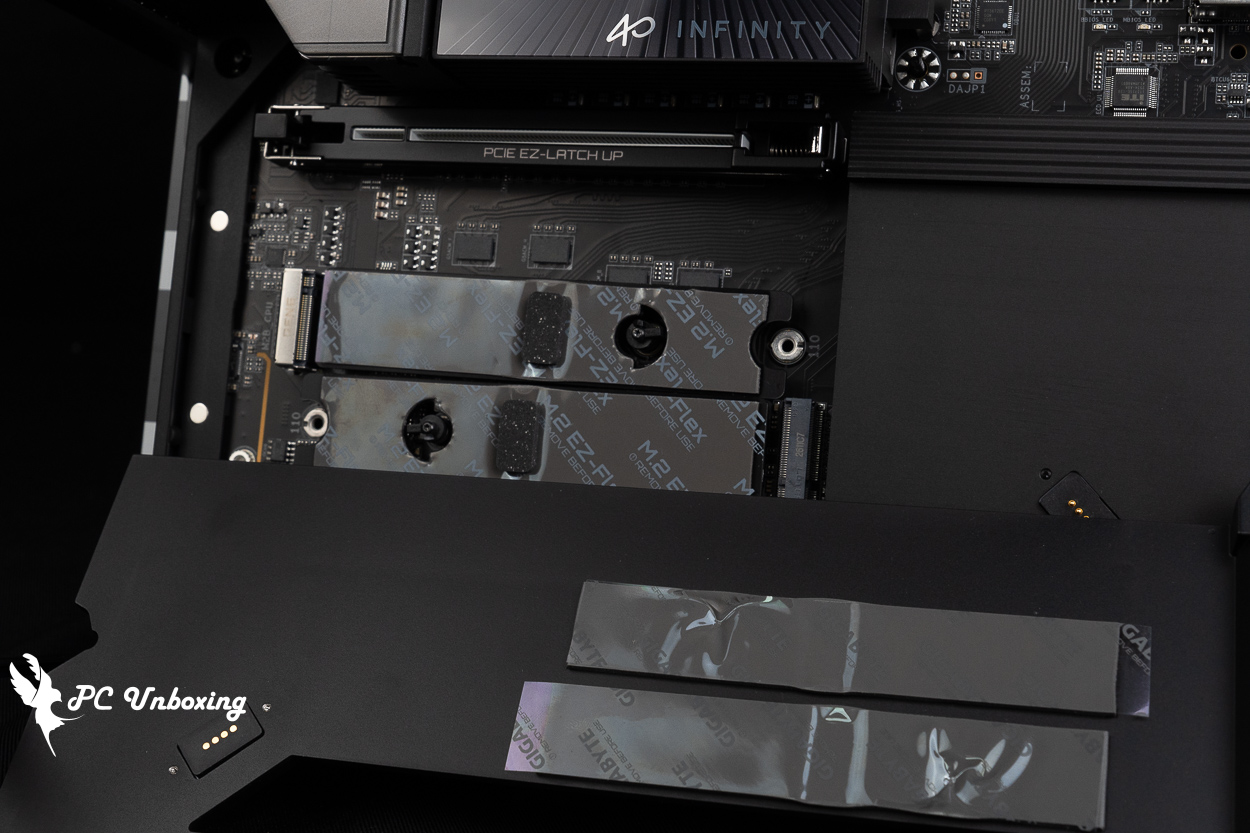
△ On-board M.2 SSD expansion slots, from top to bottom: M2B_CPU Gen5, M2D_SB Gen4.
The rear I/O panel features an exclusive overclocking "Ignition" button, a Q-Flash Plus button, a PS/2 keyboard and mouse port, four USB 5Gbps Type-A ports (blue), one HDMI 2.1 integrated graphics output (supporting resolutions up to 4096×2160 at 60 Hz), three USB 10 Gbps Type-A ports (red), an RJ-45 5 Gbps LAN port, one USB 4 Type-C 40 Gbps port, a Wi-Fi 7 antenna port, an optical S/PDIF digital audio output, and two audio jacks.
An exclusive overclocking power button featuring a lightning bolt design allows overclockers and system builders to apply power during system assembly—even before the processor is installed—to check whether the custom liquid cooling loop is functioning properly and free of leaks. If you find that you need to press the power button twice to boot up normally during daily use, please check whether this feature is enabled.
There is a USB 4 Type-C 40Gbps port on the rear of the motherboard that supports DisplayPort 1.4 version of the processor's built-in graphics output, which allows users to have an additional display output slot available through the internal display, with a resolution of up to 3840×2160 240 Hz.
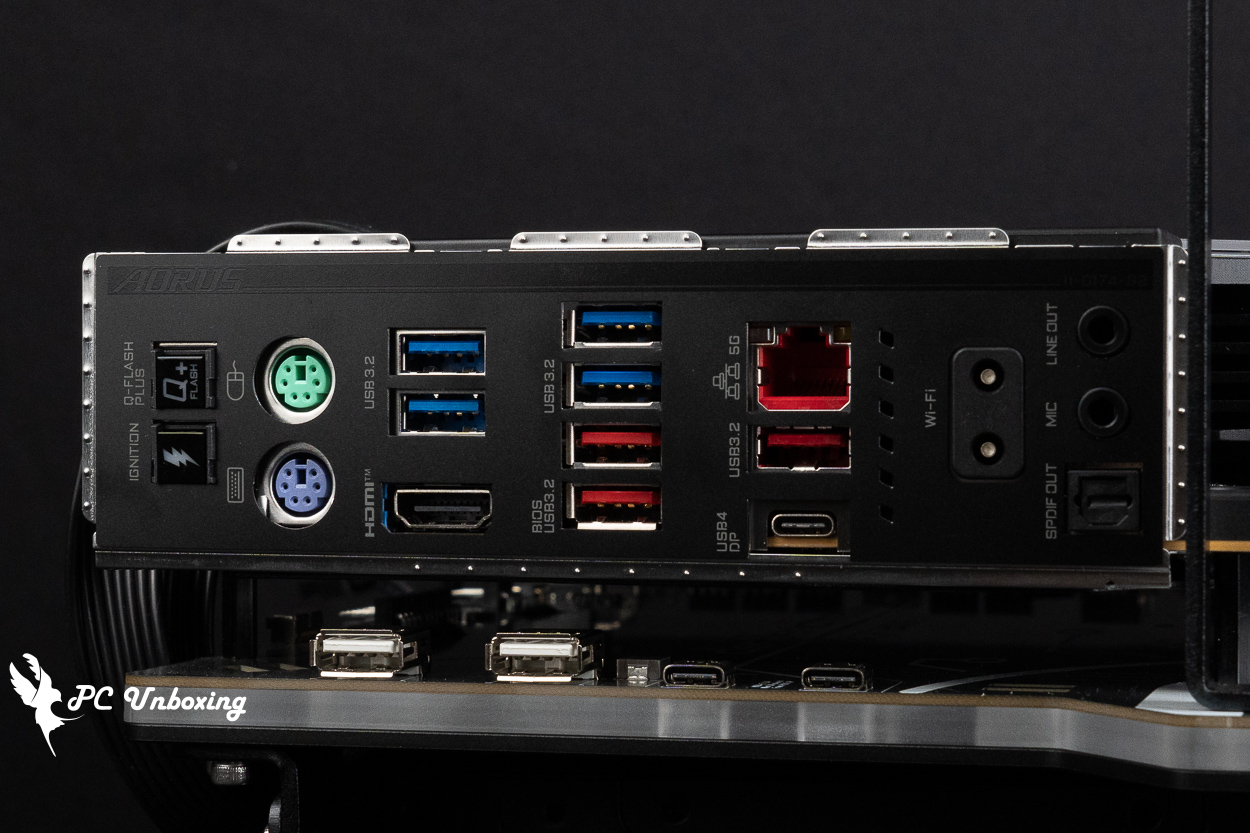 △ Overview of the rear I/O panel; the X870 AORUS INFINITY features an integrated cover.
Analysis of the 18+2+2-Phase VRM Power Supply: 110A SPS and 10-Layer PCB Design
The X870 AORUS INFINITY motherboard features an 18+2+2-phase Dr. MOS and SPS (Smart Power Stage) power delivery system. The 18-phase 110A SPS handles the CPU VCORE phases (processor operating voltage), 2 110A SPS phases handle the SOC phases (related to integrated graphics and memory overclocking), and the remaining 2 Dr. MOS phases handle the VDD MISC phases (related to the CPU’s PCIe lanes).
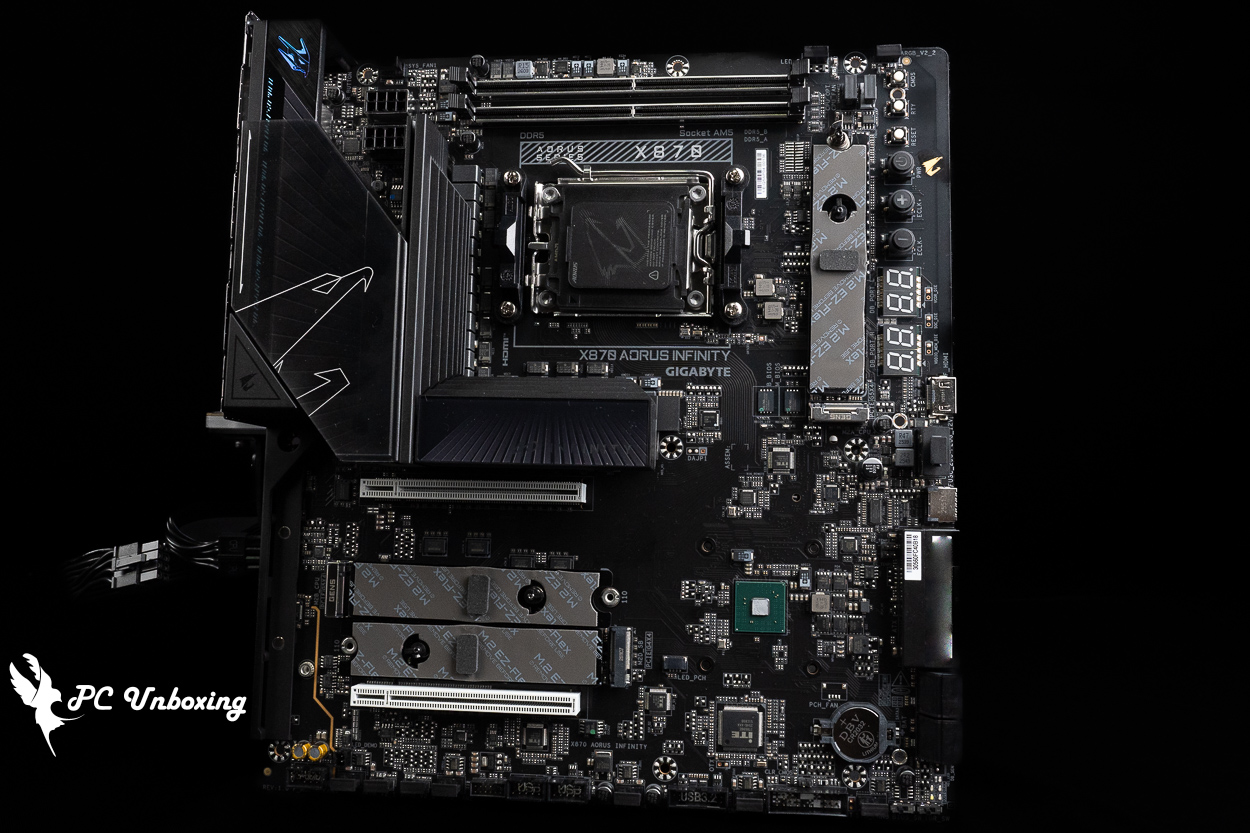
△ In addition to standard screws, the back of the VRM heatsink is secured with hexagonal copper posts, which require a socket wrench or pliers. Since I couldn’t find the tools I needed, I had to give up on completely disassembling it.
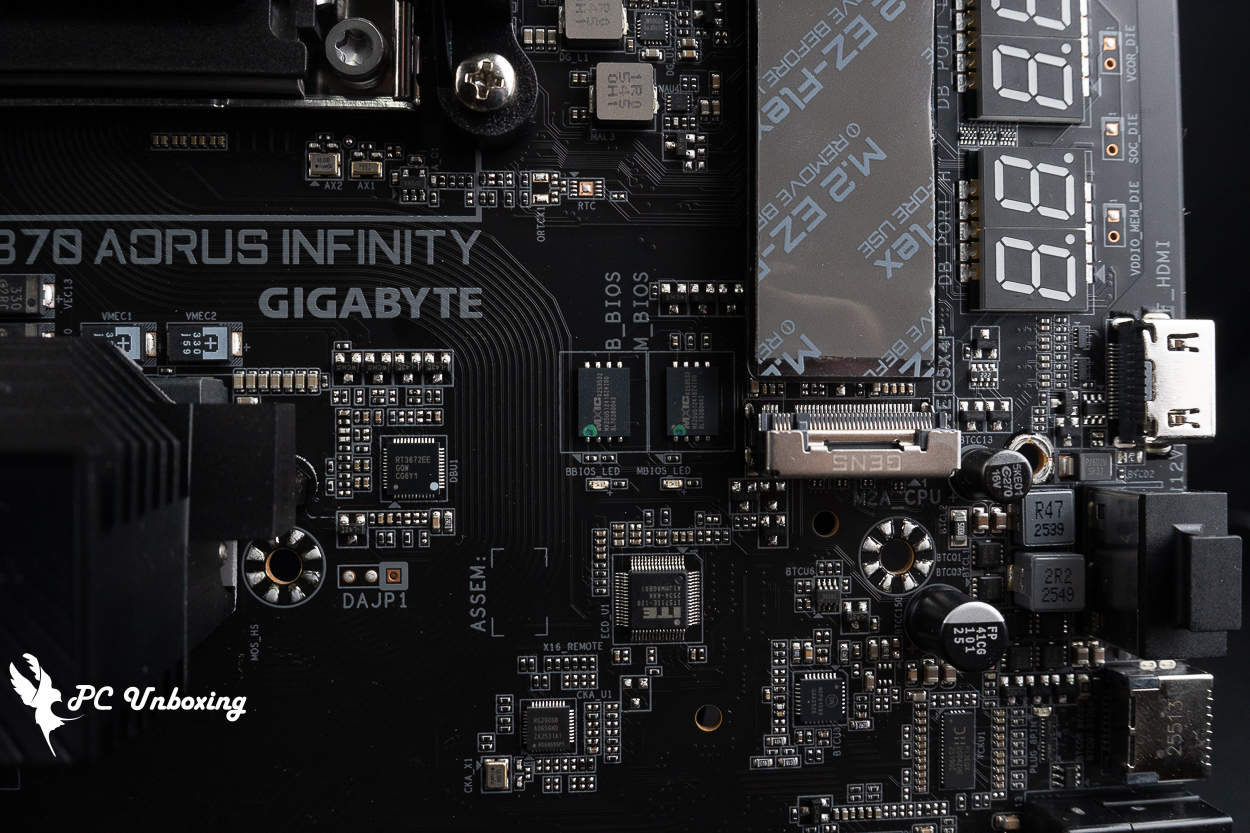
△ Dual BIOS chips.
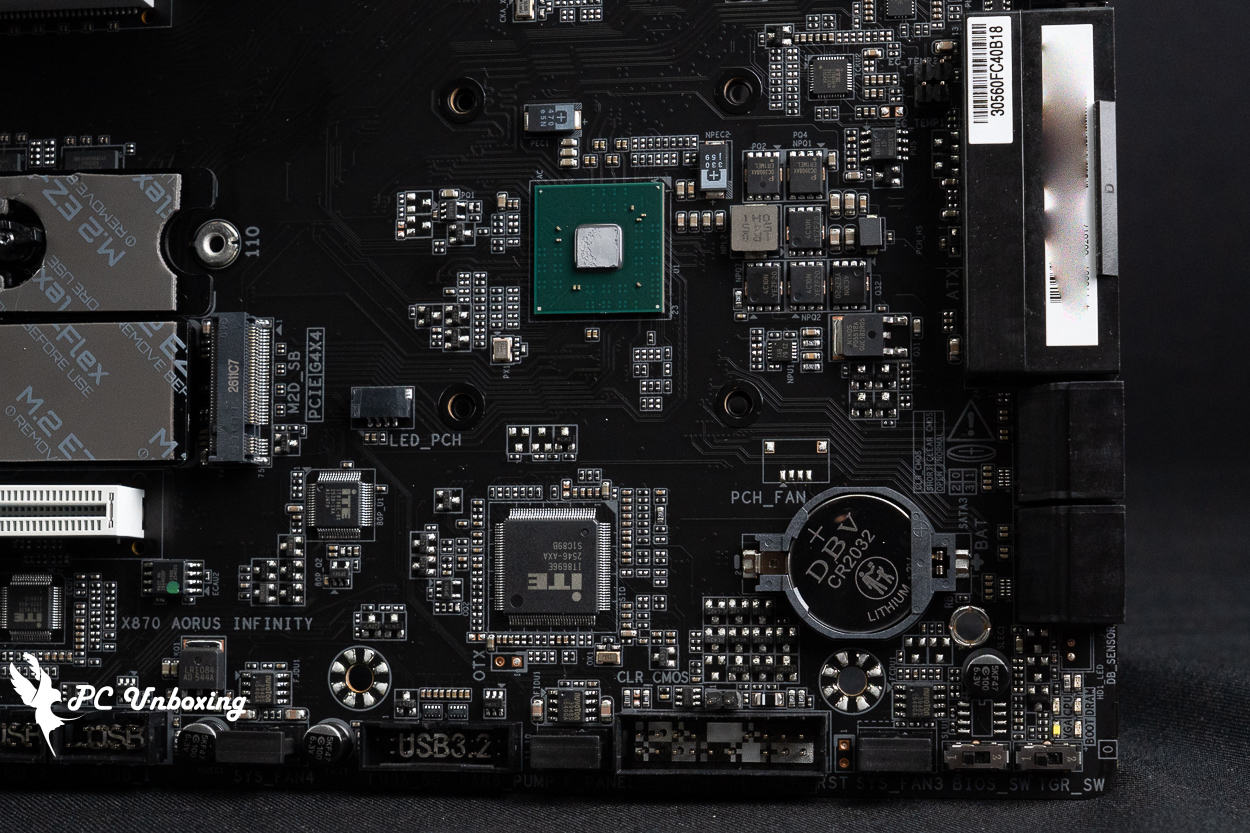
△ X870 PCH chipset; the motherboard battery is a CR2032.
X870 AORUS INFINITY RGB Lighting Effects and Motherboard Design Showcase
Then the actual power on and off to show the motherboard on-board lighting effect for your reference.
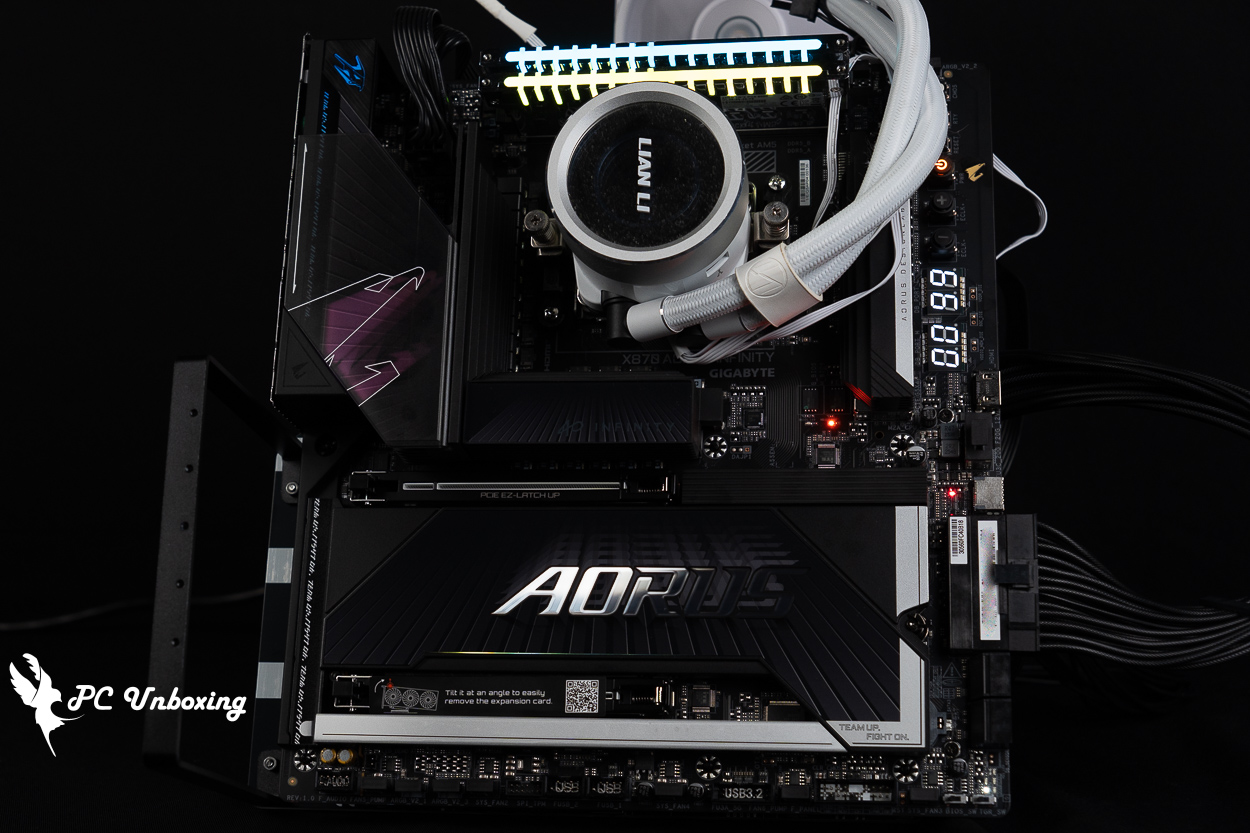
△ Motherboard lighting effect.
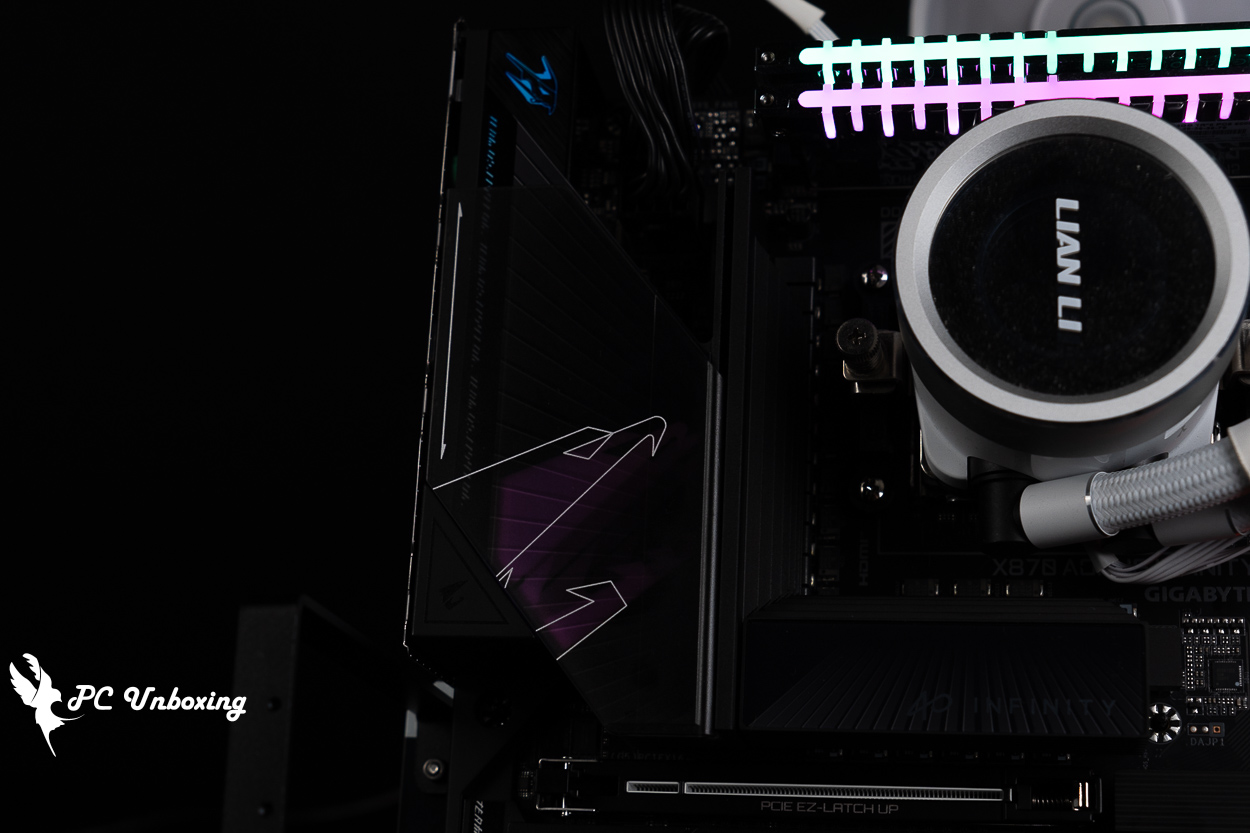
△ The VRM heatsink features an AORUS logo light effect, but since it’s covered by a translucent trim panel, it’s not very noticeable, to be honest.
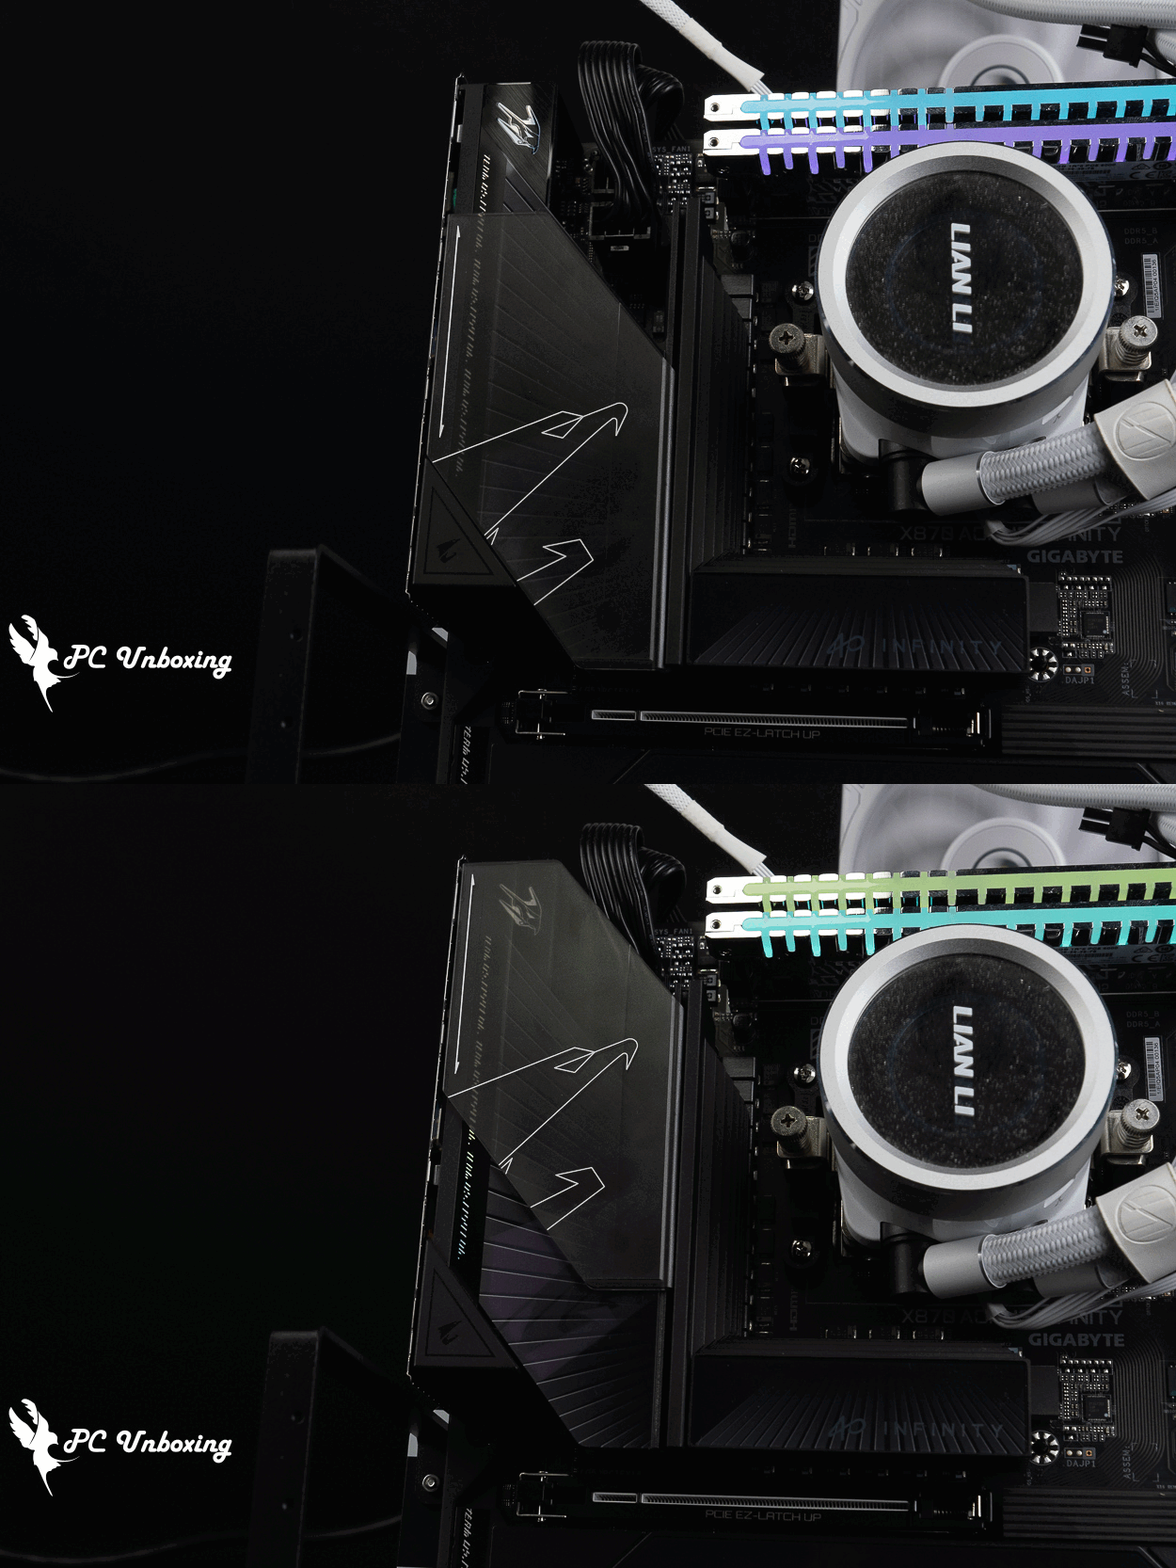
△ Demonstration of the adjustable decorative cap.
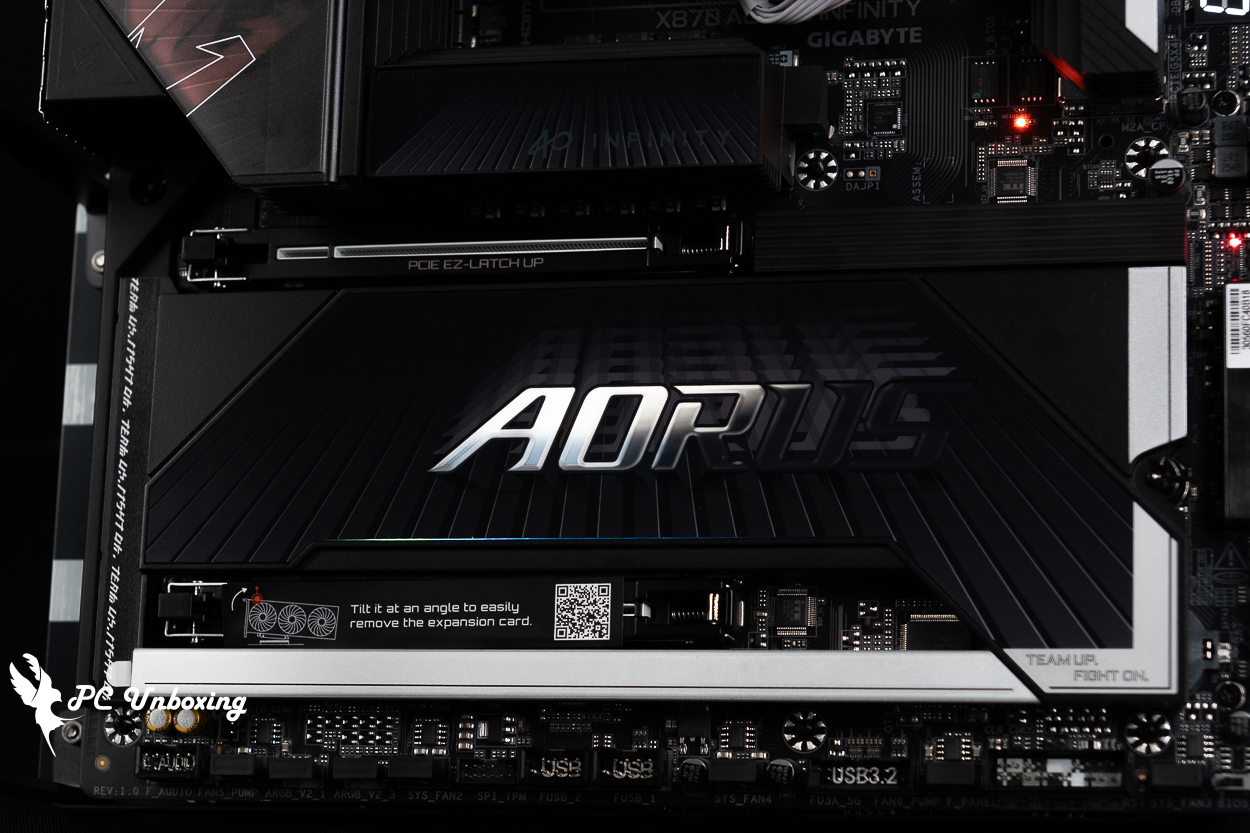
△ There’s also an ARGB light strip underneath the large M.2 heatsink, but it’s very subtle.
X870 AORUS INFINITY Performance Testing and Test Platform Configuration
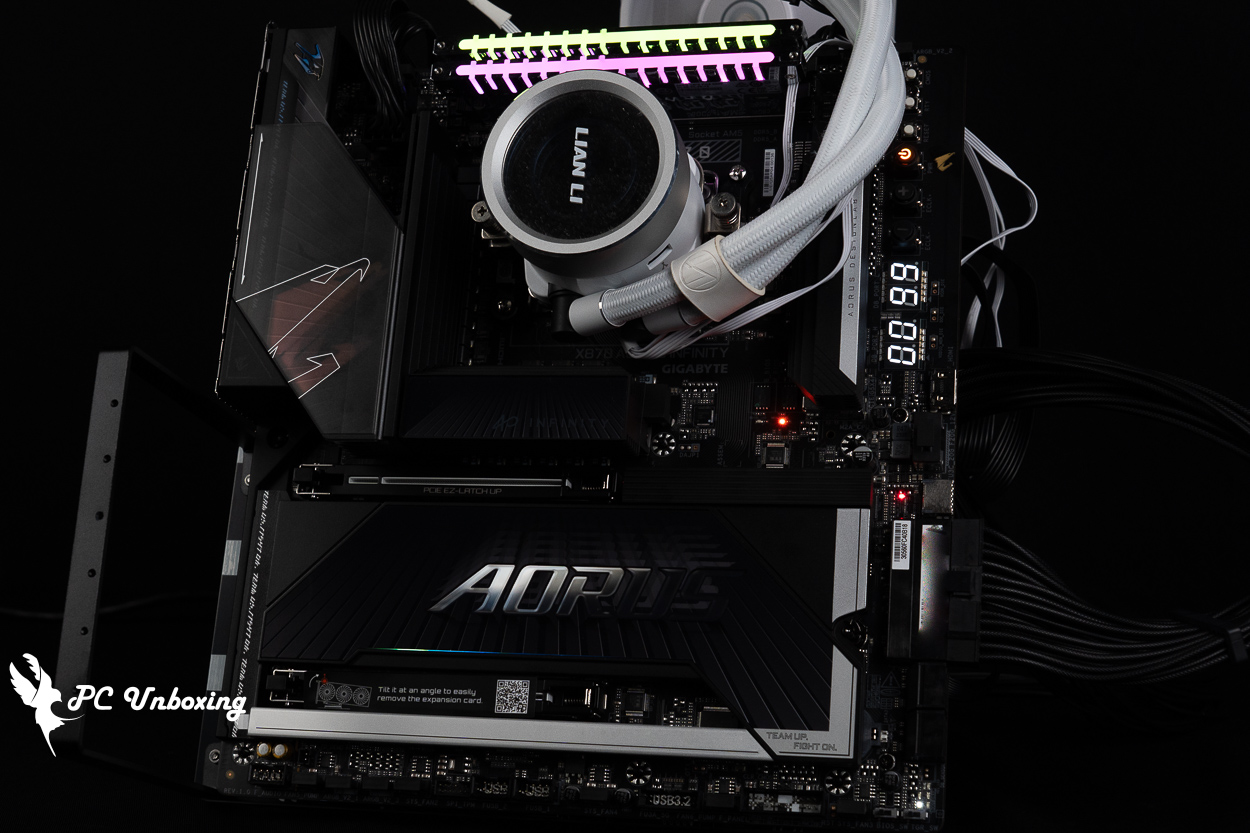
For this motherboard performance test, we used a 16-core, 32-thread AMD Ryzen 9 9950X3D2 Install the processor, update the motherboard BIOS to the latest version, set up the system, and enable Profile 2 for the memory.
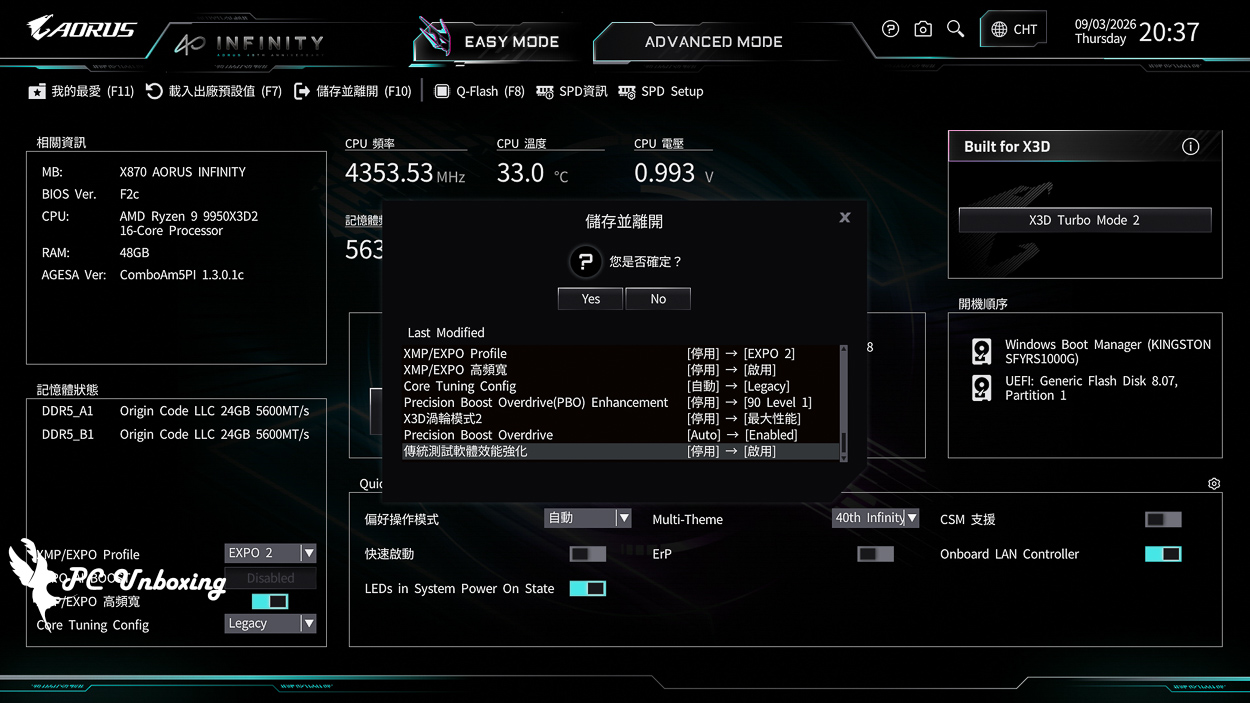
Extra On GIGABYTE High Bandwidth and Low Latency Features, along with performance enhancements in X3D Turbo Mode 2 and traditional benchmarking software; testing was conducted with AMD PBO manually set to "Enabled" at Level 1 (90).
Testing Platform
Processor:AMD Ryzen 9 9950X3D2(PBO activated)
Cooler: LIAN LI GA II Trinity SL-INF 360 (full speed)
Water-cooled fans: 3x LIAN LI P28 (full speed)
Thermal paste: Cooler Master MASTERGEL MAKER 40g (thermal conductivity 11W/mK)
Motherboard: GIGABYTE X870 AORUS INFINITY (BIOS Version: F2c)
Memory:Origin code vortex DDR5 48 GB (24 GBx2) 8000 MT/s CL36-47-47-108 1.45V
Graphics: NVIDIA GeForce RTX 4060 Ti Founders Edition 8GB
Operating System: Windows 11 Professional 25H2
Chassis:Thermal Grizzly der8enchtable Bare Benchmark Stand
firstly CPU-Z View this testbed hardware information.AMD Ryzen 9 9950X3D2 The processor features 16 cores and 32 threads; codenamed Granite Ridge, it is manufactured using TSMC’s 4nm FinFET process. The motherboard supports PCIe 5.0 lanes, and the BIOS is the latest version available at the time of testing.
We also ran the CPU-Z internal tests for your reference.
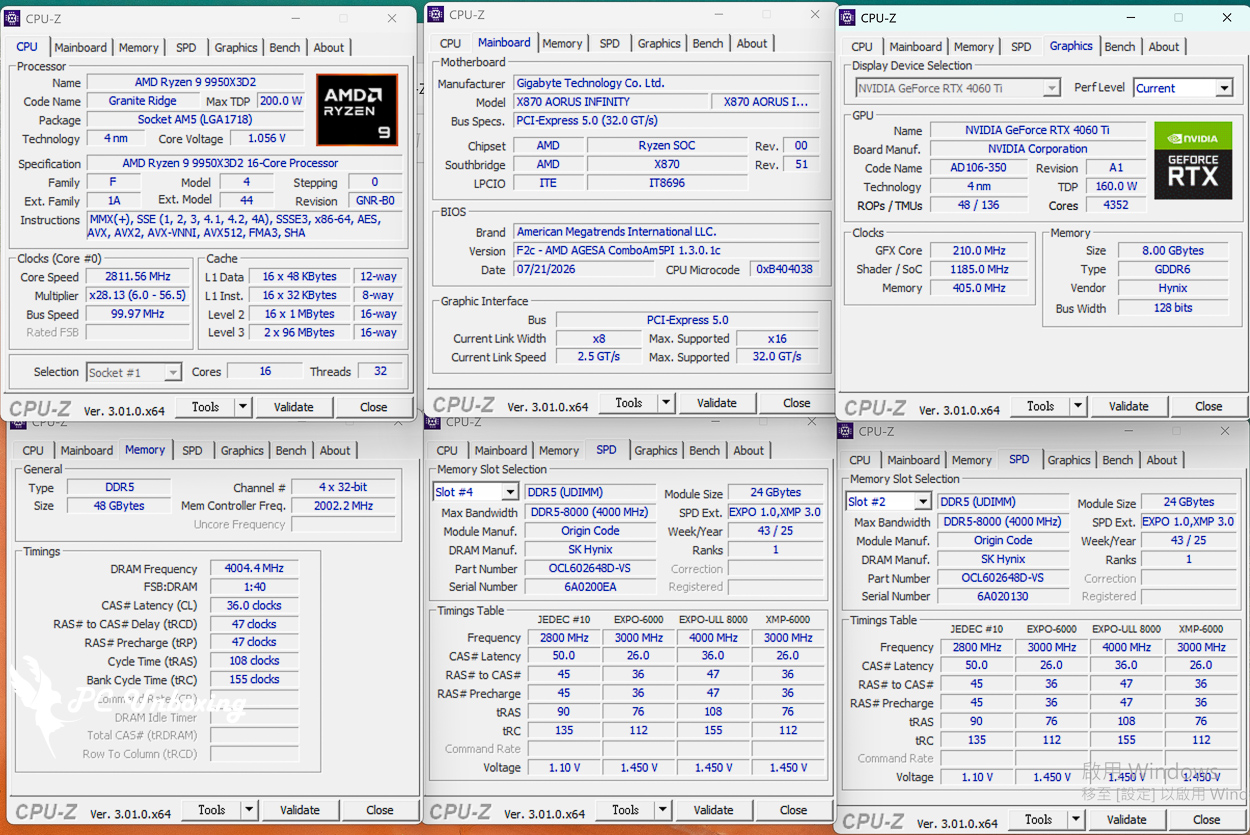
CPU-Z platform information at a glance.
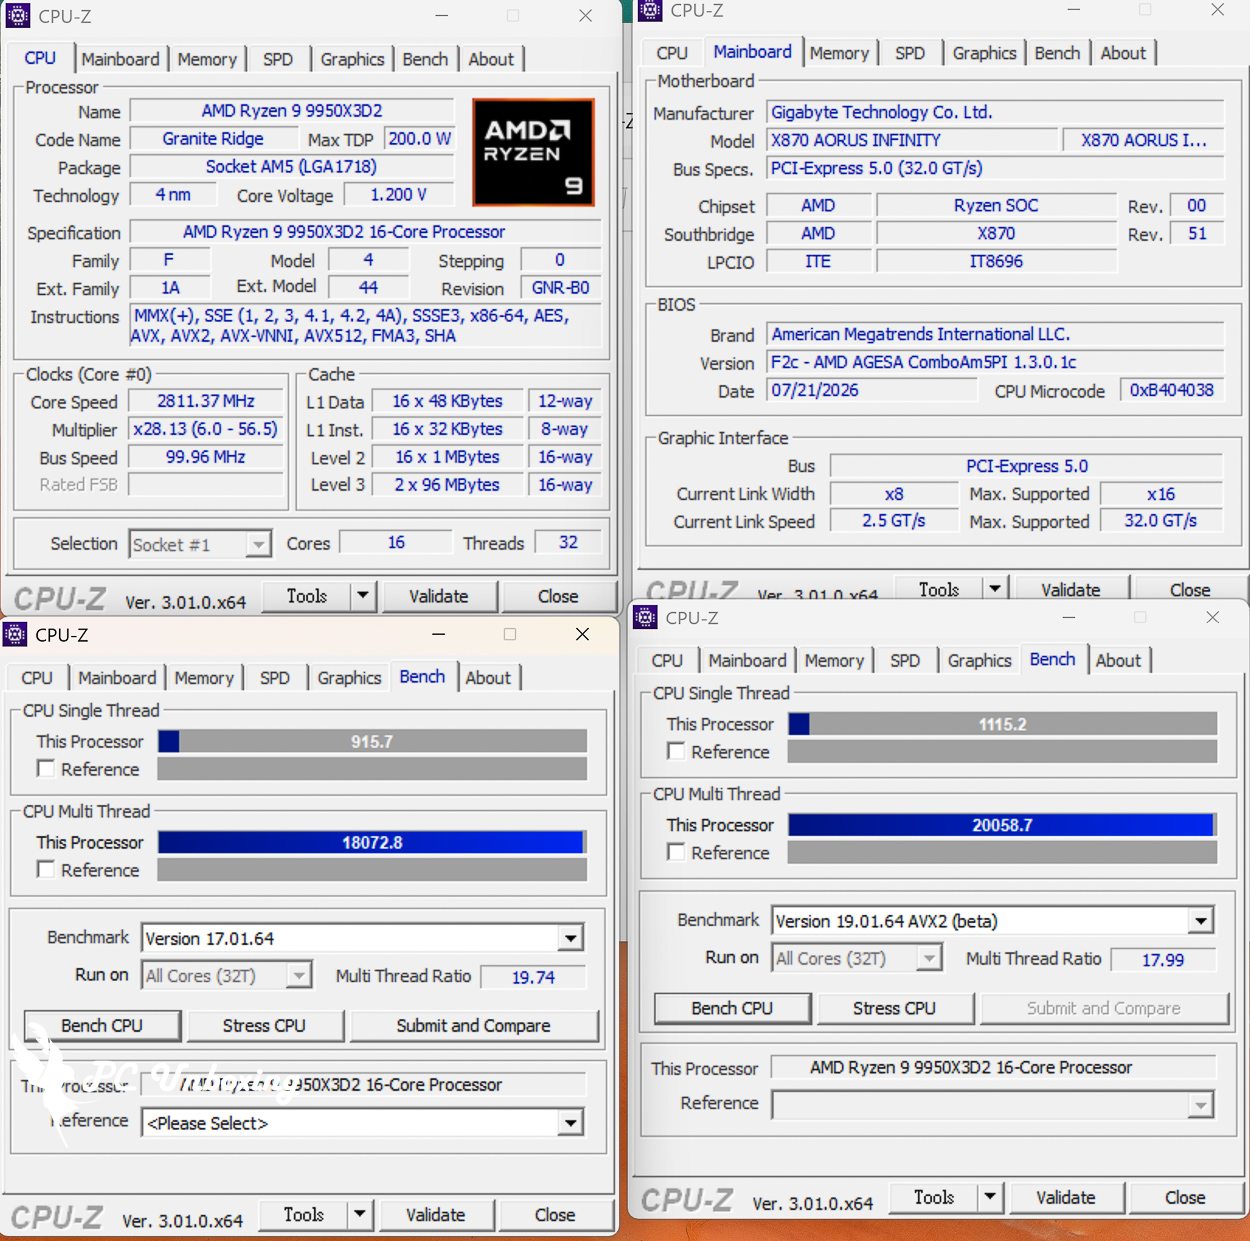
△ CPU-Z internal test score results.
AIDA64 Cache & Memory Benchmark It is mainly used to test the performance of processor caches and RAM. The read/write/copy bandwidth performance score represents the rate of transfer between CPU and memory, which means the efficiency of data throughput (the higher the score, the better), and the time delay score of accessing data indicates the responsiveness of the memory system.
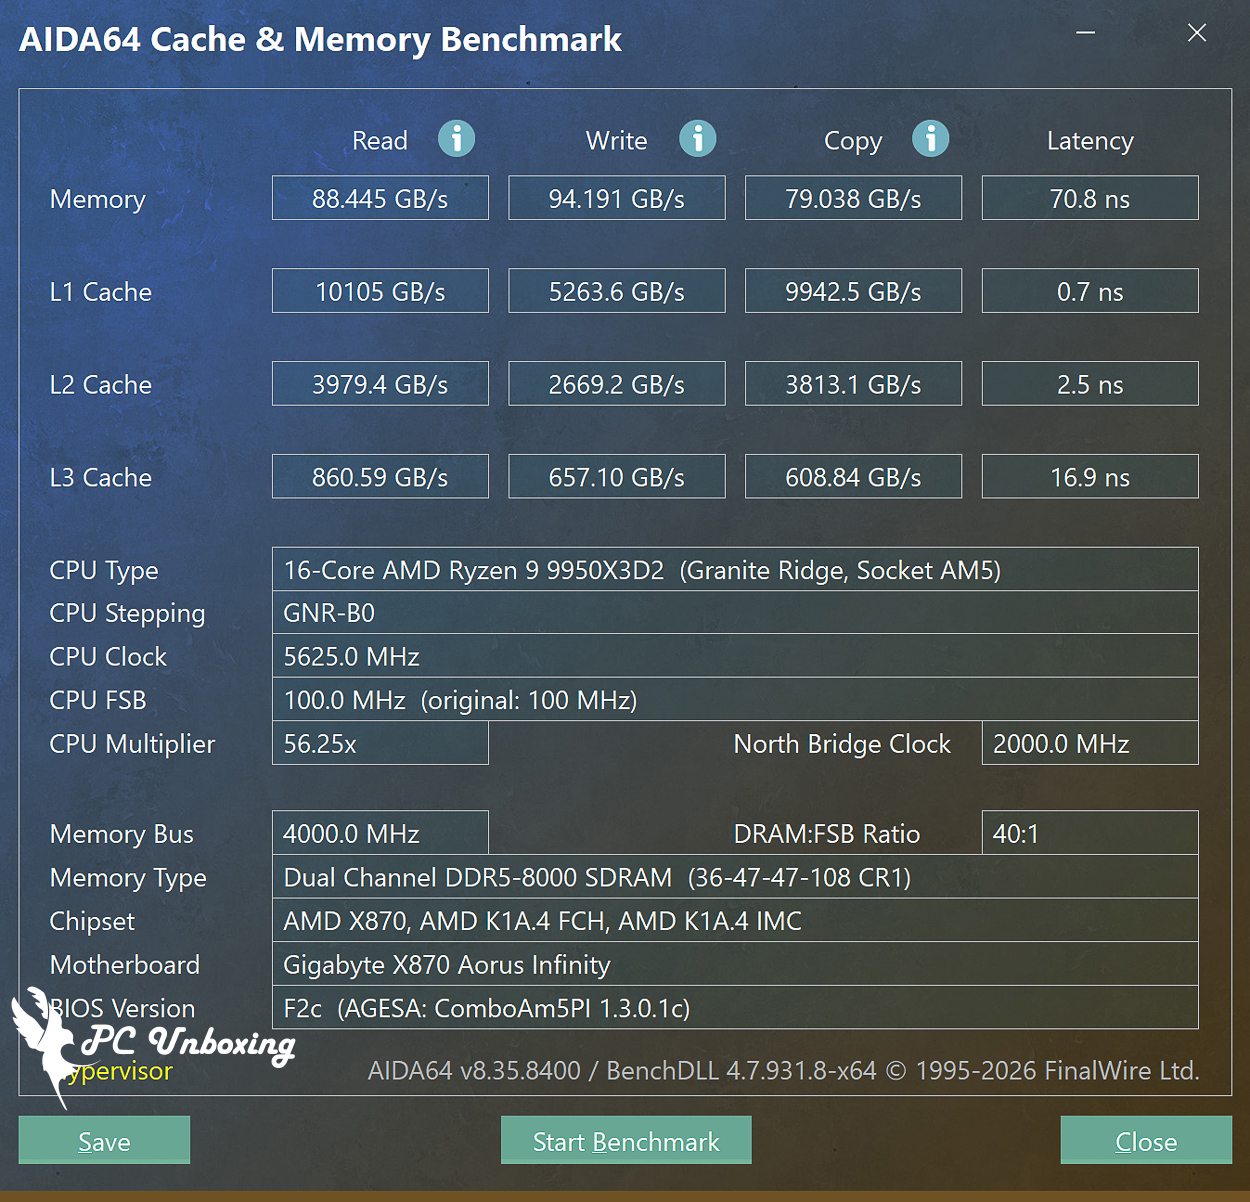
△ AIDA64 cache and memory test.
by Maxon Cinebench An industry-standard benchmarking software, Cinebench 2026 tests GPU and CPU performance using Maxon's powerful Redshift rendering engine.
The new version of Cinebench 2026 adds a test for evaluating the performance of SMT-enabled CPU cores, which means that it is now possible to test: GPU, processor full-core, processor single-core, and processor single-thread performance.
Based on the latest Cinema 4D 2026 and Redshift code, and using the updated Clang V19 compiler, the benchmarking accuracy of contemporary and next-generation processors has been improved to test whether the equipment is stable under high loads, whether the thermal solutions of the desktop or laptop are sufficient to cope with the demands of long-term operation in order to maximize the potential of the CPU, and whether the machine is capable of handling demanding 3D tasks. and whether the machine is capable of handling demanding 3D tasks.
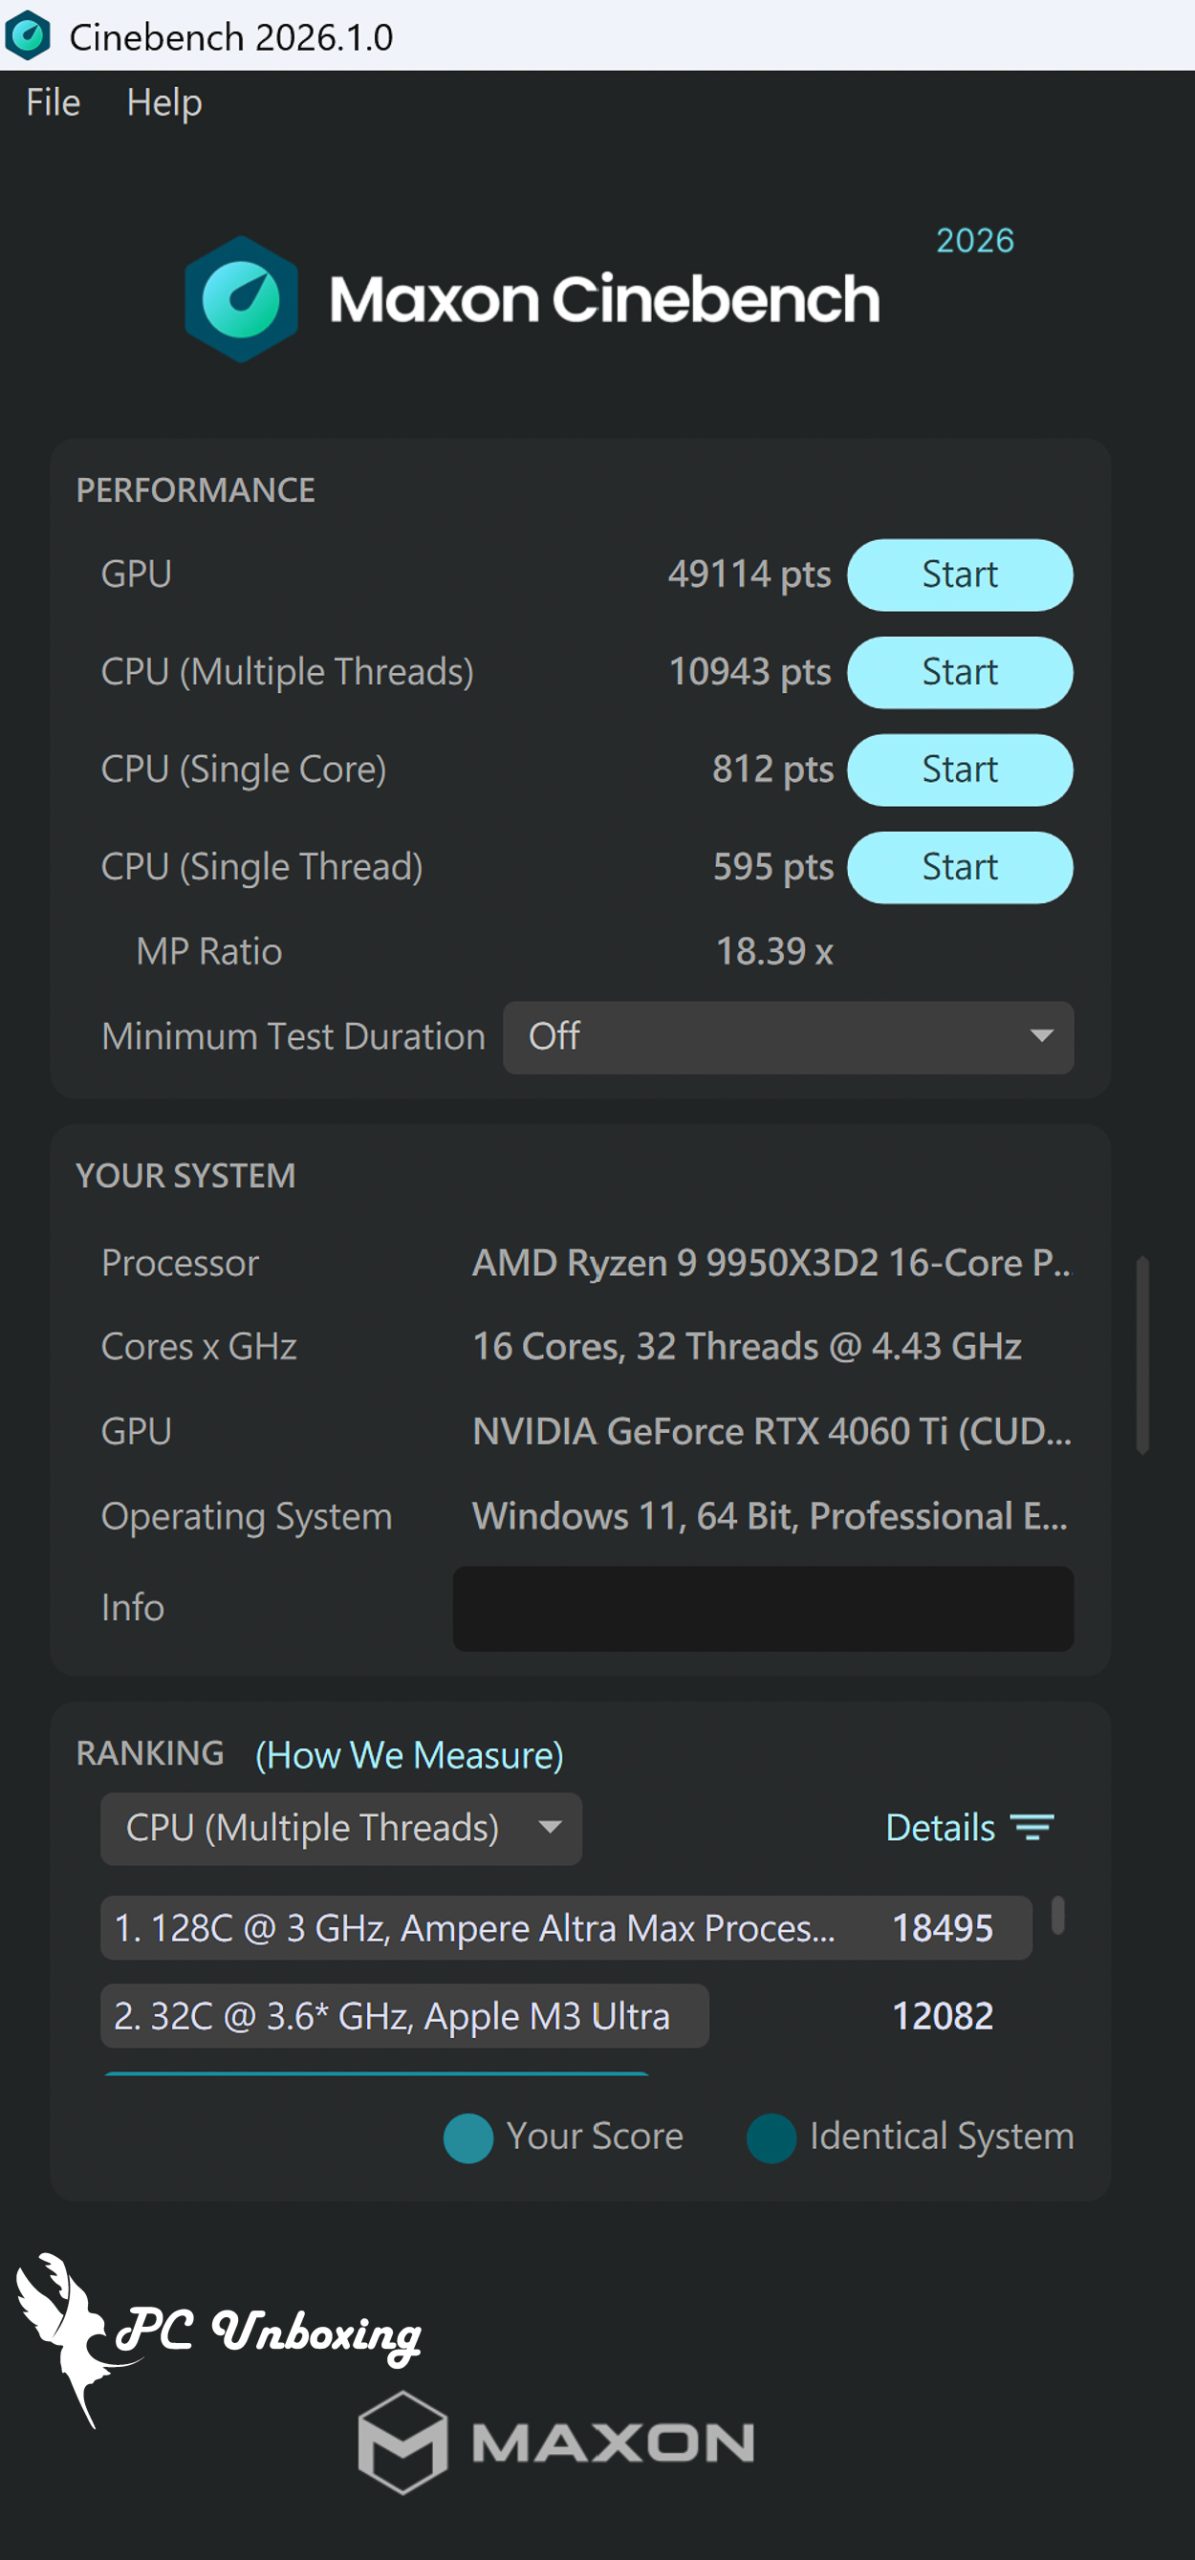
△ Cinebench 2026.
PCMark 10 It also simulates test scenarios to determine the overall performance of the computer. The common basic functions include application launching, web browsing, and video conferencing tests, while productivity simulates document and spreadsheet writing, and the last item, video content creation, includes professional tests such as photo editing, video editing, and rendering.
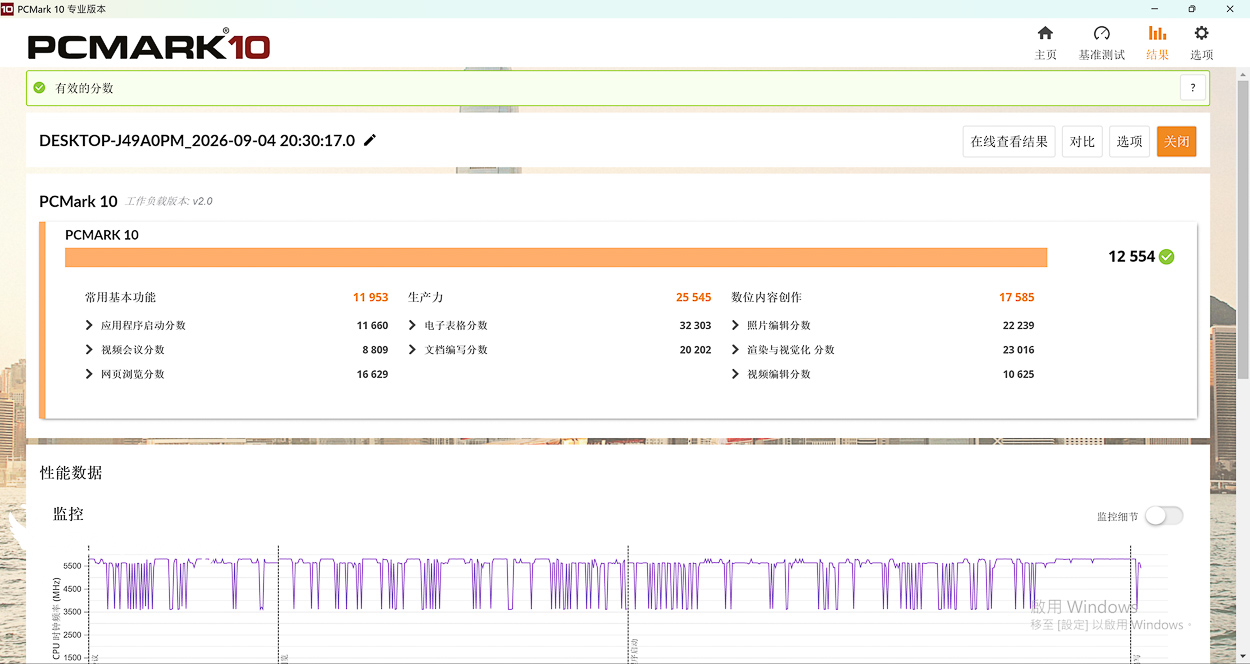
△ PCMark 10 test.
V-Ray 6 Benchmark V-Ray Engine Test Software is an image rendering program developed by Chaos Group. The free Benchmark examines the rendering speeds of the CPU and GPU on the V-Ray Engine, which tests the rendering performance of the processor.
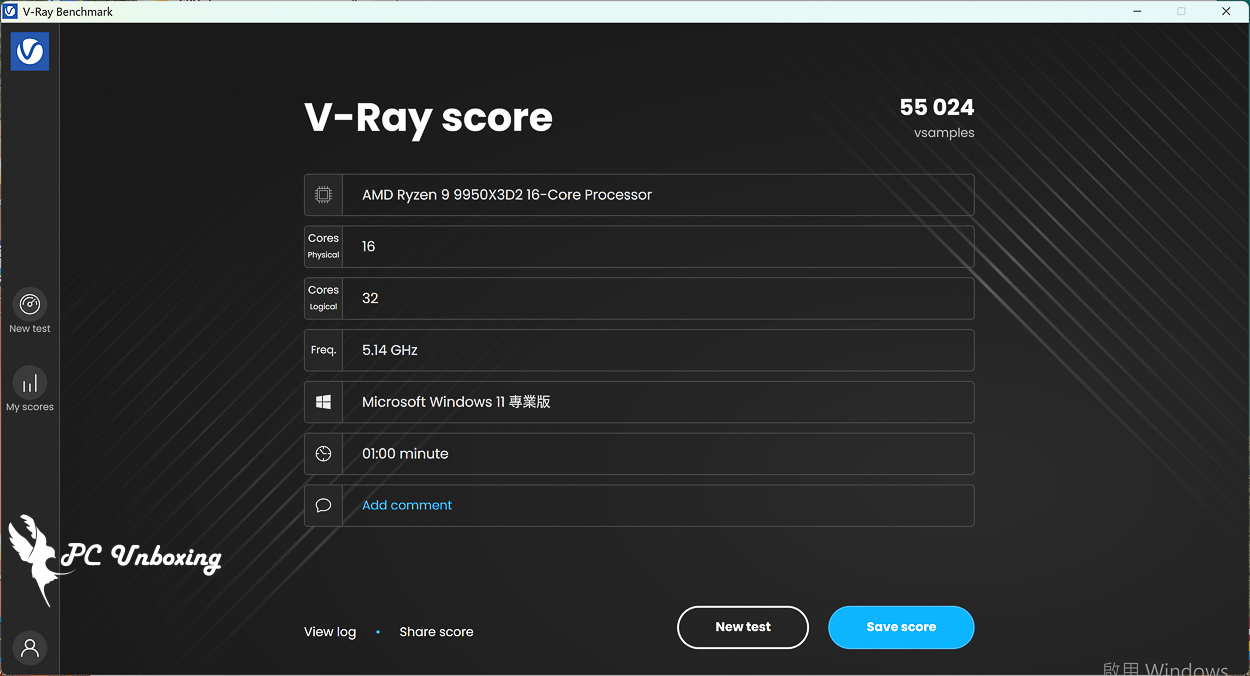
△ V-Ray 6 Benchmark.
Corona Benchmark is a free test software based on the Corona 10 rendering core that evaluates the performance of a system by using Corona 10 rendered scenes to measure the rendering speed of the system in terms of rays per second (rays/s). More rays per second means faster rendering, and the scores are linearly scaled. For example, a system with 6 million rays per second will have twice the rendering speed and performance of a system with 3 million rays per second.
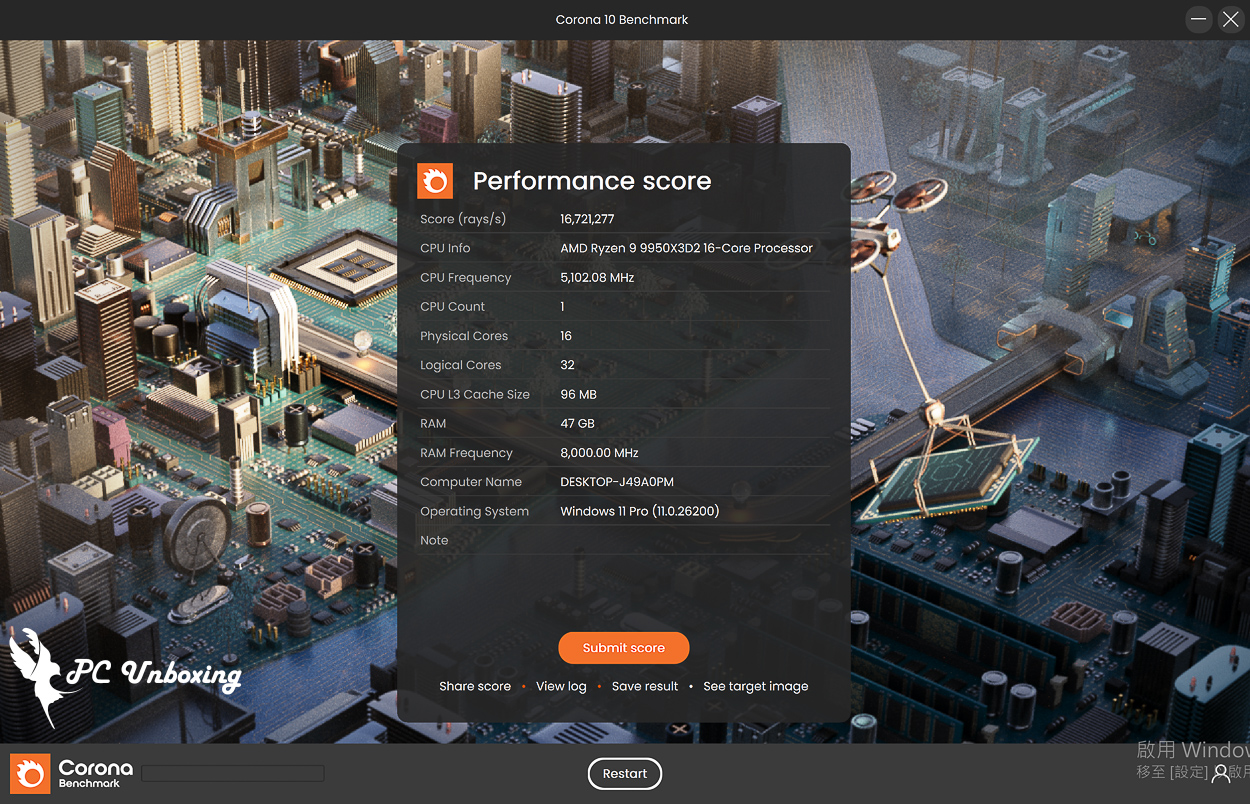
△ Corona Benchmark.
OCCT CPU BENCHMARK CONFIGURATION Single thread and Multiple threads will be tested using AVX and SSE instruction sets respectively.
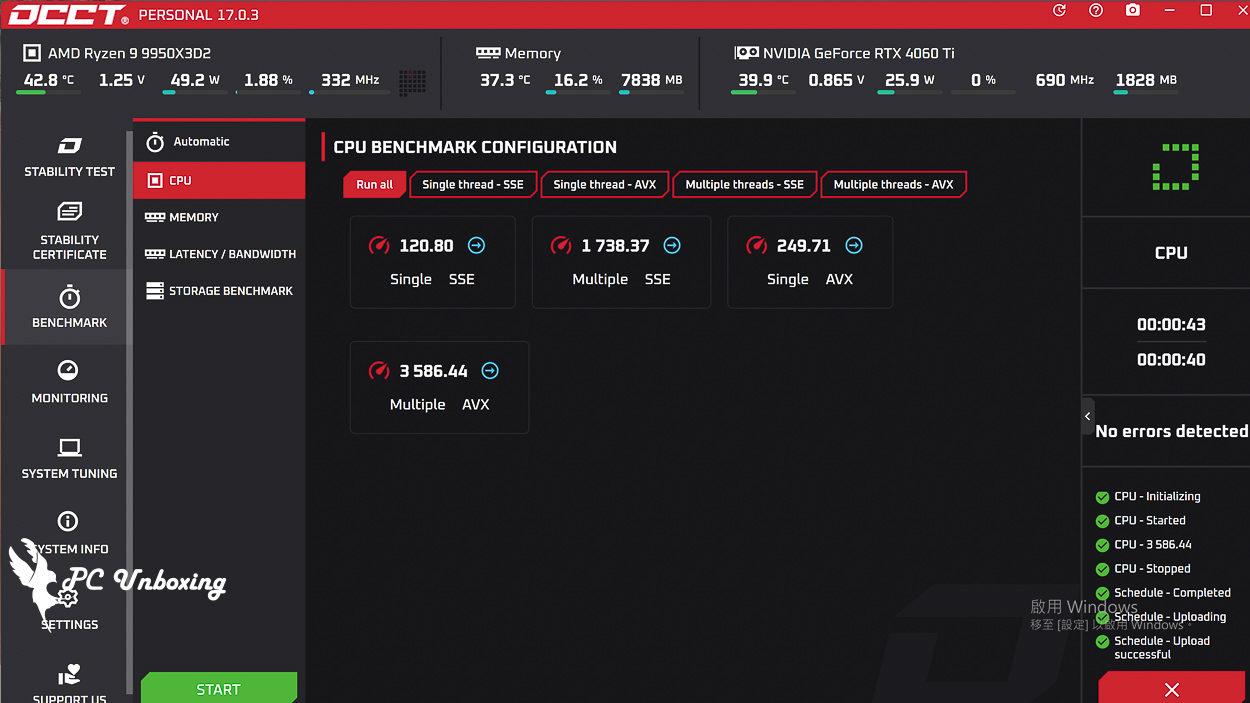
△ OCCT CPU BENCHMARK CONFIGURATION.
CrystalMark Retro It is a comprehensive benchmark software that measures CPU, HDD, 2D graphics (GDI) and 3D graphics (OpenGL) performance. Developed by hiyohiyo and koinec, the authors of CrystalDiskMark and CrystalDiskInfo, the results are individual scores and not in any common units.
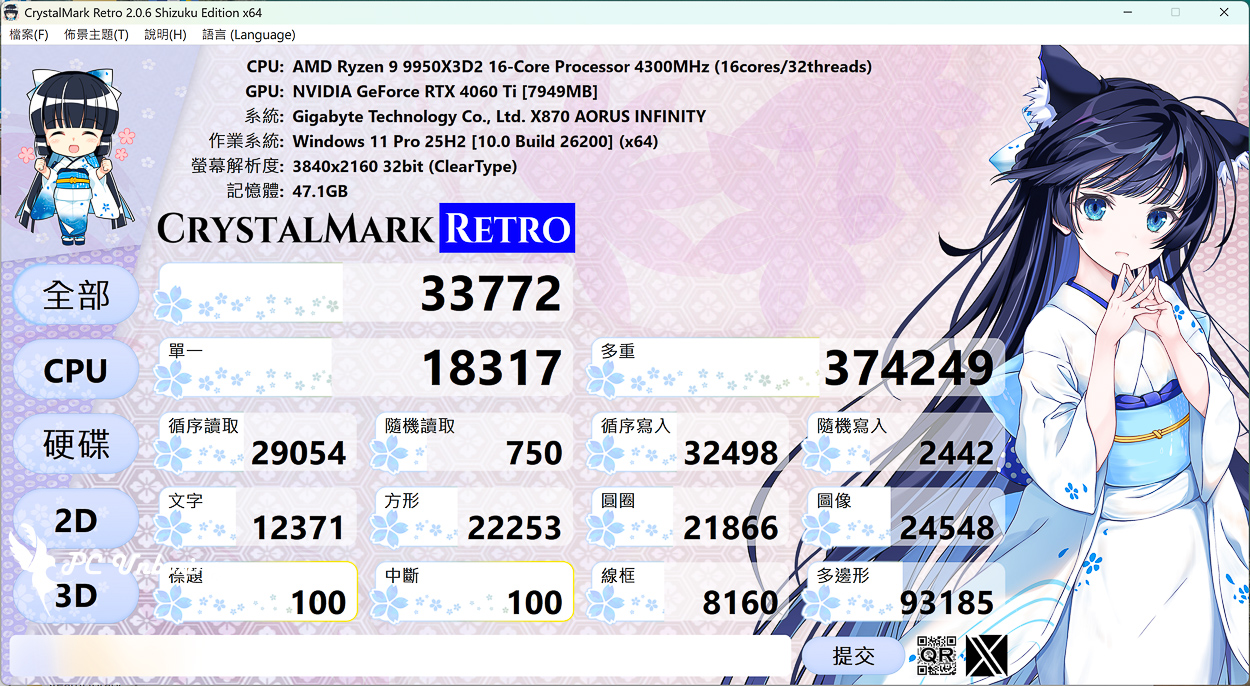
△ CrystalMark Retro.
Use with empty disk CrystalDiskMark Software to testMicron Micron Crucial T710 1TB PCIe Gen5 NVMe 2280 M.2 SSD Read/write performance on the motherboard is tested in NVMe SSD configuration mode with the file size set to 1GiB in the default profile.
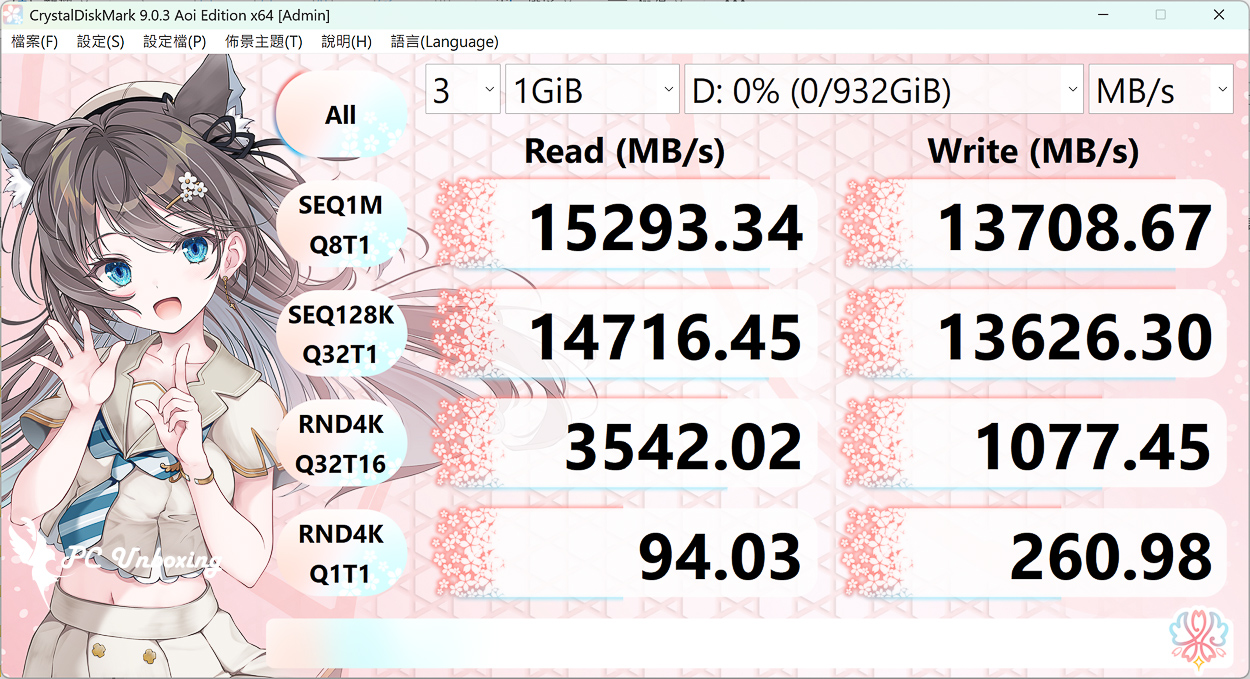
△ CrystalDiskMark Settings: NVMe SSD / Profile: Default, Sequential Read/Write and Random Read/Write test results.
3DMark Benchmark Test: X870 AORUS INFINITY Gaming Performance
Next up, the 3DMark series, one of the most benchmarks for gaming scores, was used to compare the theoretical results of the same graphics platform with different processors through a series of tests with different picture quality and different GPU APIs.
3DMark CPU Profile This test will test the performance of MAX, 16, 8, 4, 2, 1 threads respectively, while the performance of 16 threads and above is more for 3D rendering or audio/video professional work, and most of the mainstream DirectX 12 game performance can refer to the score of 8 threads, while the score of 4 and 2 threads are related to the old games developed with DirectX 9.
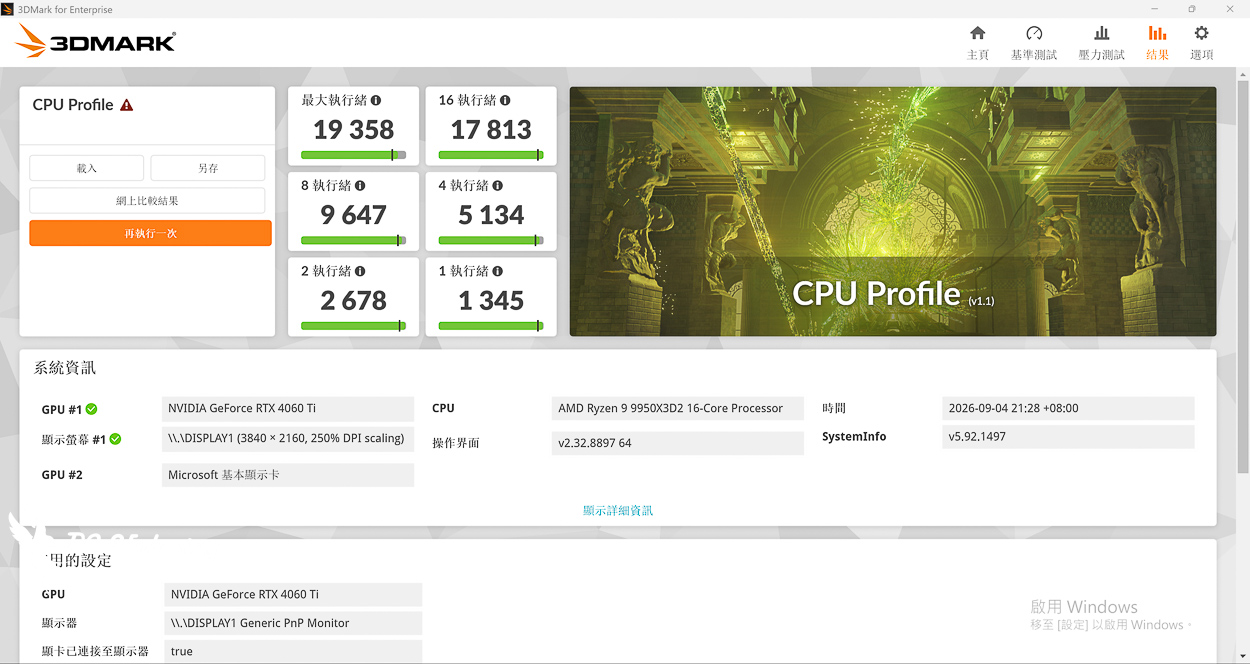
△ 3DMark CPU Profile.
In addition, the author has also used the commonly used game performance simulation test 3DMark Fire Strike、3DMark Time SpyThe two programs are Fire Strike, which represents the 1080p quality DirectX11 GPU API situational game simulation test, and Time Spy, which represents the 1440p quality DirectX 12 GPU API situational game simulation test.
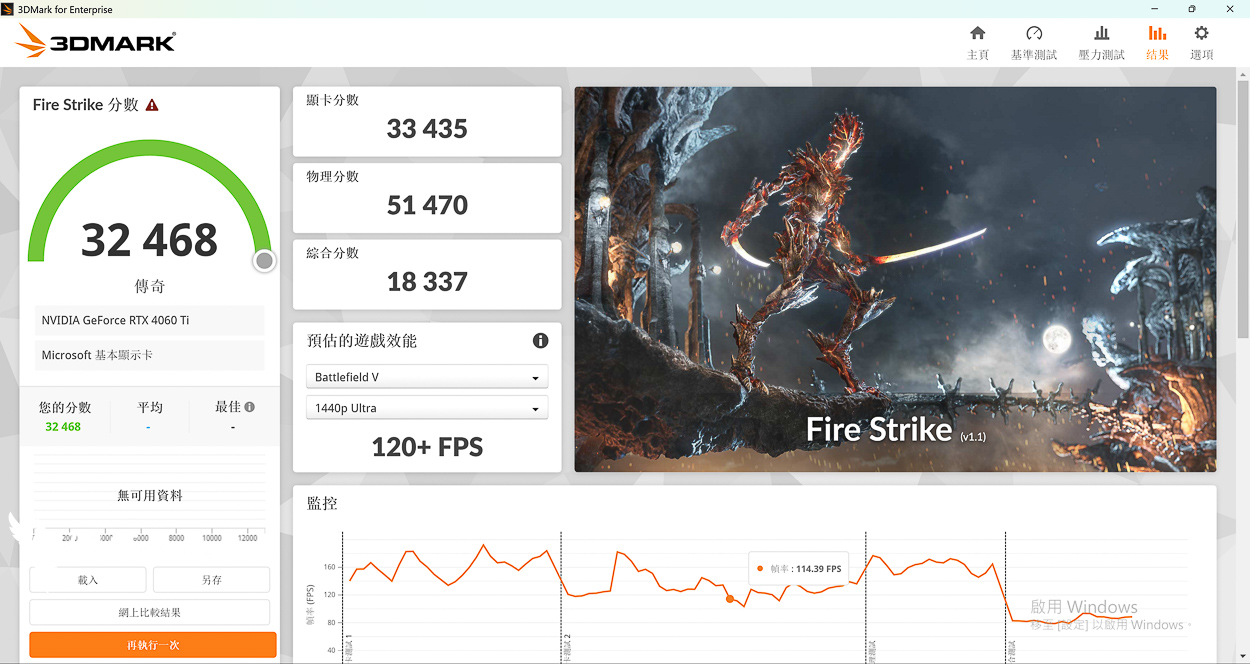
△ 3DMark Fire Strike.
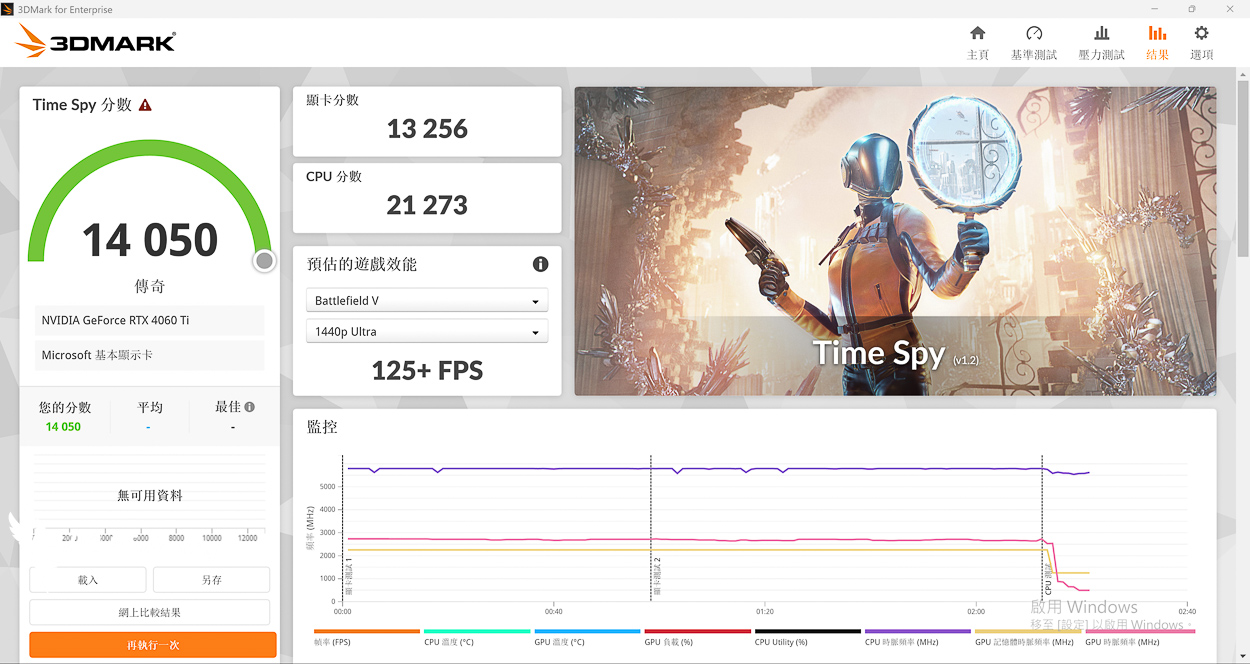
△ 3DMark Time Spy.
VRM Cooling and Temperature Testing: Actual MOS and PCH Temperatures
After running the various benchmarking tools listed above, the motherboard reached a maximum VRM MOS temperature of 51 °C and a maximum PCH temperature of 43 °C on a bare-bone test platform without any additional fans blowing directly on it.
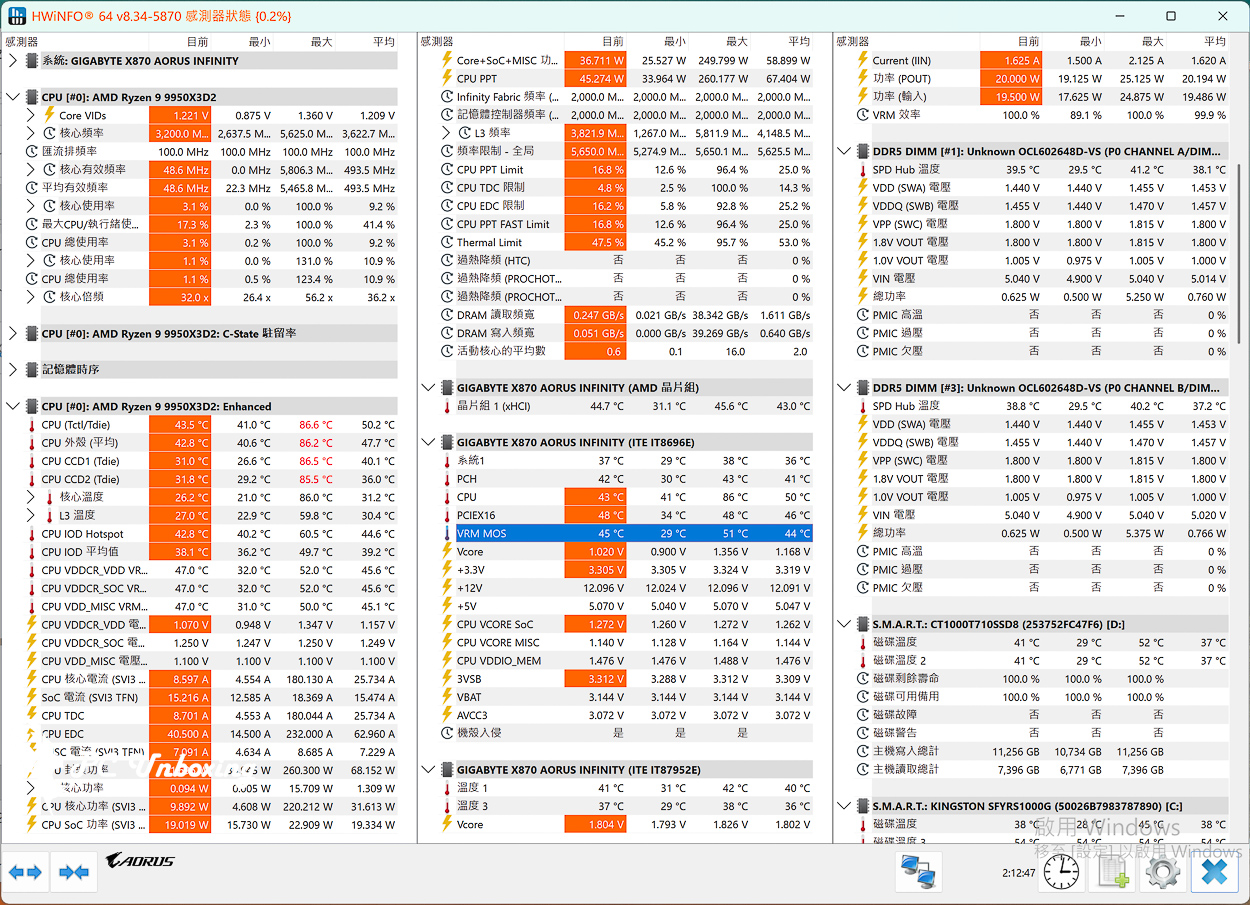
△ During the benchmarking process with the above suite of testing software, HWiNFO 64 was used simultaneously to record the maximum MOS temperature.
DDR5-10400 MT/s Overclocking Test: Overclocking Performance of the X870 AORUS INFINITY Memory
Since this motherboard features a 1DPC (1 DIMM per channel) dual-slot and channel layout designed for better compatibility with memory overclocking (O.C.), why not give it a try? It would be pretty boring to just enable a memory profile without doing anything else.
For this overclocking test, I wanted to try overclocking with two memory modules installed—that is, in dual-channel mode. I continued to use the AMD Ryzen 5 8500G CPU, as it makes overclocking the memory frequency easier. For the CPU cooler, I used a standard all-in-one liquid cooler, and the memory modules retain their original heat spreaders—we did not replace them or add thermal pads. The memory is cooled exclusively by air; we did not use liquid nitrogen (LN2) for cooling.
Ultimately, the author successfully overclocked the system to DDR5 10,400 MT/s (5,200 MHz) with two memory modules installed and without overclocking the BCLK, and ran an AIDA64 benchmark for your reference.
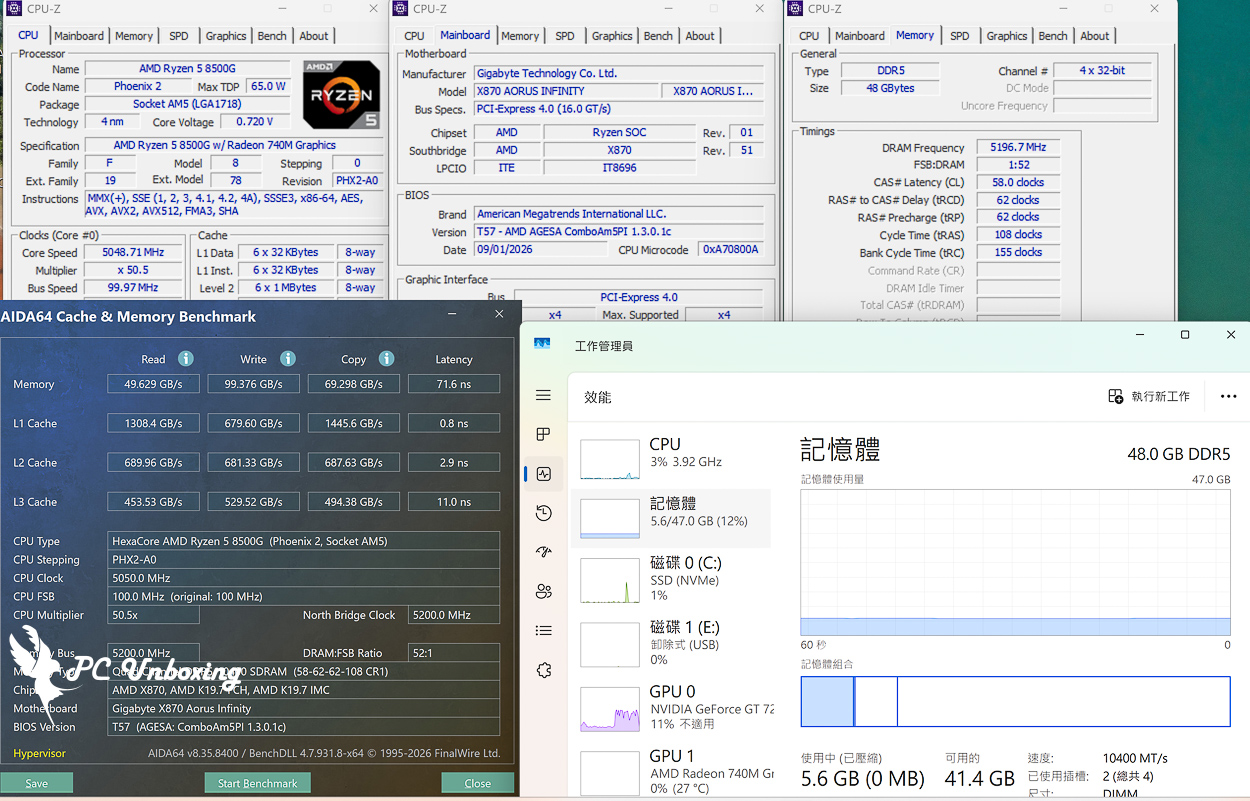
△ Benchmark test after overclocking to DDR5 10400.
GIGABYTE X870 AORUS INFINITY Review Summary: DDR5 Overclocking and Overall Performance
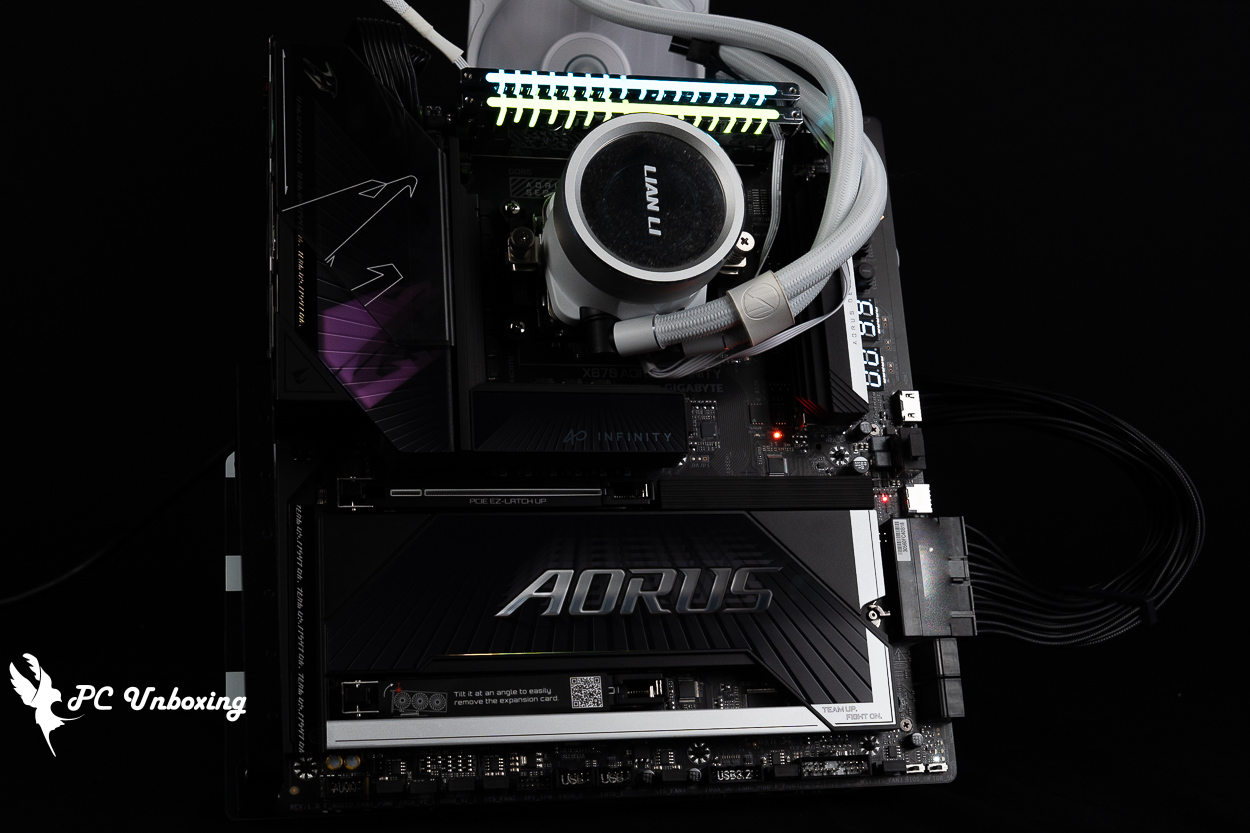
All in all, the Gigabyte X870 AORUS INFINITY motherboard remains a product designed with overclocking in mind. It features 1DPC (1 DIMM per channel) dual DDR5 memory slots, more comprehensive debug code display, dedicated overclocking tool buttons, LN2-specific backplate accessories. For enthusiasts looking to maximize their overclocking potential, this adds another option to the mix. The motherboard also features a more understated design—it all comes down to personal preference.
In terms of product positioning, this motherboard is comparable to X870 AORUS TACHYON ICE They are essentially very similar. Aside from their appearance, the differences between the two models are as follows: the X870 AORUS INFINITY has slightly higher SOC and MISC power delivery amperage, features a new reinforced PCB backplate, removes the noise-sensing slot, adds 65W PD fast charging via the front Type-C port, all fan slots are equipped with protective plugs; it includes the CPU Thermal Matrix as an additional accessory; it features a one-piece shroud; it has two M.2 Gen 5 expansion slots on the processor channel; the processor power connector is designed for easy plugging and unplugging; and it supports X3D Turbo Mode 2.0. These differences account for a price difference of 5,000 New Taiwan Dollars. It’s up to each user to decide whether these features meet their needs and to make their own choice, but the INFINITY does indeed give me a sense of XTREME-level luxury.
Screenshots are provided throughout the sections on platform performance and overclocking for reference. In this test, I also used an AM5 processor to overclock the dual-channel memory modules to DDR5 10,400 MT/s. Although this is still a ways off from the official demo speed of DDR5 11,400 MT/s, I suppose this is the difference between an amateur like me and a professional overclocking engineer. Interestingly, when testing the Gen5 SSD this time, it actually achieved a read speed of 15,293 MB/s—and I don’t recall overclocking the SSD at all.

Yun
Drinks with less than full sugar are colored water. Crossing Turbid Creek, full sugar is not a crime!
Related articles

10-phase power supply + DDR5 9333! ASRock B860I Lightning WiFi motherboard unboxing!

The Gift of the Black Dragon King MSI MPG B650 CARBON WIFI Motherboard Unboxing and Testing
 繁體中文
繁體中文  English