
GIGABYTE X870I AORUS PRO ICE Unboxing and Review: ITX Motherboard Specifications, Performance Tests, and Gaming Benchmarks
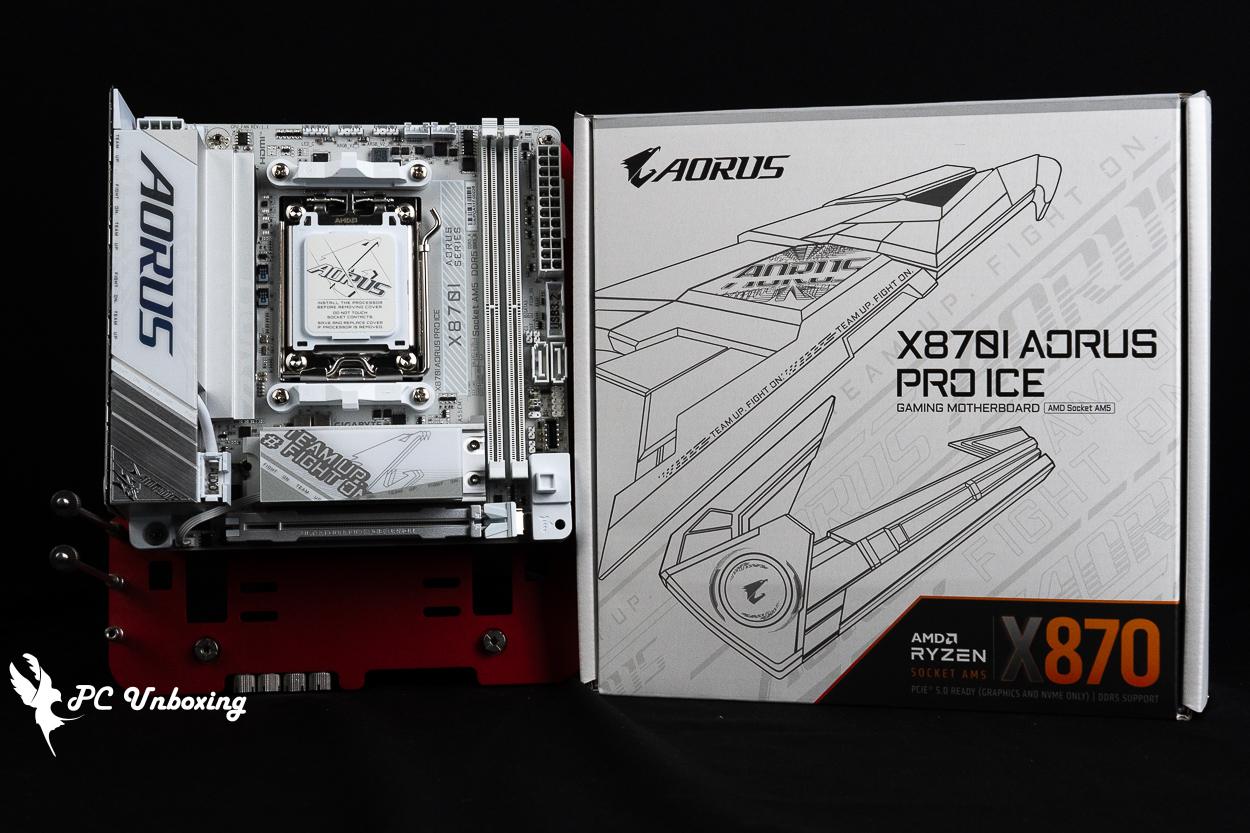
GIGABYTE’s X870I AORUS PRO ICE motherboard, built on the AMD AM5 800 Series chipset, makes a comeback with an all-white PRO ICE design. It features an 8+2+1-phase power delivery system, two M.2 expansion slots, USB4 Type-C, a wired 2.5GbE LAN port, Wi-Fi 7, and a screwless M.2 heatsink. This article will summarize and compare the specification differences between the previous-generation B650I and this motherboard for your reference.
GIGABYTE X870I AORUS PRO ICE MotherboardSpecifications:
Size: Mini-ITX 17 x 17 cm
Processor Support: AMD Ryzen 9000 / 8000 / 7000
Processor Socket: AM5 LGA 1718
CPU power phases: 8 (110A) + 2 (80A) + 1 (30A)
Chipset: AMD X870
Memory Expansion: 2x DDR5 DIMM slots, 8400 (O.C.) MT/s, maximum capacity 128 GB (single slot supports up to 64 GB)
Memory Certification: AMD EXPO (Extended Profiles for Overclocking), Intel XMP 3.0 (Extreme Memory Profile)
Integrated Graphics Output Ports: HDMI 2.1 (4K at 60 Hz), USB 4 Type-C (4K at 240 Hz)
Expansion slot for graphics cards: PCIe 5.0 x16
Storage Expansion Slots: 2x SATA 6 Gb/s, M2A_CPU 2280 PCIe Gen 5 x4, M2C_SB 2280 PCIe Gen 4 x4
Wired Network: Realtek 2.5 Gbps
Wireless Connectivity: Realtek Wi-Fi 7 RTL8922AE, Bluetooth 5.4
Audio Chip: Realtek ALC4080
USB Ports (Front Expansion): 1x USB 10Gbps Type-C, 1x USB 5Gbps (supports two USB 5Gbps Type-A ports on front), 1x USB 2.0 Type-A (supports two USB 2.0 ports on front)
USB Ports (Rear I/O): 1x USB 4 Type-C (40 Gbps), 1x USB 10 Gbps Type-C, 2x USB 10 Gbps Type-A (red), 2x USB 5 Gbps Type-A (blue), 2x USB 2.0 Type-A
RGB Power Connectors: 2x ARGB 5V 3-pin, 1x RGB 12V 4-pin
Fan Power Connectors: 1x 4-Pin CPU Fan, 1x 4-Pin SYS FAN, 1x 4-Pin SYS FAN/PUMP
GIGABYTE X870I AORUS PRO ICE Unboxing: Motherboard Specifications, Accessories, and Design Overview
The ITX test platform I used previously was also a GIGABYTE B650I AORUS ULTRA motherboard, Given that both feature the AMD AM5 socket and ITX form factor, I specifically switched to the newer GIGABYTE X870I AORUS PRO ICE motherboard. What differences are there in terms of expandability and usability? I’ll summarize my findings in this review for your reference.
The Gigabyte X870I AORUS PRO ICE is also a Mini-ITX motherboard designed for the AM5 platform, supporting AMD Ryzen 9000, 8000, and 7000 series processors and other AM5 platform components; however, at first glance, it’s clear that Gigabyte has adopted the ICE series’ white aesthetic for its 800-series chipset ITX motherboards.
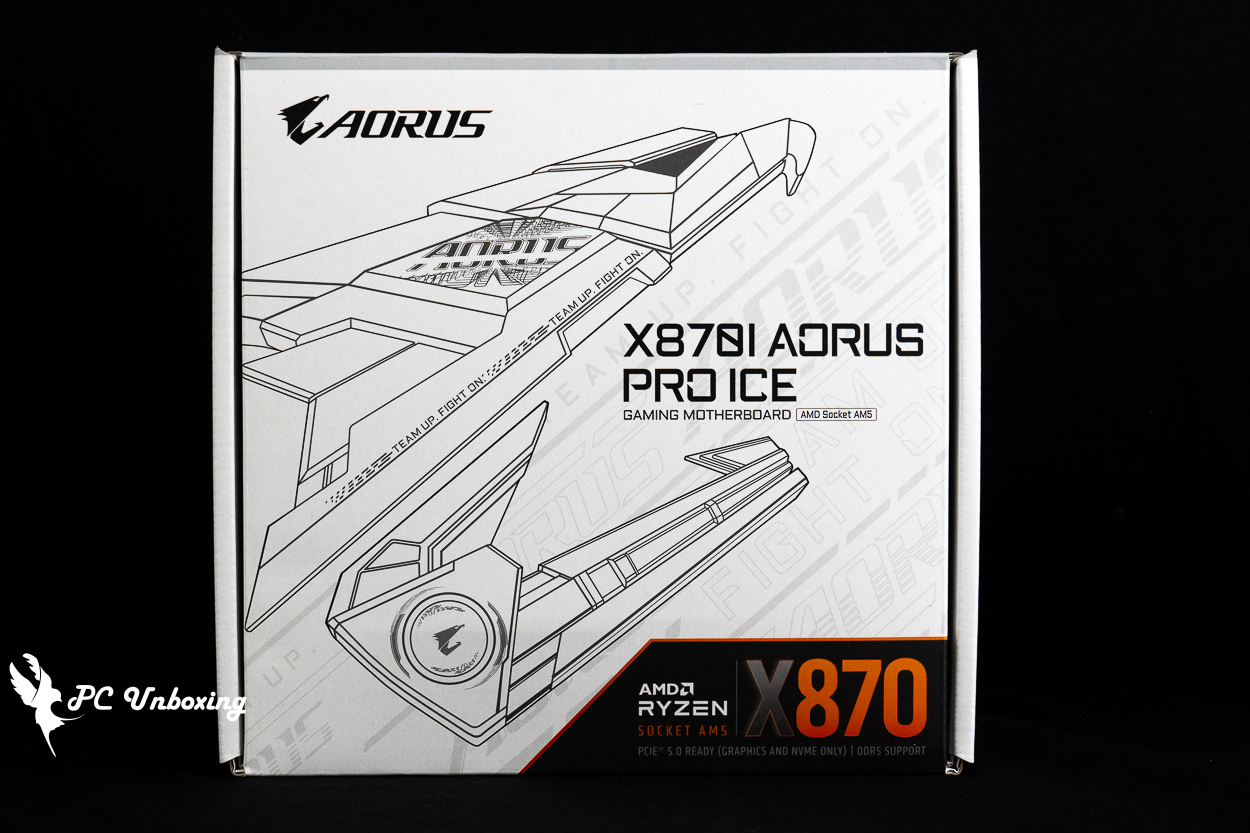
△ Gigabyte X870I AORUS PRO ICE.
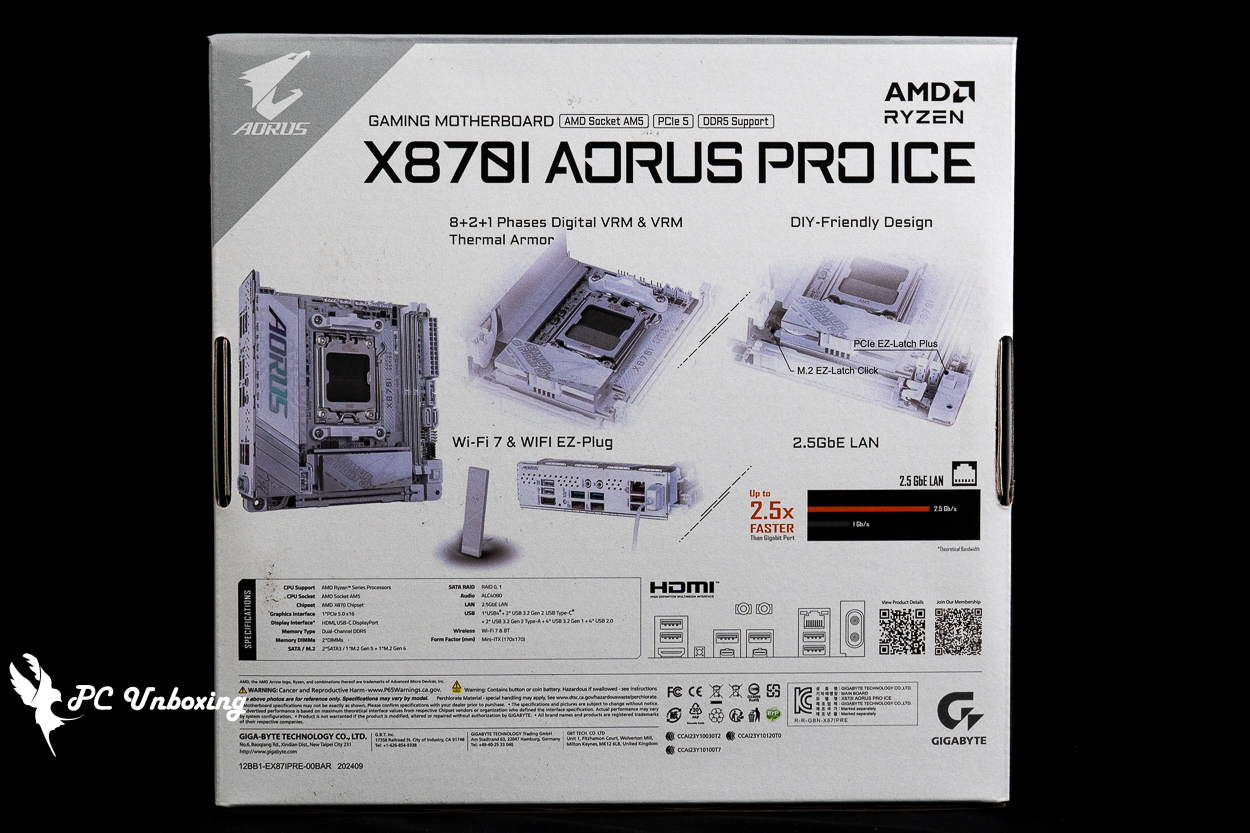
△ Basic features and specifications of the motherboard.
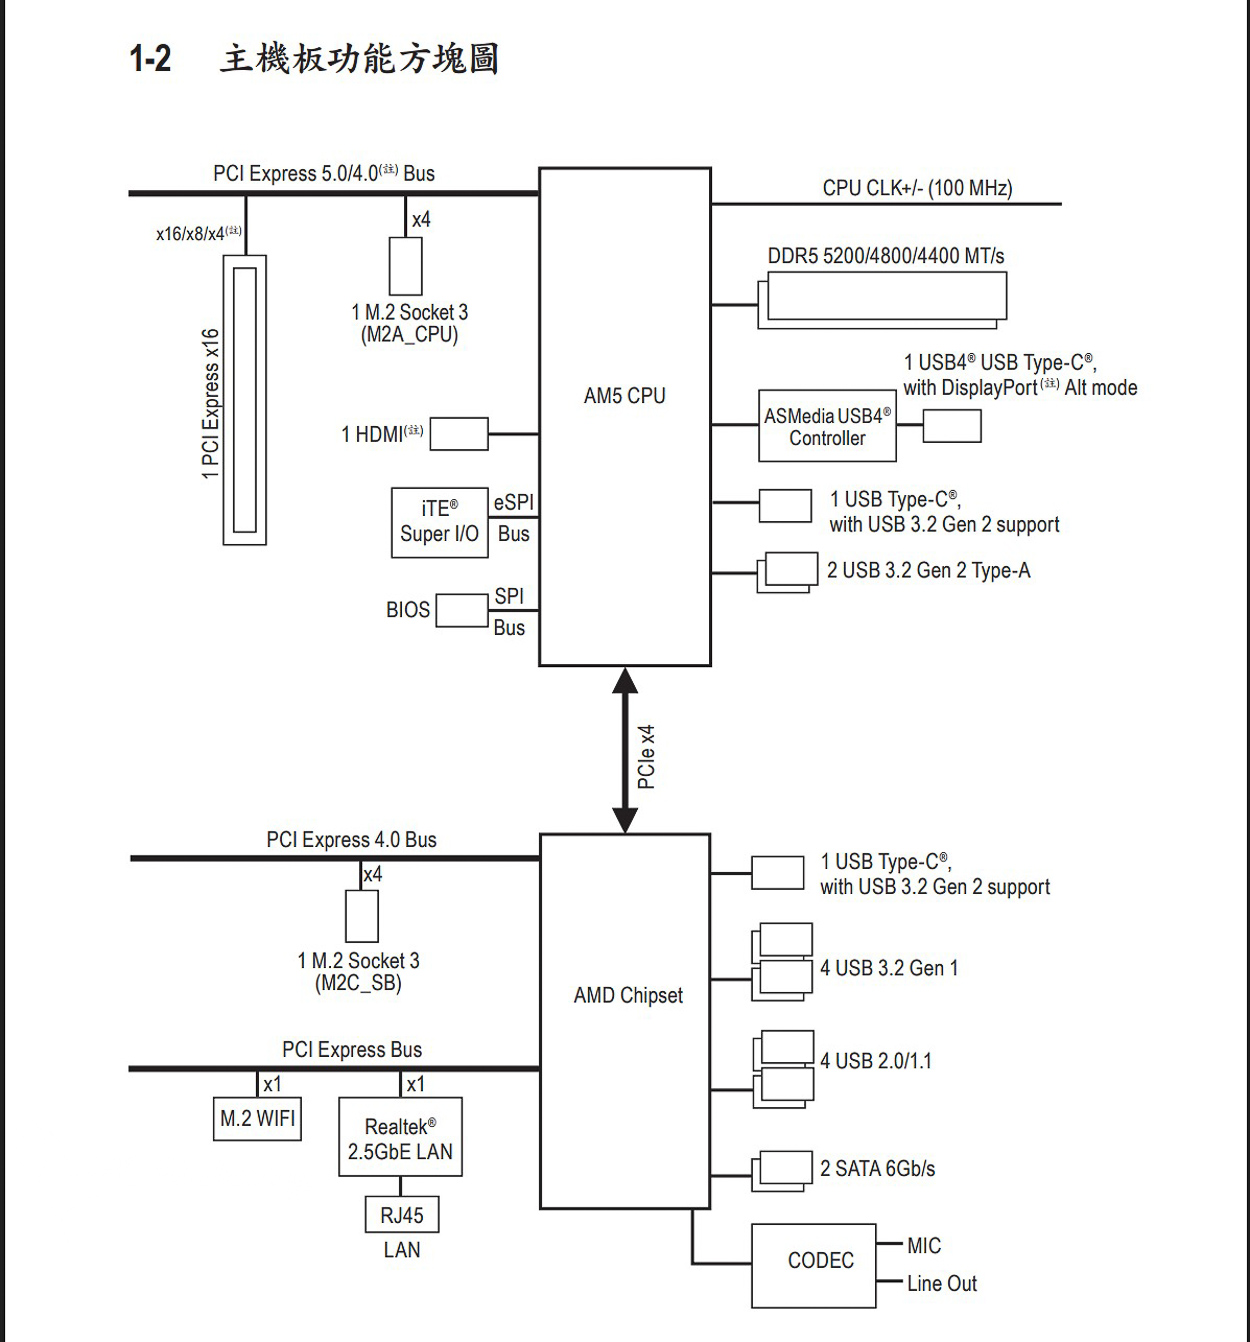
△ Motherboard channel configuration diagram.
The motherboard accessories include: 2 SATA cables, a Wi-Fi 7 antenna, M.2 screws, an M.2 thermal pad, two fan adaptor cables, and case screws (presumably as spares in case the case screws conflict with certain armor components).
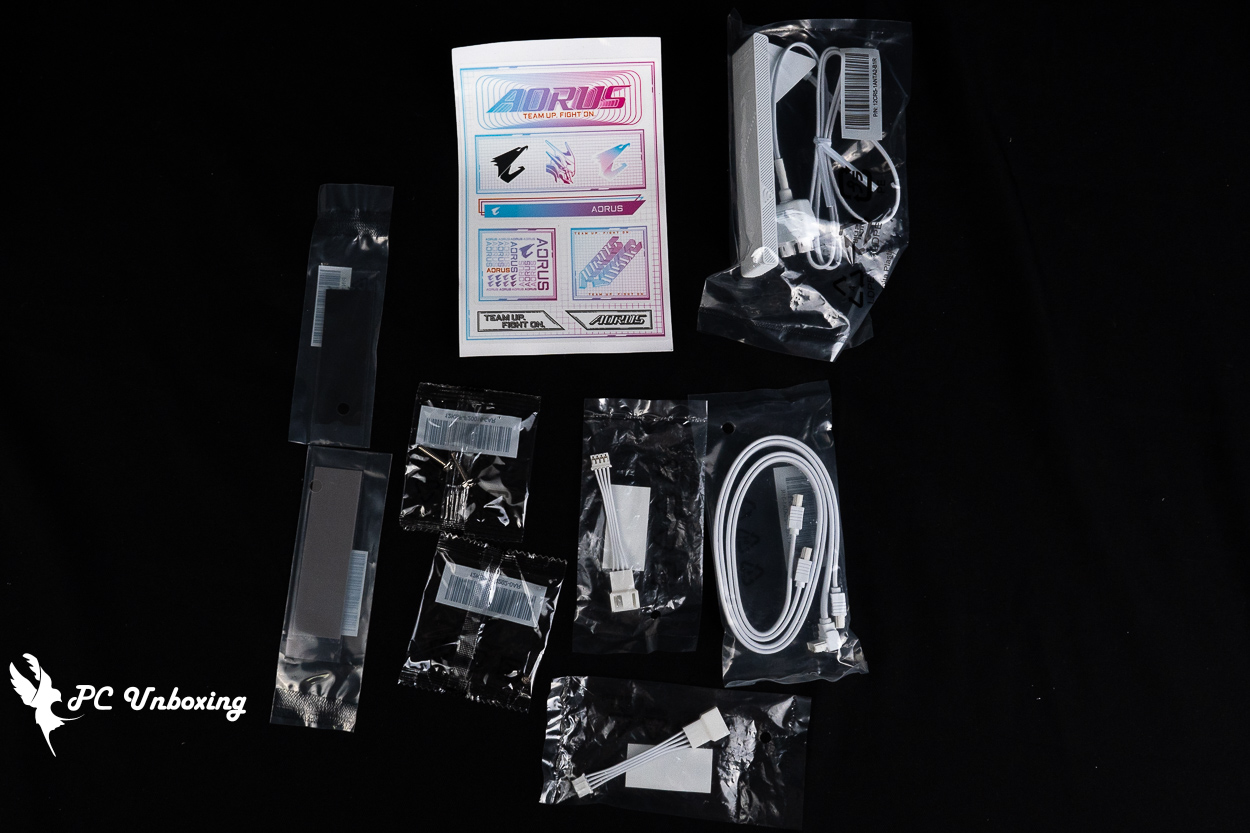
△ List of accessories.
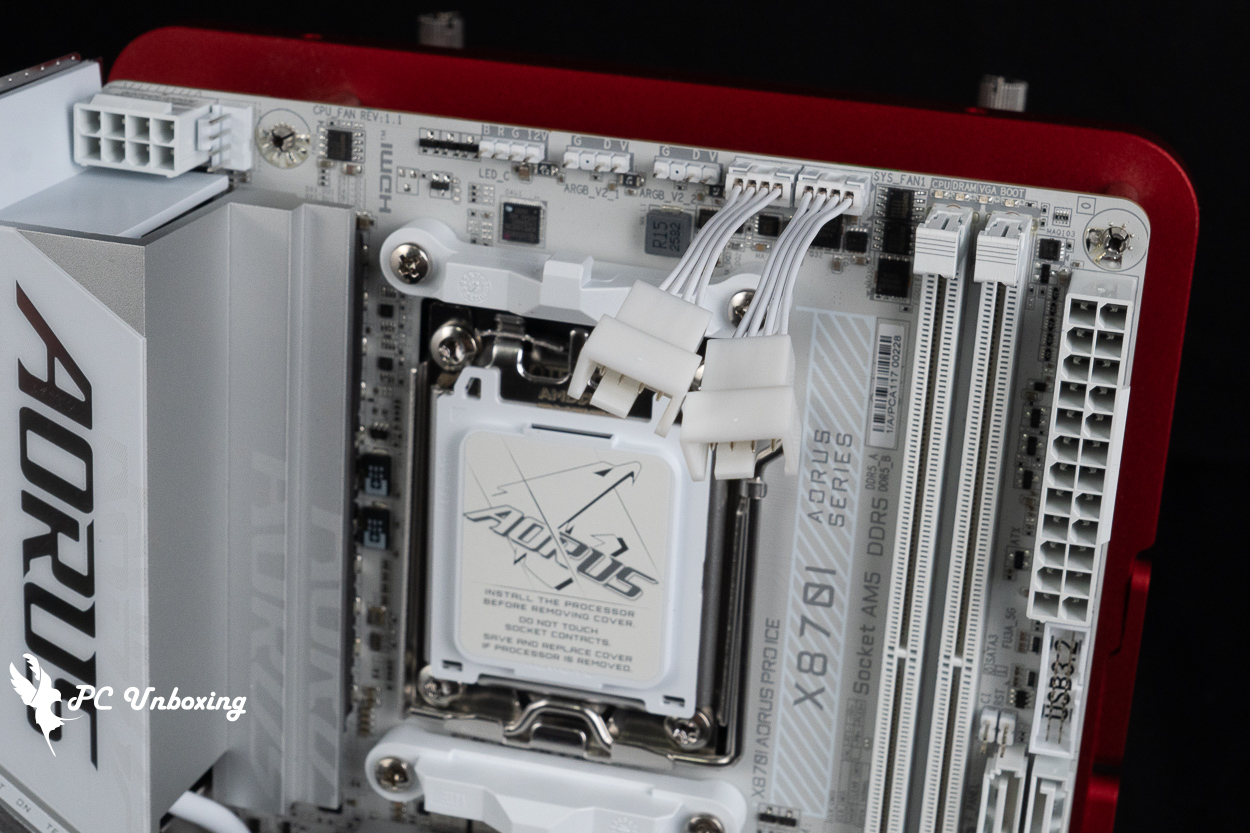
△ The fan adapter cable must be connected to the CPU_OPT and SYS_FAN1 sockets on the top of the motherboard. These two fan sockets are custom-spec, so an adapter cable is required for use.
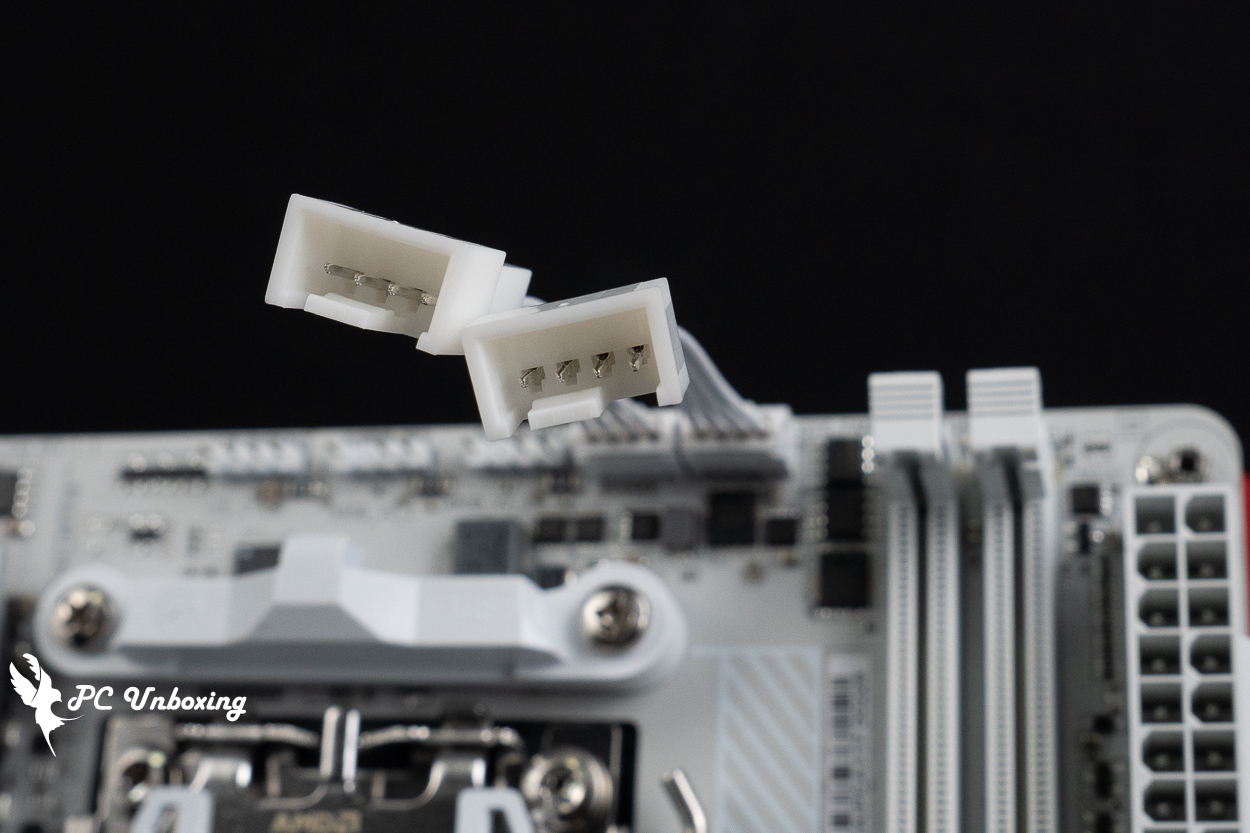
△ Installation demonstration: The output is a 4-pin PWM connector.
The GIGABYTE X870I AORUS PRO ICE motherboard features an 8+2+1 digital power delivery design and a 10-layer PCB.
With a Mini-ITX form factor measuring 17 x 17 cm, this motherboard offers greater flexibility and better expandability than pre-built mini PCs for users looking to build a mini PC to save space.
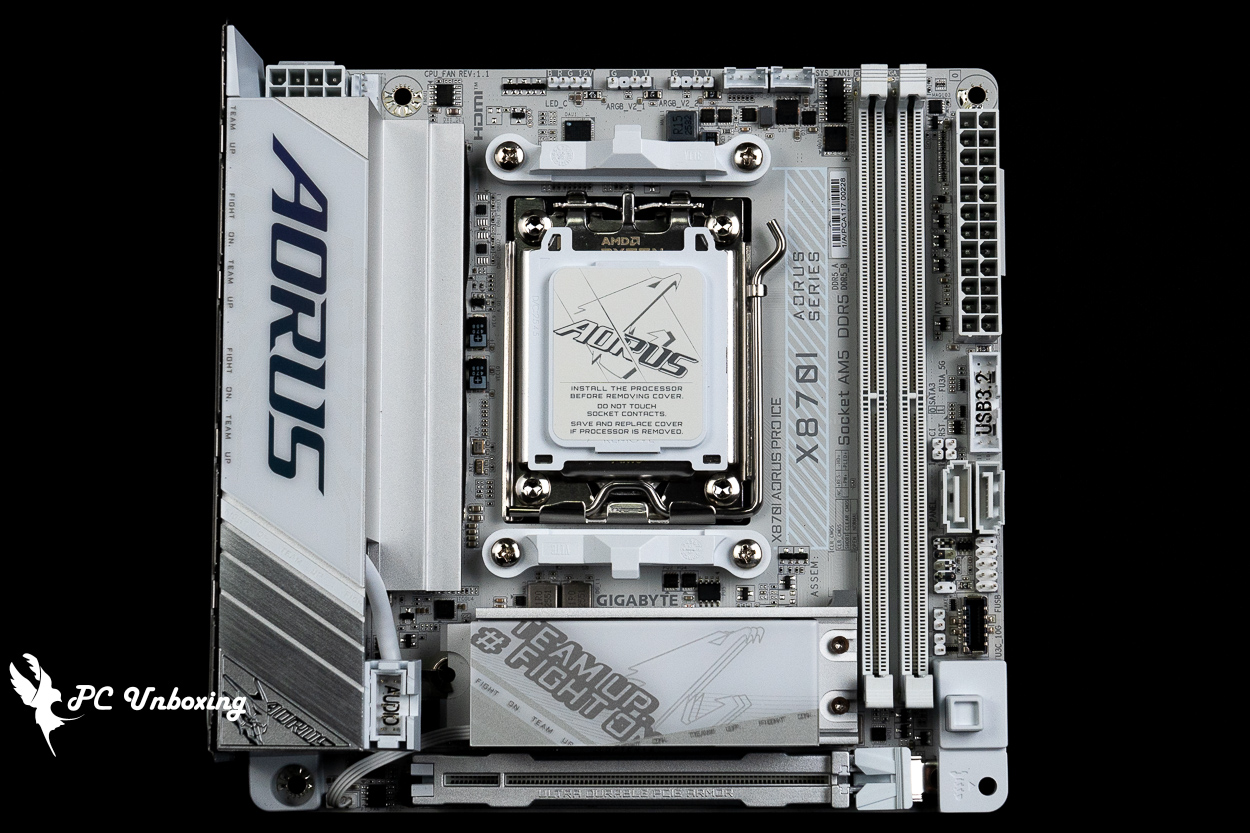
△ The ITX-sized X870I AORUS PRO ICE.
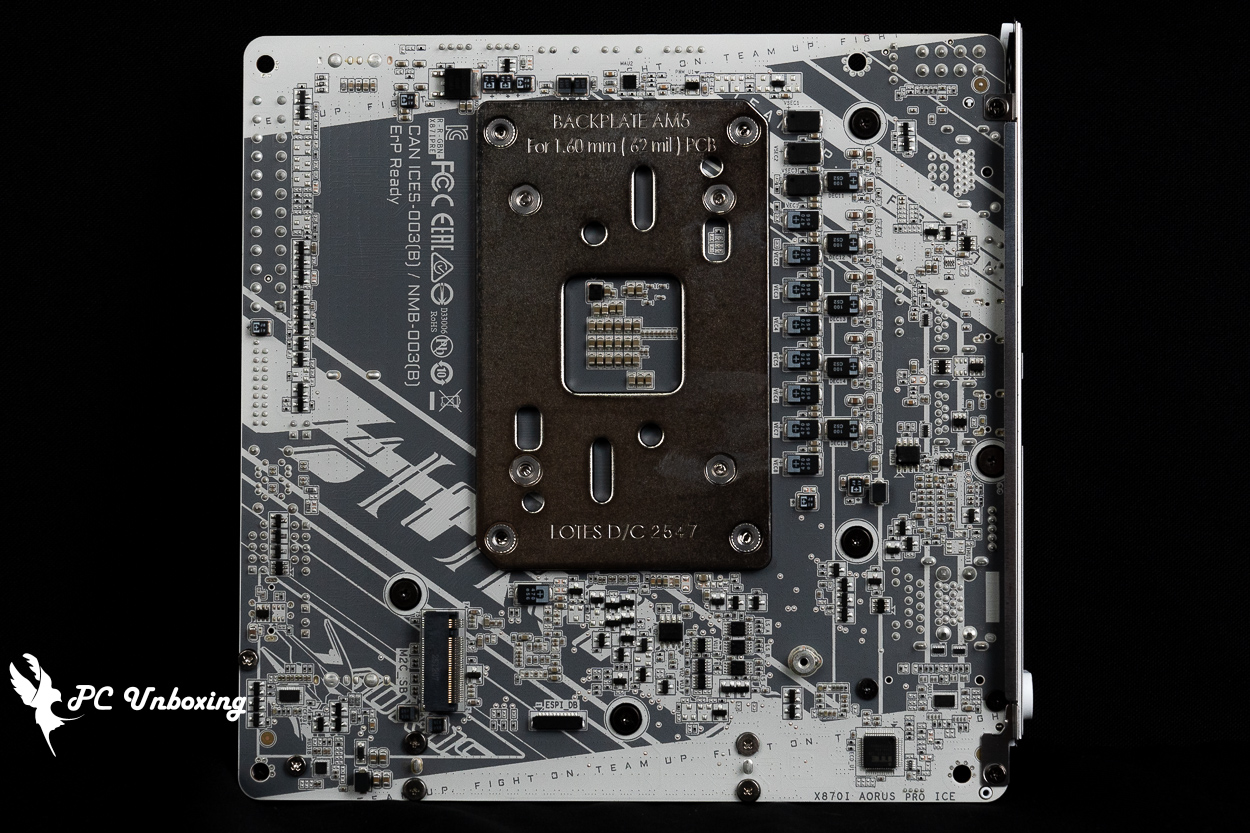
△ There is no reinforced back plate.
The VRM cooling area on the motherboard features an "H"-shaped heatsink that dissipates heat from the power supply components beneath it, while a high-performance thermal pad with a thermal conductivity of 12 W/mK makes direct contact with the MOSFETs to maintain system stability.
The X870 continues to use the AM5 LGA 1718 socket and supports AMD Ryzen 9000, 8000, and 7000 series processors. Since it retains the same cooler mounting brackets and hole spacing as the AM4 socket, users can directly reuse their existing AM4 cooler mounting kits for installation.
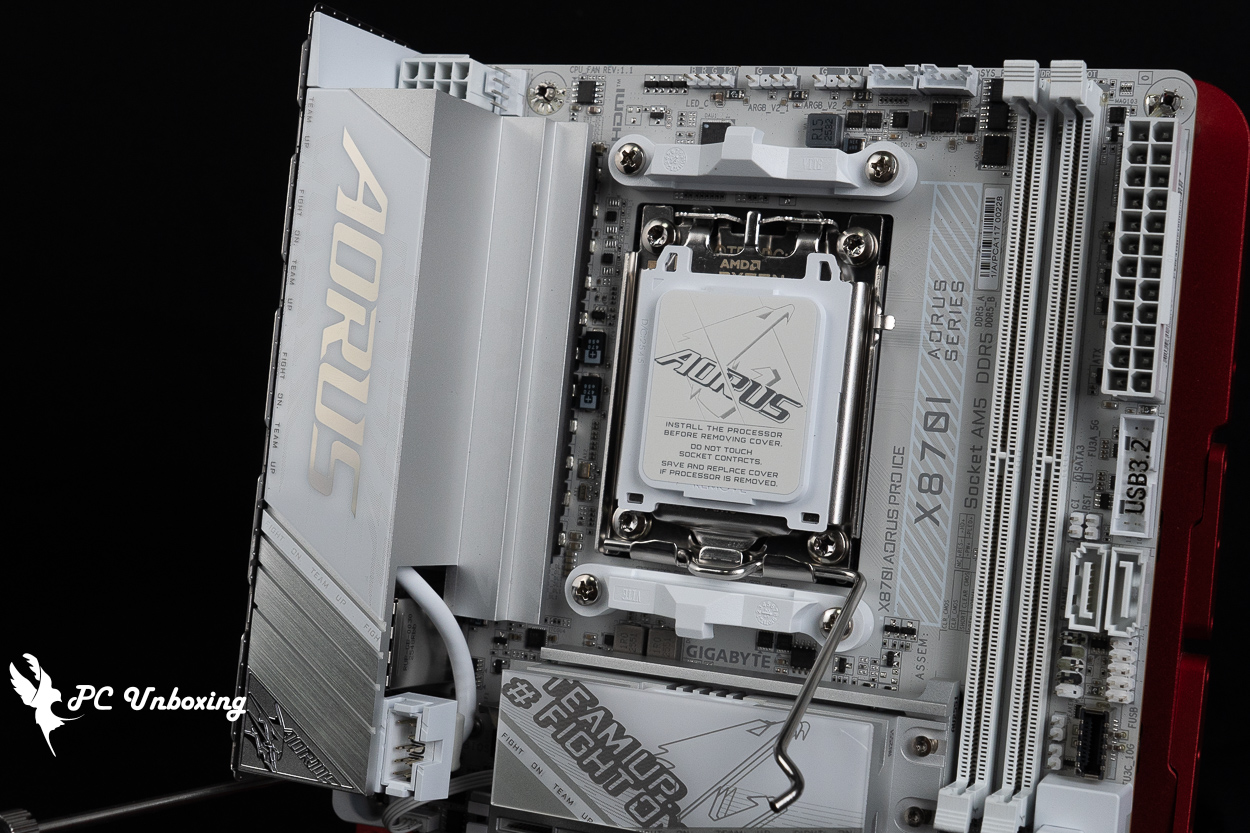
△ VRM Thermal Armor Advanced.
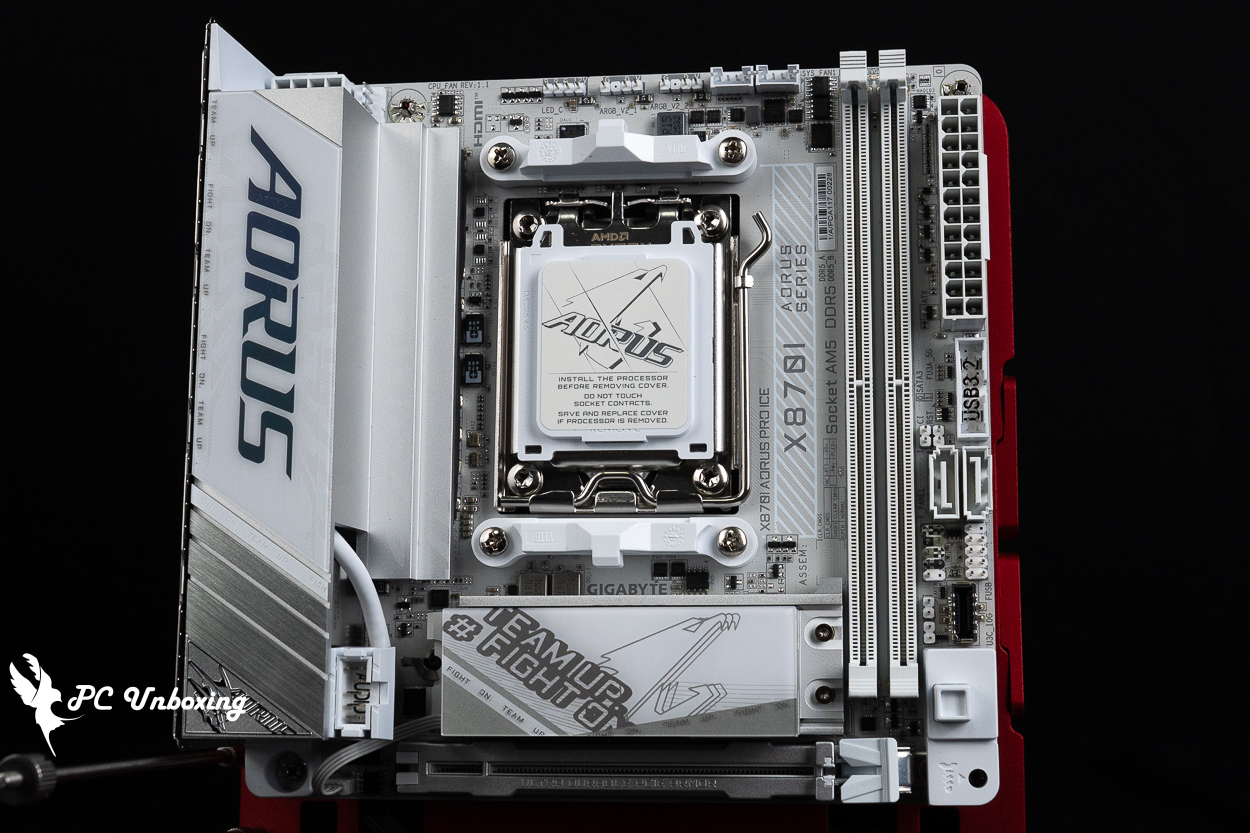
△ Processor pin cover.
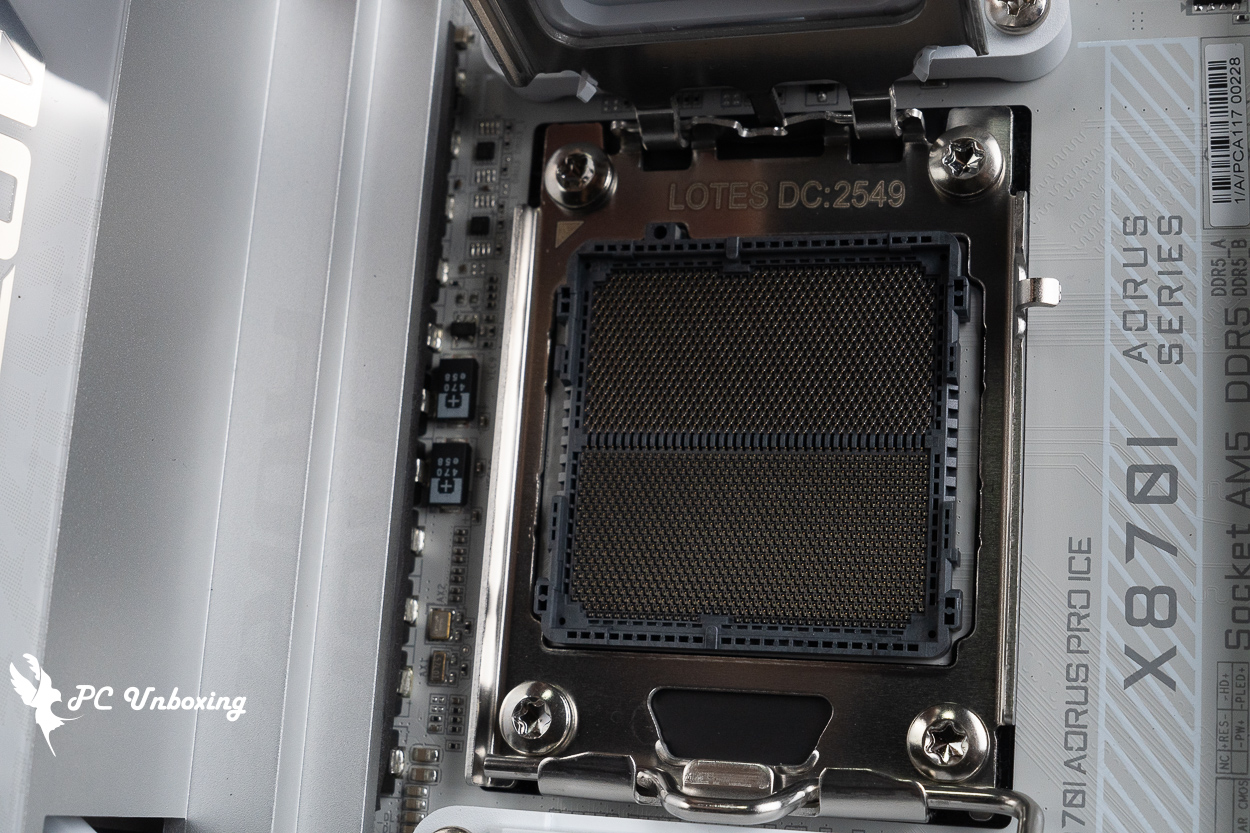
△ AM5 LGA 1718 feet.
Next, let’s take a look at each of the expansion and power connectors on the GIGABYTE X870I AORUS PRO ICE motherboard. In the upper-left corner of the motherboard, there is a single 8-pin ATX_12V CPU power connector, along with a CPU_FAN connector right next to it.
Directly above the processor socket are a 12V 4-pin RGB connector, two 5V 3-pin ARGB_V2 connectors, CPU_OPT and SYS_FAN 1 fan and liquid cooling power connectors, as well as the EZ DeBug indicator lights. All of the motherboard’s fan and lighting control connectors are concentrated at the top; it is recommended that you route the cables in advance during assembly before installing the motherboard into the case.
EZ DeBug allows users to quickly identify which components are causing problems during the motherboard's self-test, preventing the system from booting. Users can then refer to the motherboard manual to perform troubleshooting steps.
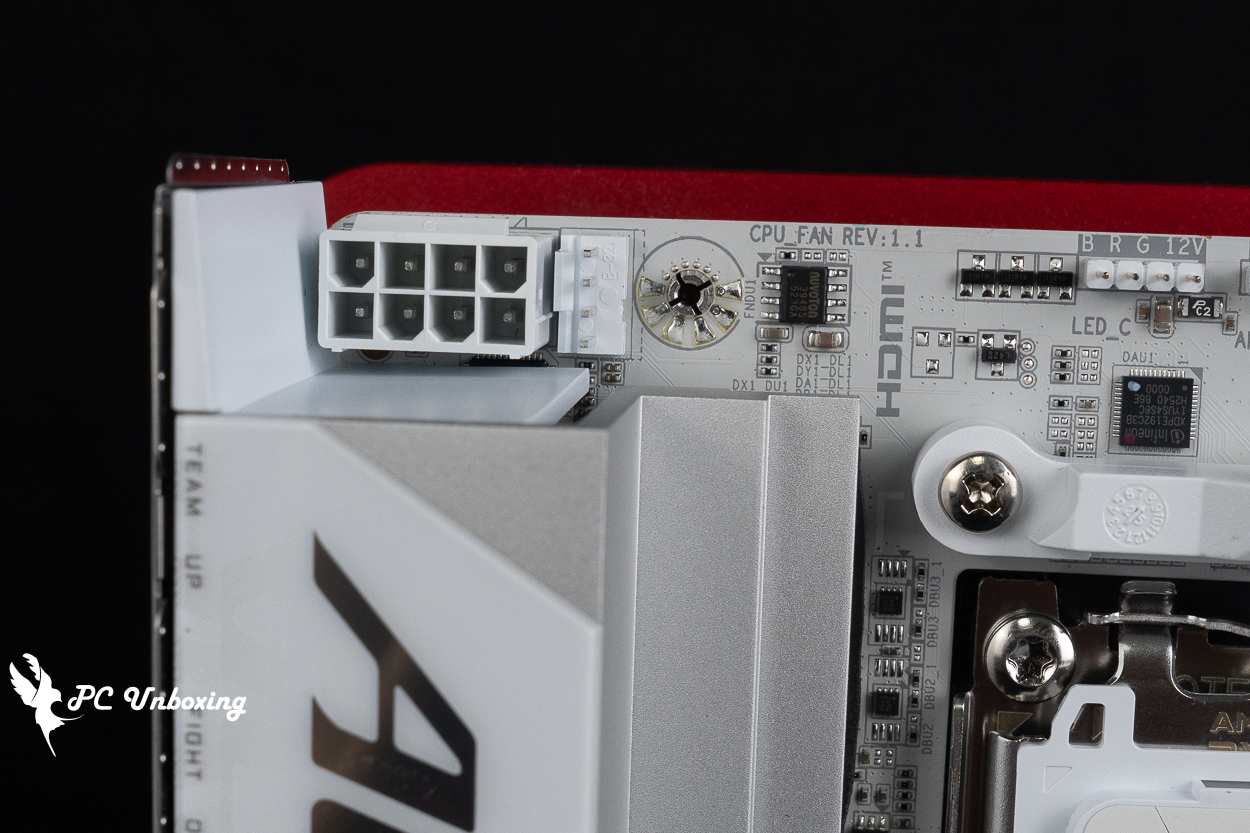
△ A single 8-pin CPU power connector, with a CPU cooler fan connector next to it.
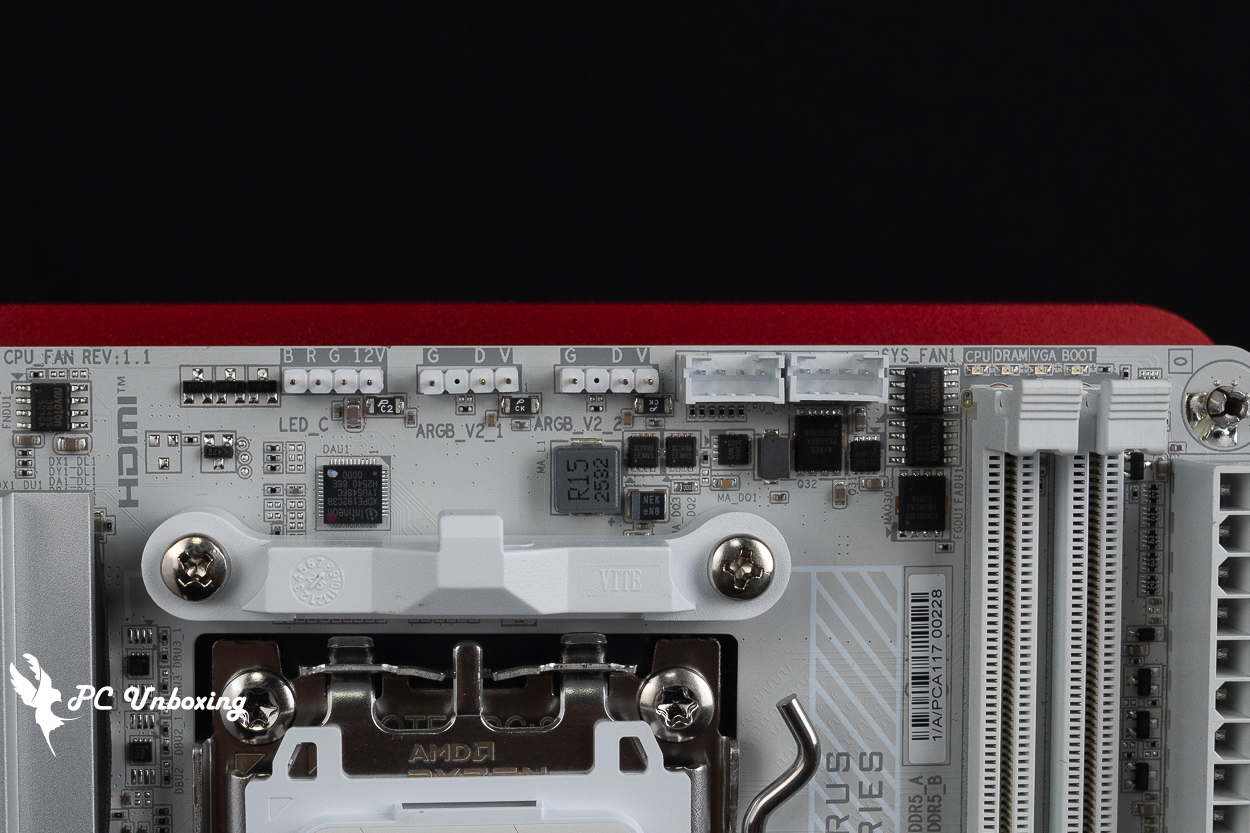
△ One 12V 4-pin RGB connector, two 5V 3-pin ARGB_V2 connectors, CPU_OPT and SYS_FAN 1 fan and liquid cooling power connectors, EZ DeBug indicator lights, etc.
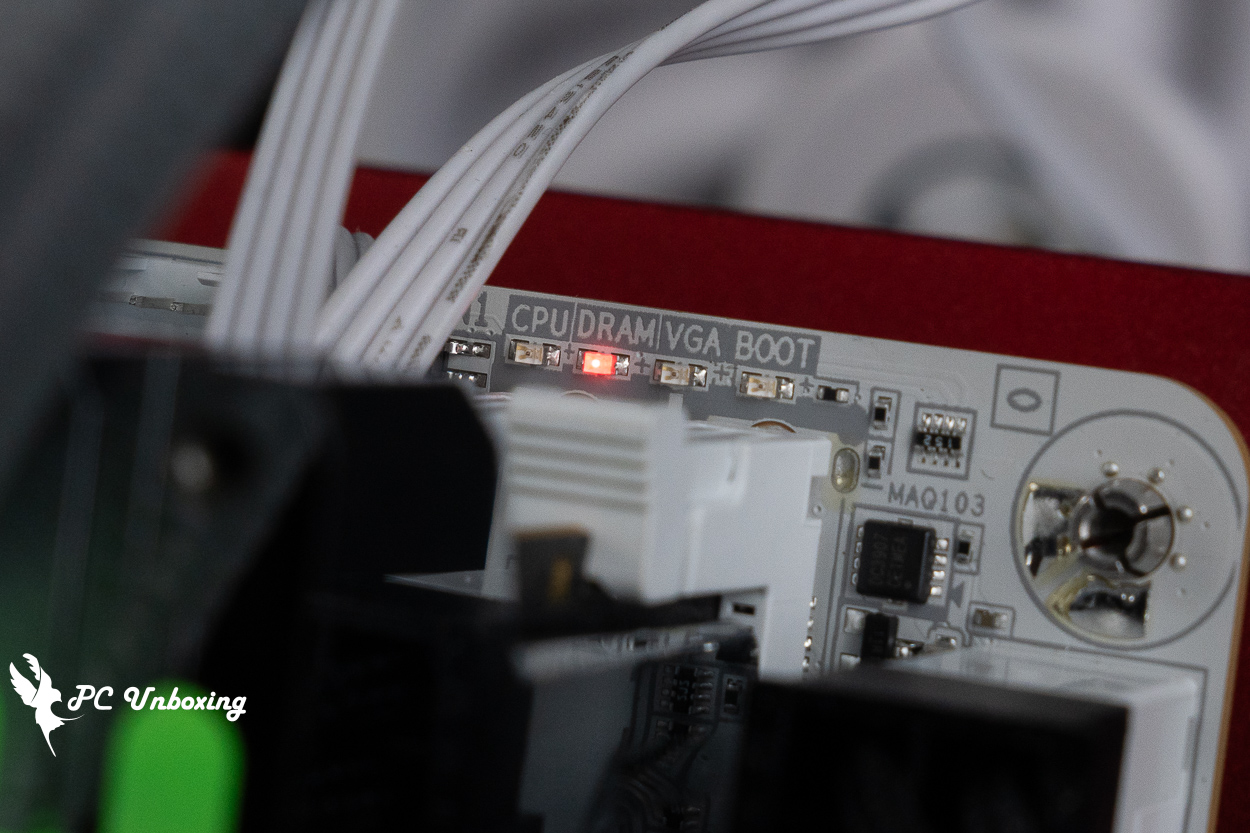
△ EZ DeBug LED indicator demonstration.
The two DDR5 DIMM dual-latch memory slots feature a 1DPC (1 DIMM per channel) configuration and support non-ECC, unbuffered DIMM memory. The maximum total capacity for both slots is 128 GB, meaning the upper limit for a single module is 64 GB. It also supports AMD EXPO (Extended Profiles for Overclocking) and Intel XMP 3.0 (Extreme Memory Profile) one-click overclocking profiles.
In the QVL (Qualified Vendor List) for memory overclocking, dual-channel memory modules are listed as being capable of passing compatibility stress tests at a maximum frequency of 8400 MT/s when used with Ryzen 8000 series processors, As a reminder, when selecting and installing memory modules, it is best to refer to the motherboard’s Memory QVL (Qualified Vendor List) compatibility report.
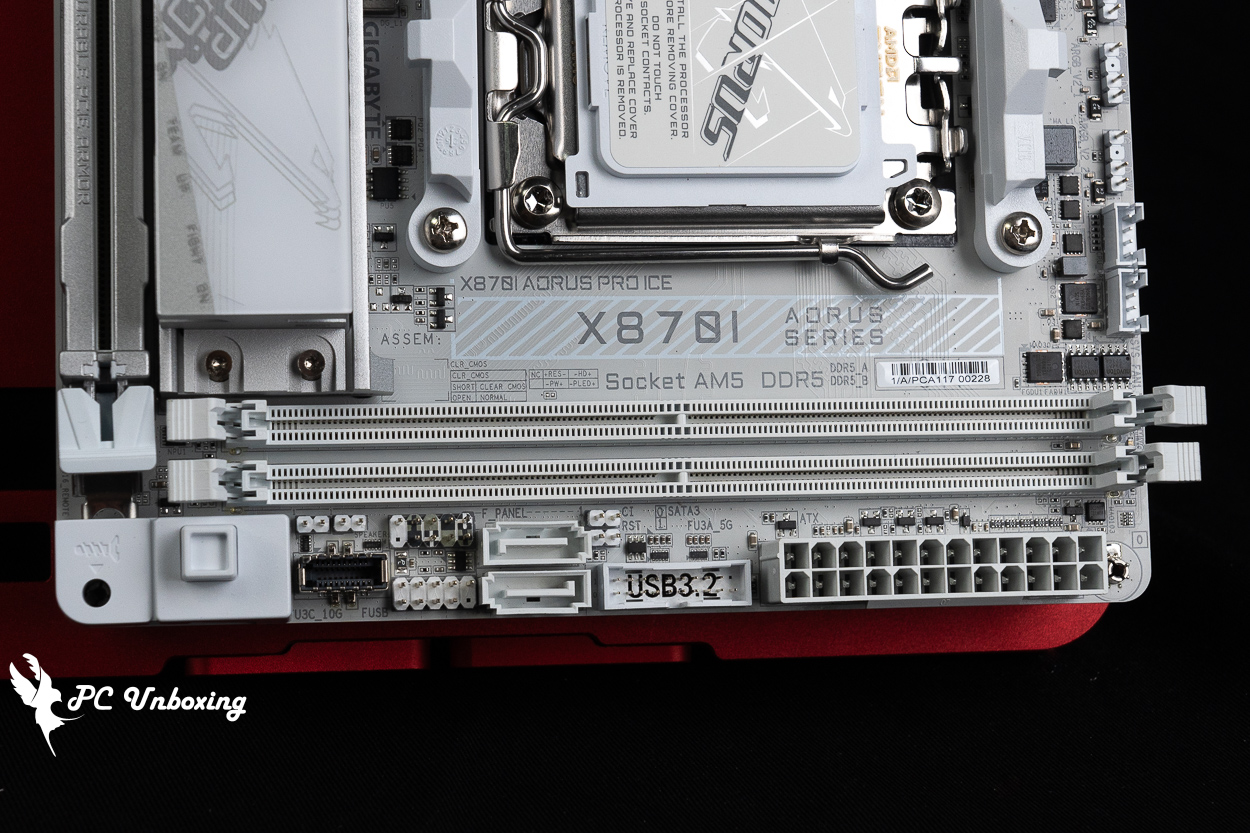
△ 2x Unbuffered DDR5 DIMM memory slots, compatible with UDIMM memory modules; supports up to 128 GB of memory capacity; when two modules are installed, the QVL supports up to 8400 MT/s (overclocked).
On the right side of the motherboard are a 24-pin power connector, a USB 5Gbps header (supporting two front-panel USB 5Gbps Type-A ports), a CI chassis-open detection connector, an RST reset jumper connector, two SATA 6Gb/s connectors, a system front panel connector, a USB 2.0 connector (supporting two front-panel USB 2.0 ports), buzzer jumper socket, CMOS reset jumper socket, one front-panel USB 10Gbps Type-C port, and more.
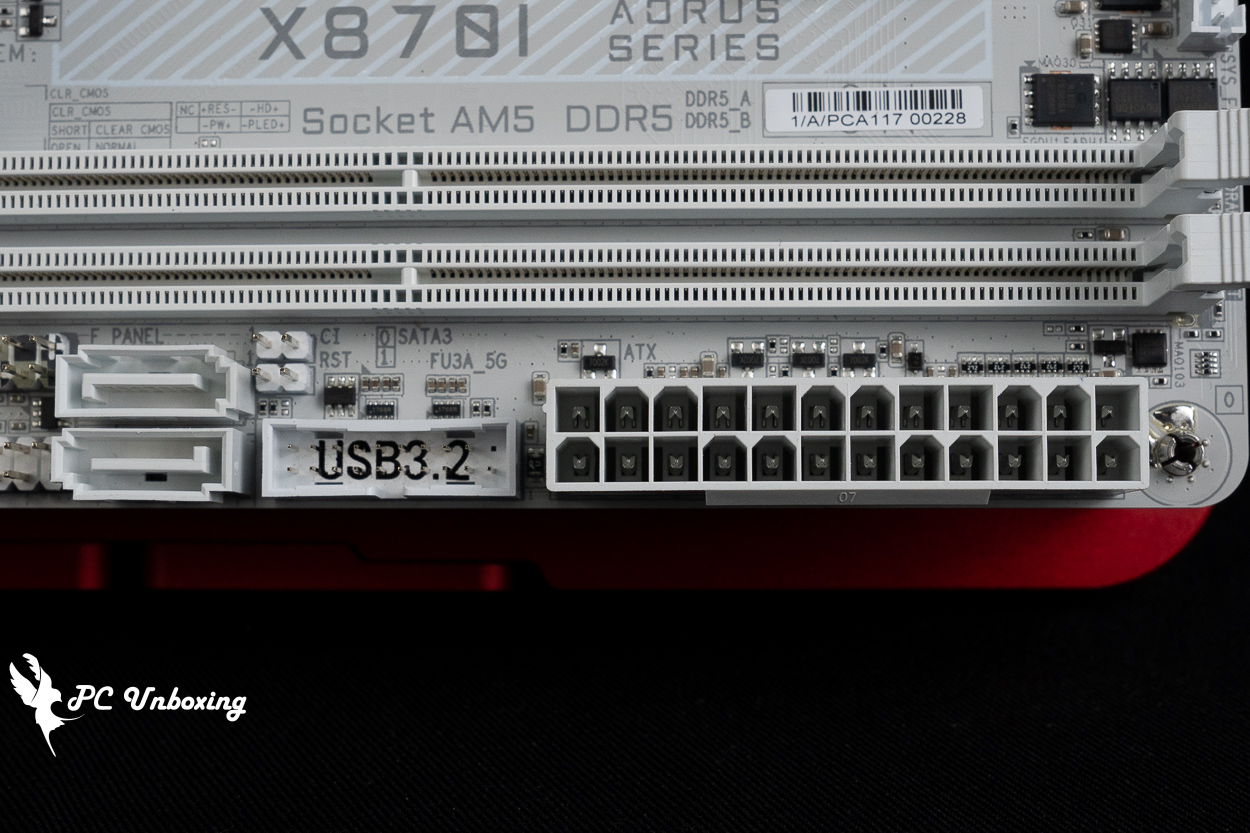
△ Motherboard: 24-pin power connector, one USB 5 Gbps port (supports two front-panel USB 5 Gbps Type-A ports), CI chassis open detection connector, RST reset jumper, and two SATA 6 Gb/s ports.
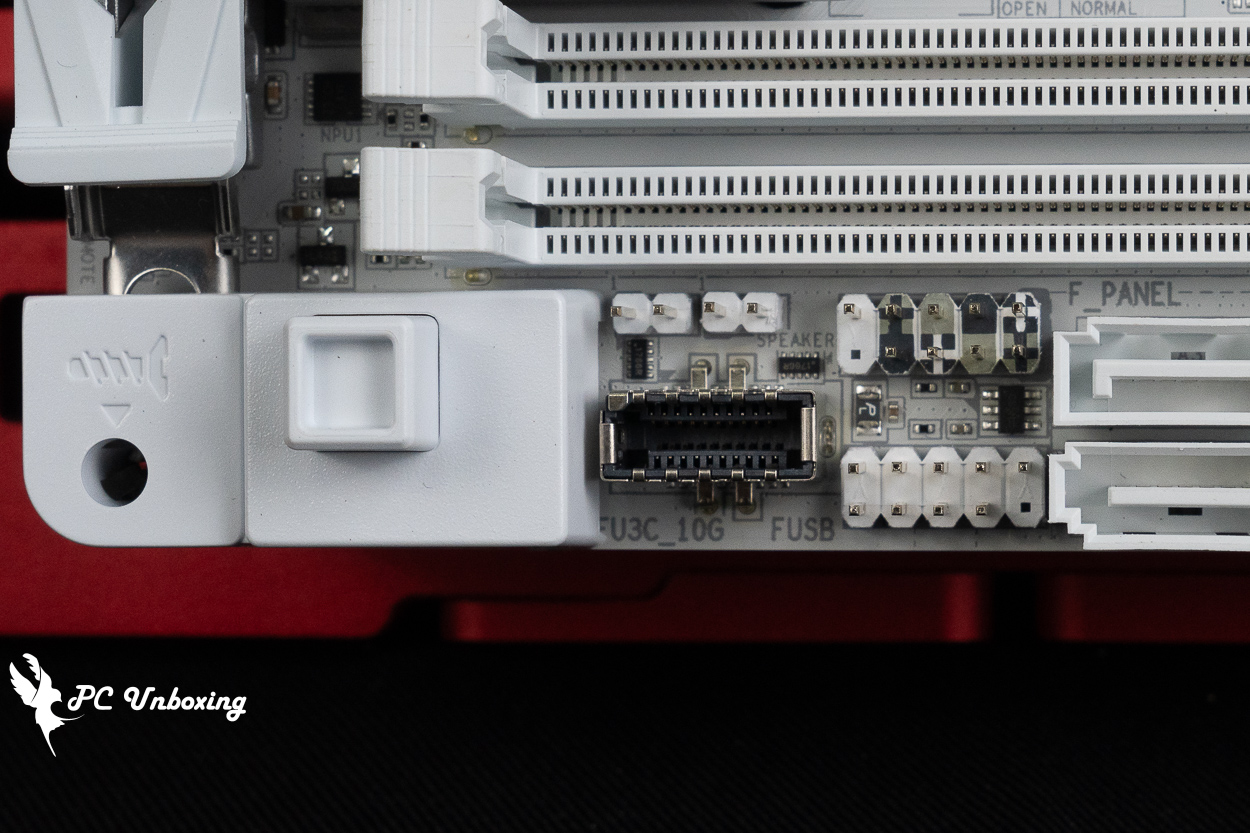
△ Front-panel ports, one USB 2.0 port (supporting two front-panel USB 2.0 ports), a buzzer jumper slot, a CMOS reset jumper slot, one front-panel USB 10 Gbps Type-C port, and more.
The motherboard features a single x16-length device expansion slot. The graphics card expansion slot is reinforced with a PCIe UD Slot X metal bracket and is lined with rubber strips on the inside, ensuring that the graphics card remains undamaged even when users take advantage of the convenient PCIe EZ-Latch Up feature.
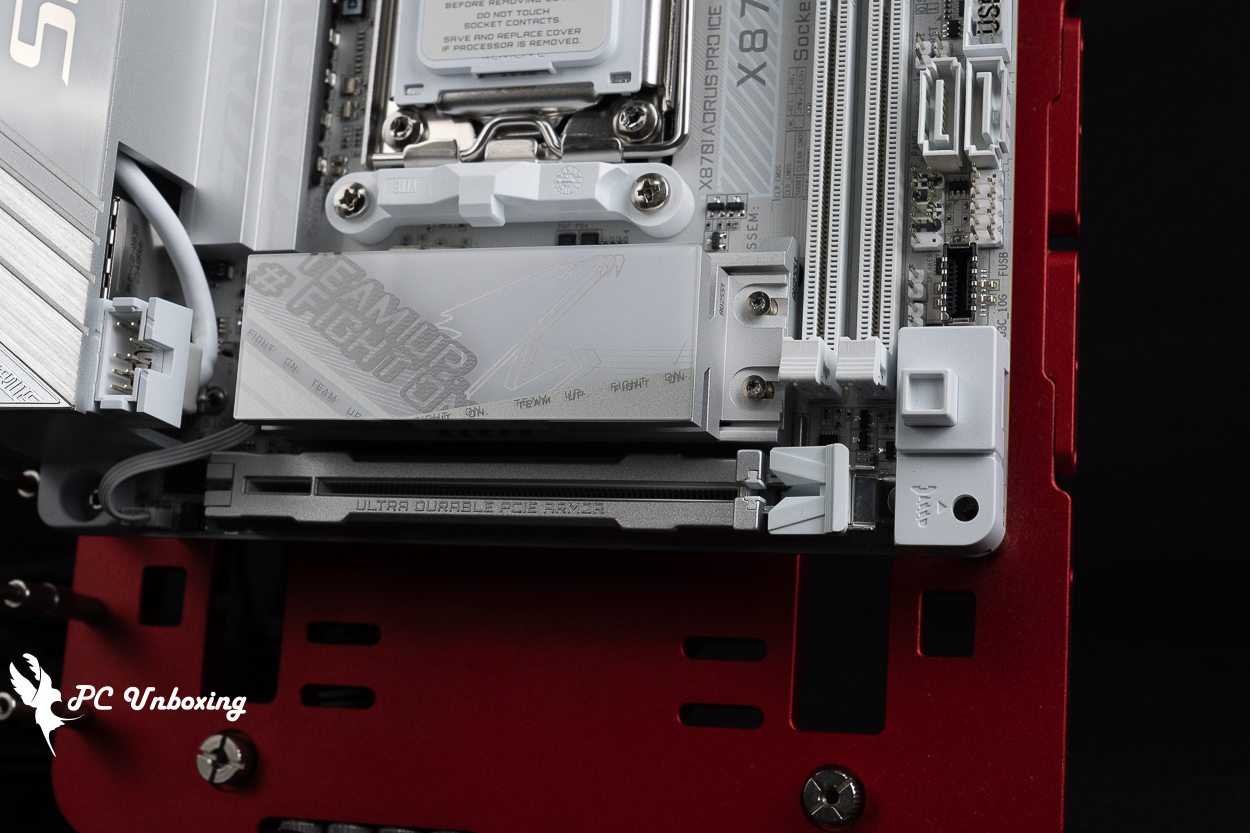
△ This graphics card features a PCIe 5.0 x16 slot that connects directly to the CPU's PCIe 5.0 x16 lane.
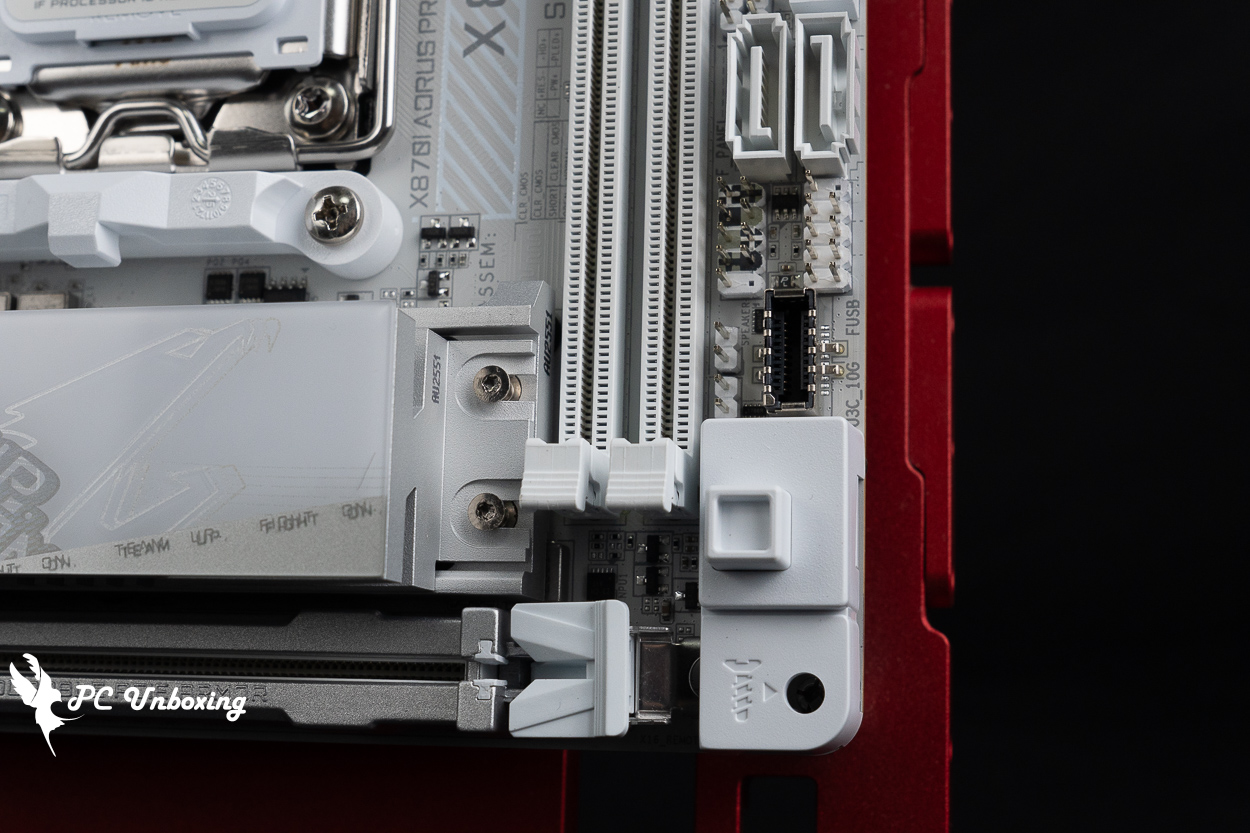
△ Quick-release button for the graphics card.
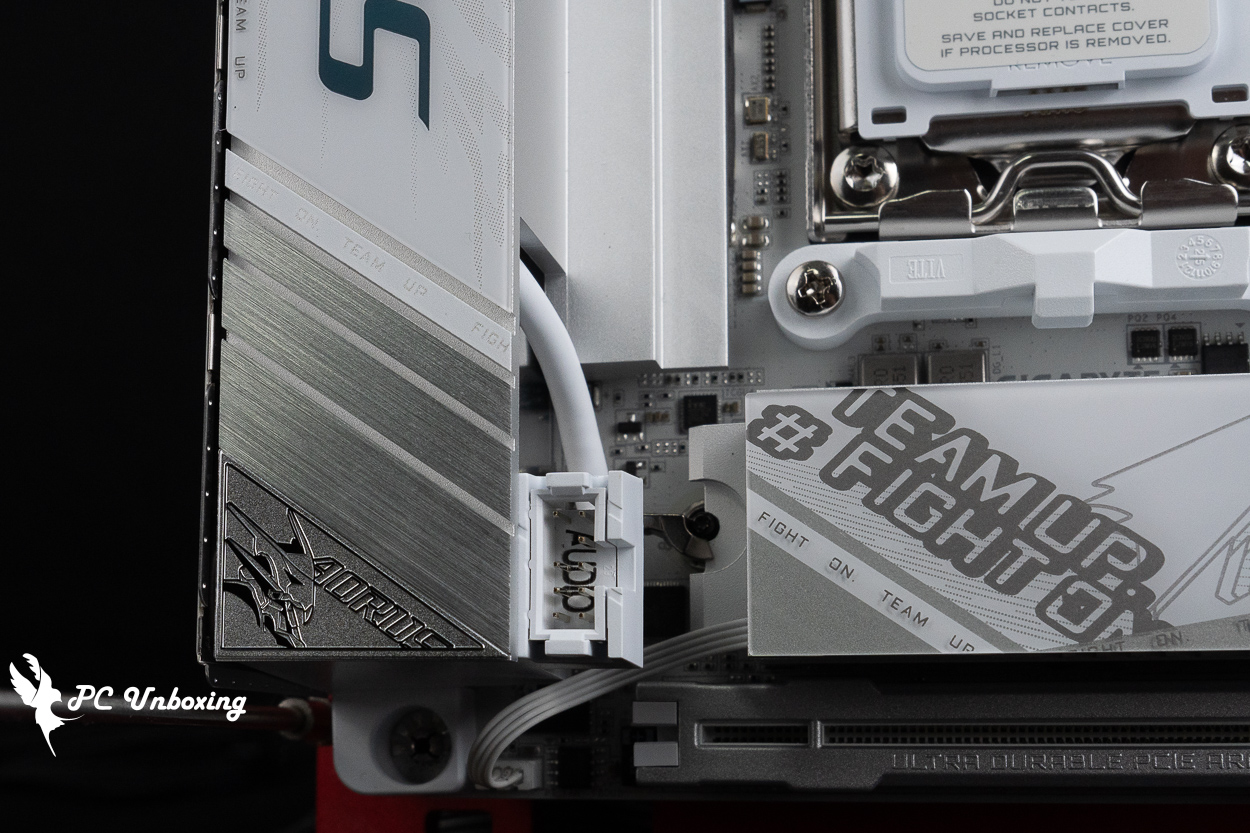
△ There is a front audio jack next to the graphics card slot.
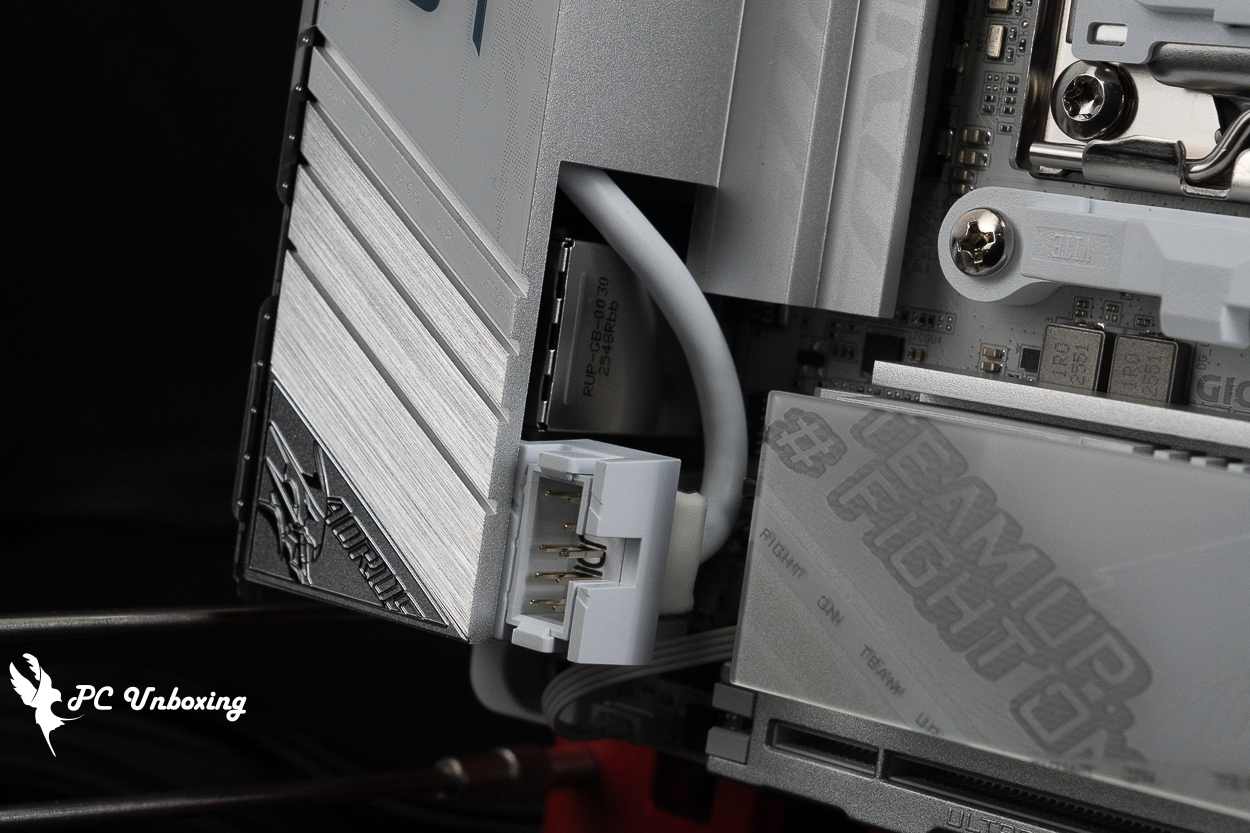
△ The front audio source is routed through the rear I/O.
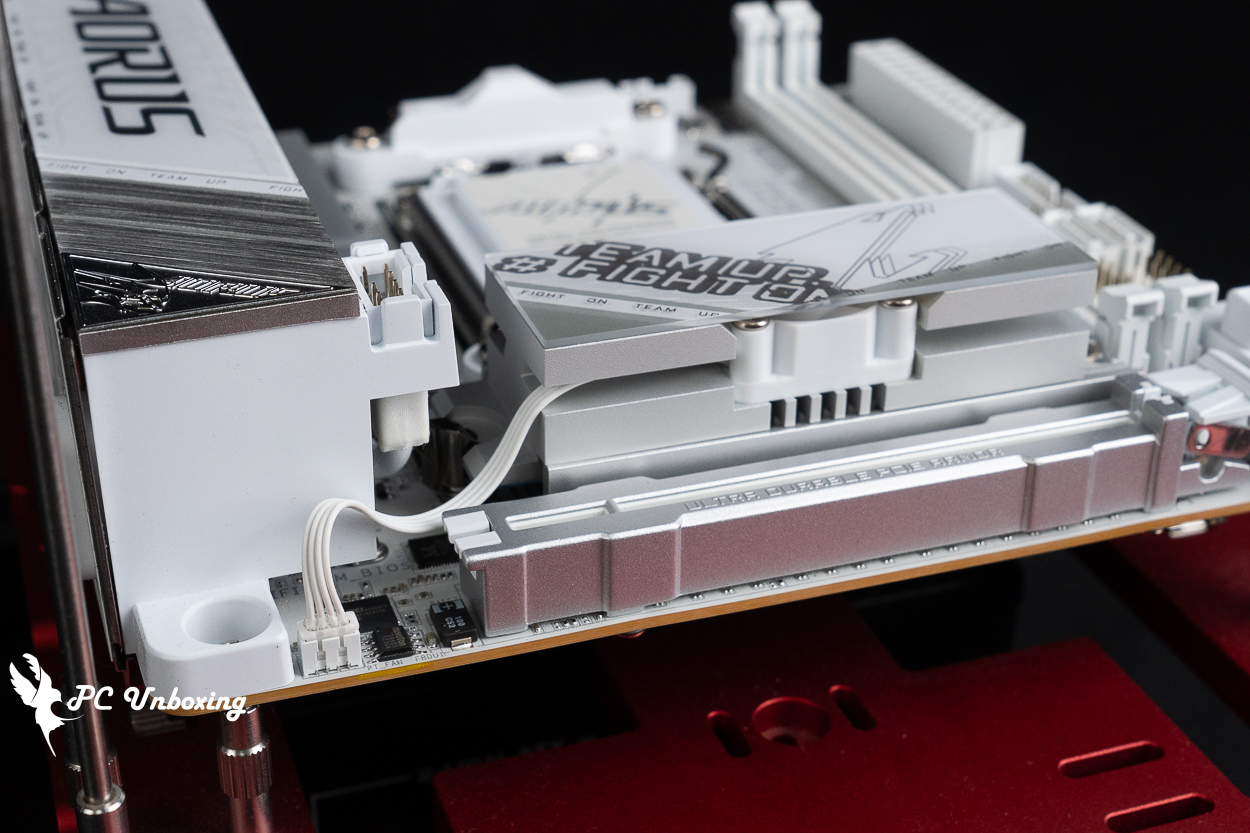
△ This slot is used to control and power the built-in fan of the M.2 Thermal Guard Ext. heat sink.
The X870I AORUS PRO ICE motherboard itself has only two onboard M.2 SSD expansion slots. It is equipped with an M.2 Thermal Guard Ext. heat sink to help dissipate heat from the M.2 SSD located in the graphics card area, and the M.2 heat sink is secured by the M.2 EZ-Latch Click. All M.2 SSD slots feature a dual-sided thermal pad design and the M.2 EZ-Latch Plus.
The M.2 SSD expansion slot next to the graphics card slot features a direct connection to the processor; the M2A_CPU slot there provides PCIe Gen 5 x4 bandwidth and supports 2280-form-factor M.2 SSDs.
The second slot, located on the back of the motherboard, is the M2C_SB slot, which uses the chipset channel and supports 2280 SSDs with PCIe Gen 4 x4 bandwidth.
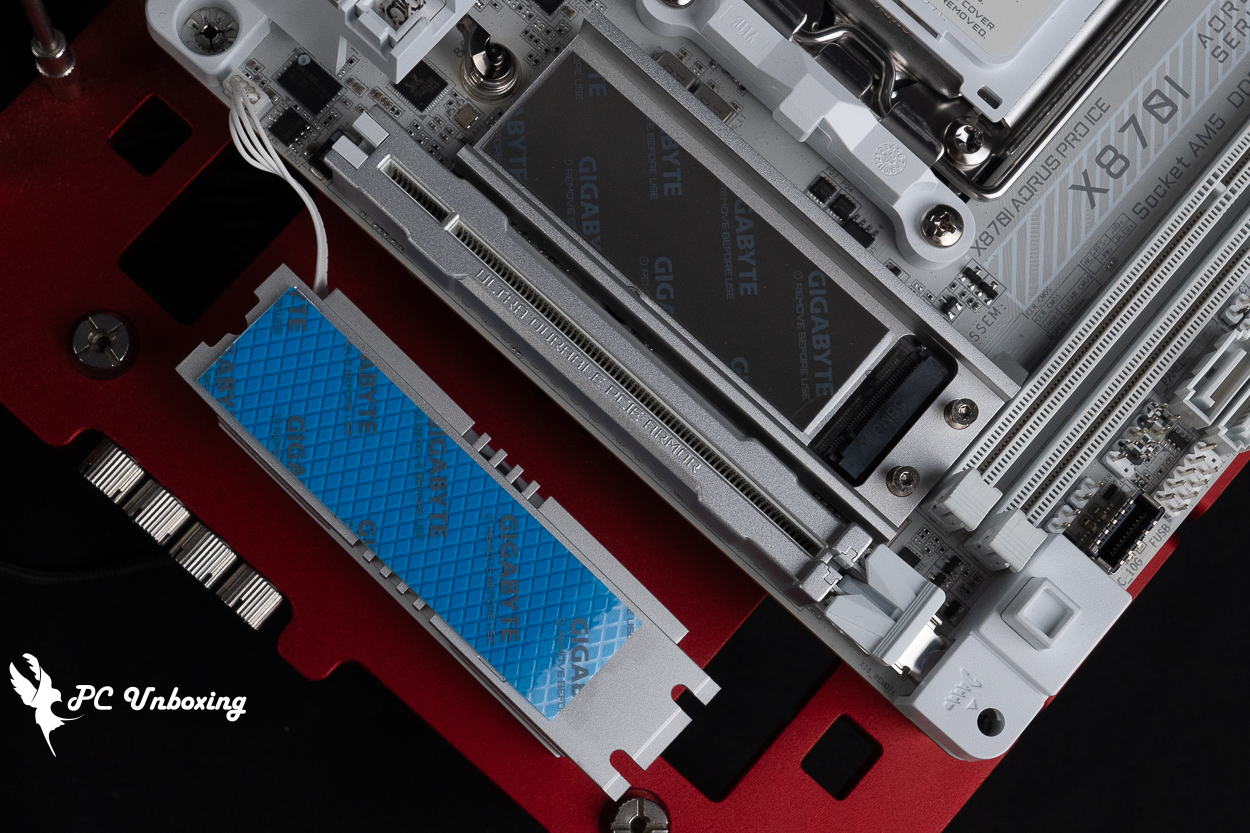
△ M2A_CPU processor-direct-connect PCIe Gen5 x4 expansion slot, equipped with double-sided thermal pads.
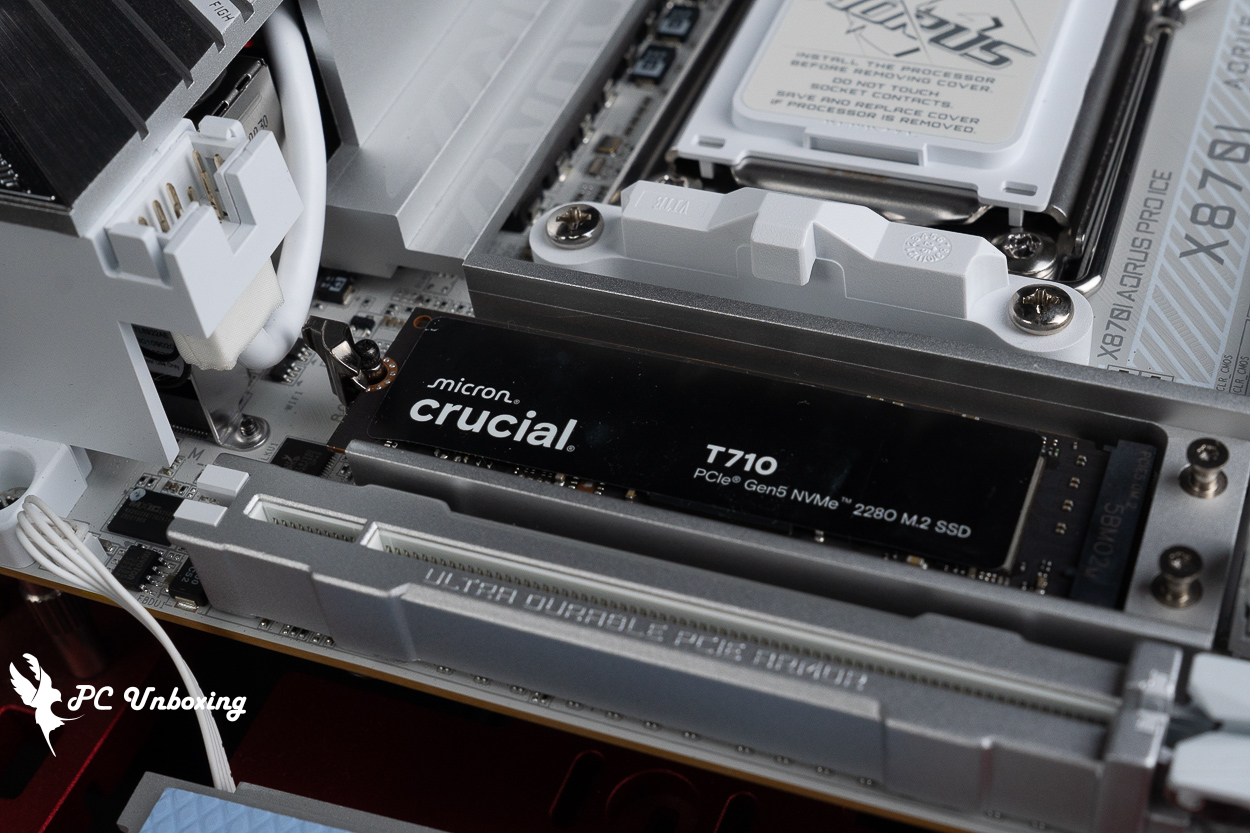
△ Recommended for use with Gen5 SSDs without a heat sink.
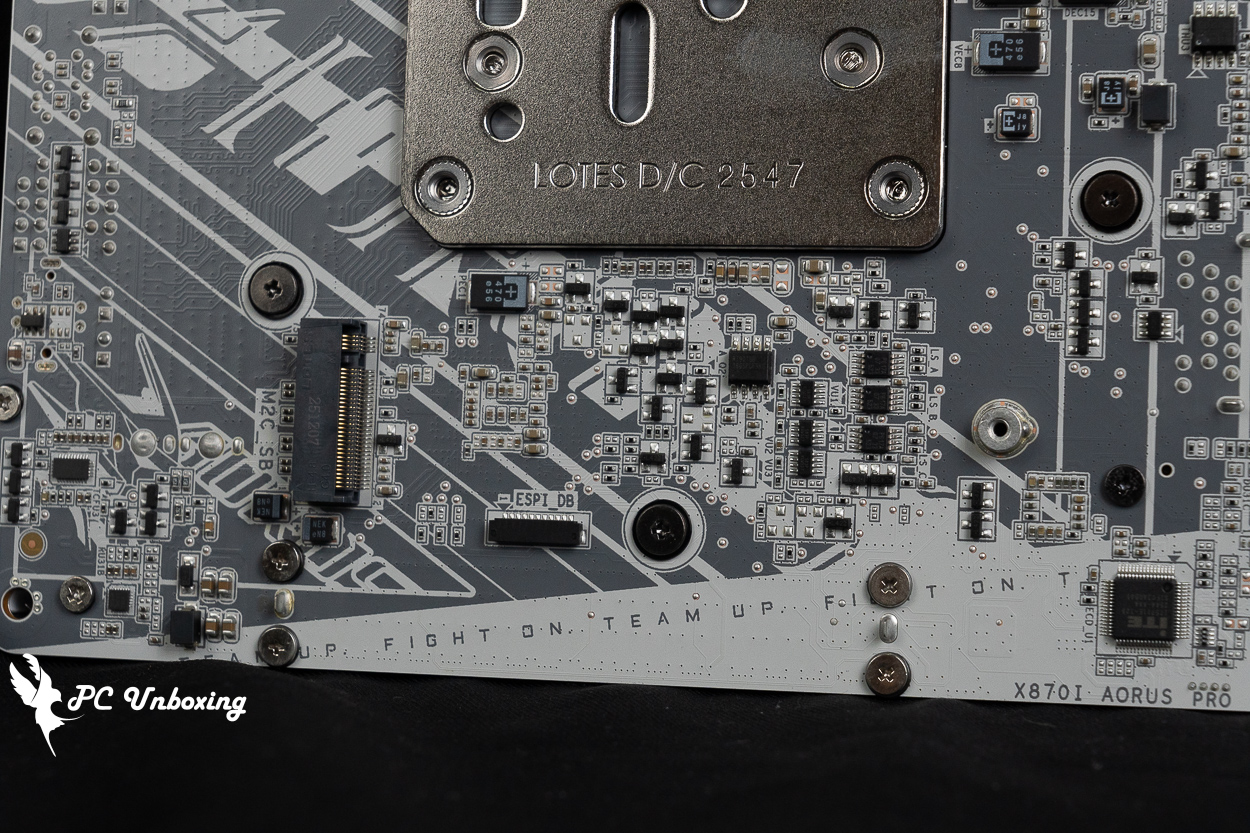
△ The M2C_SB slot on the back of the motherboard uses the chipset channel and offers PCIe Gen4 x4 bandwidth.
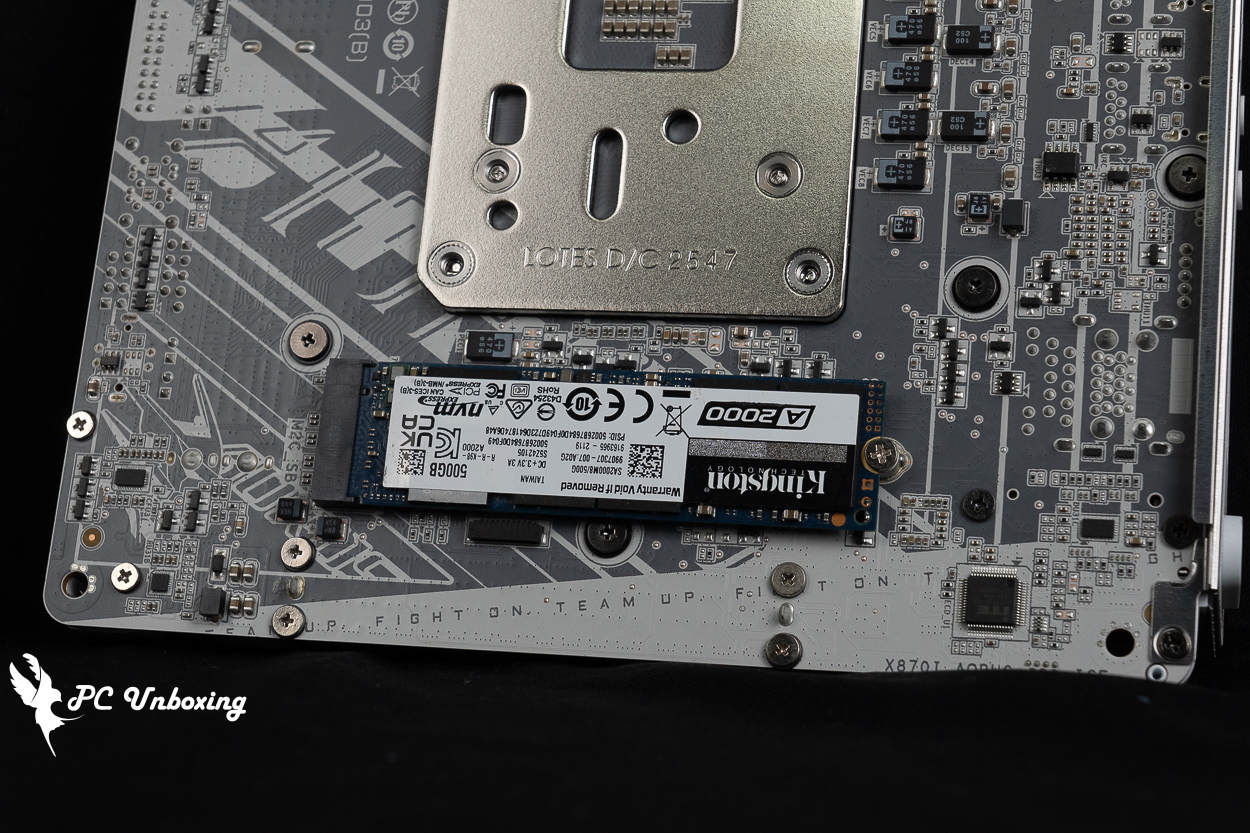
△ We recommend using this with an SSD that does not have a heat sink or one that comes with a built-in copper plate. If the heat sink is too tall, it may cause compatibility issues with the case during installation.
The rear I/O panel features one HDMI 2.1 integrated graphics output (supporting resolutions up to 4096×2160 at 60 Hz), two USB 2.0 Type-A ports (white), a Q-Flash Plus button, two USB 5 Gbps Type-A ports (white), one USB Type-C 10 Gbps port, one USB 4 Type-C 40 Gbps port, two USB 10 Gbps Type-A ports (red), RJ-45 2.5 Gbps LAN port, Wi-Fi 7 antenna port.
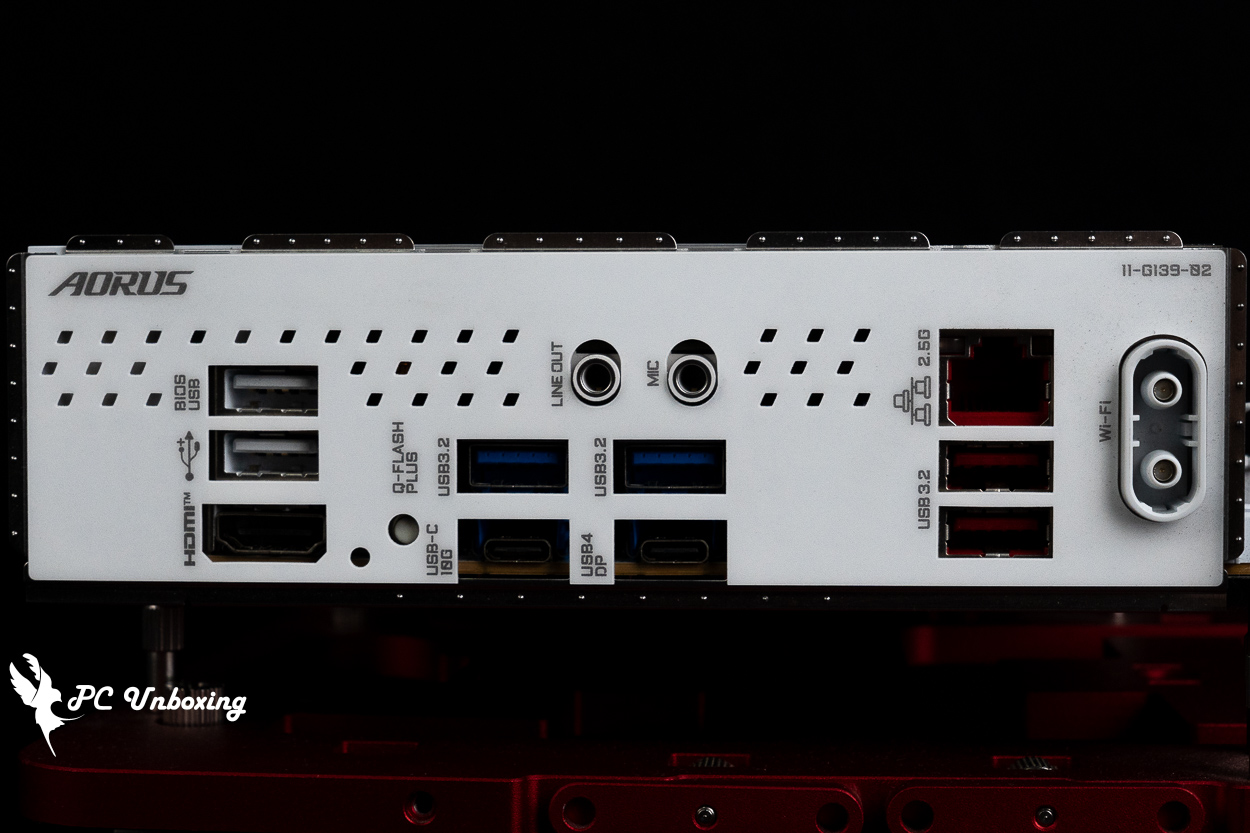
△ Overview of the rear I/O panel; the X870I AORUS PRO ICE features an integrated shroud.
GIGABYTE X870I AORUS PRO ICE Visual Overview: White ITX Motherboard with ARGB Lighting Effects
Then the actual power on and off to show the motherboard on-board lighting effect for your reference.
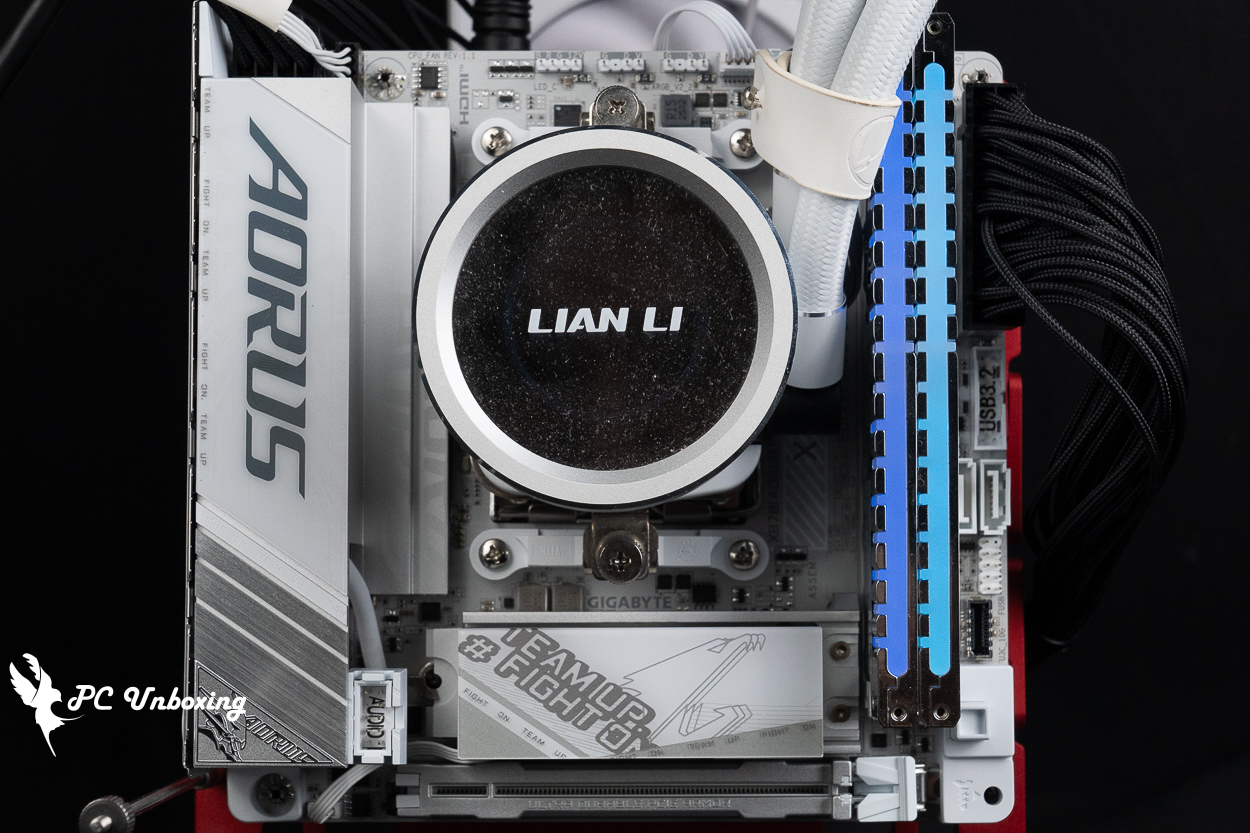
△ The motherboard itself does not have any built-in LEDs; ARGB and RGB effects are achieved through slots or other devices.
GIGABYTE X870I AORUS PRO ICE Performance Test: 9950X3D2 Test Platform and Benchmark Scores
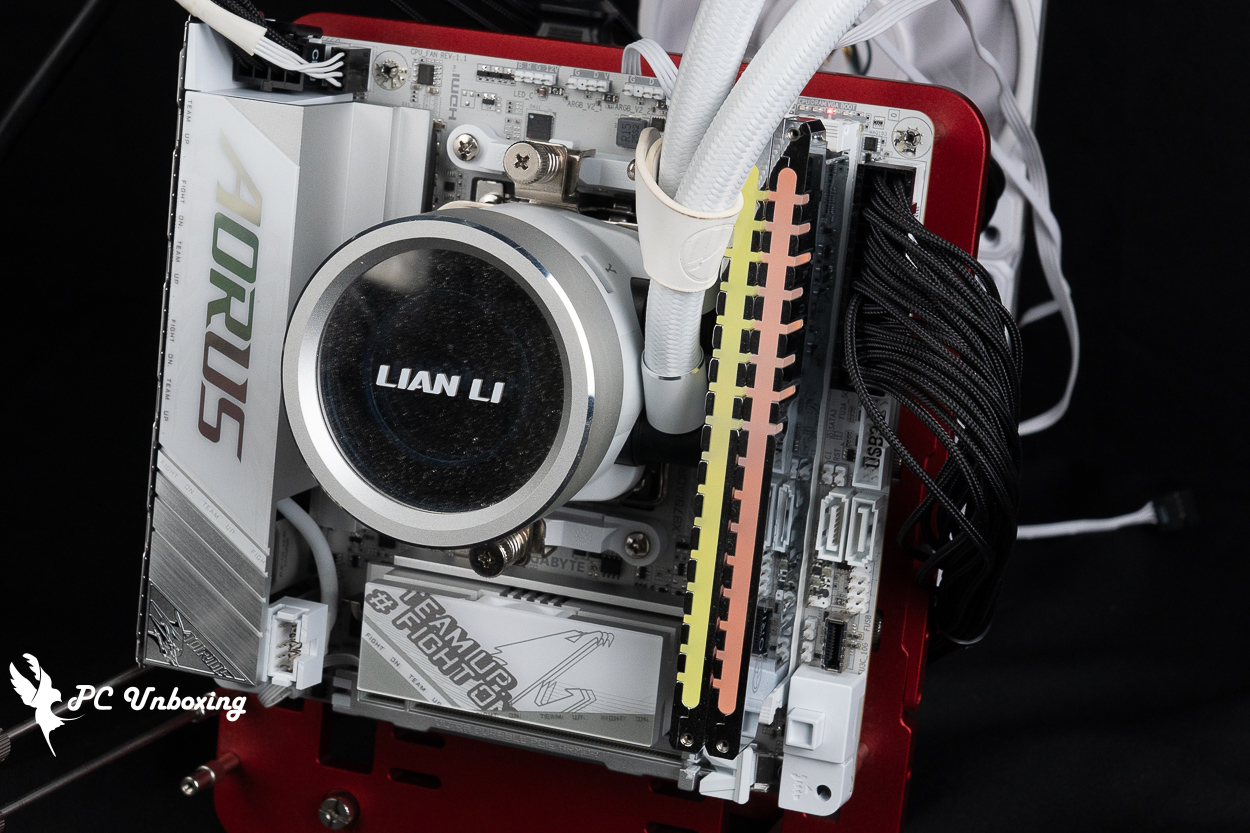
For this motherboard performance test, we used a 16-core, 32-thread AMD Ryzen 9 9950X3D2 Install the processor, update the motherboard BIOS to the latest version, set up the system, and enable Profile 2 for the memory.
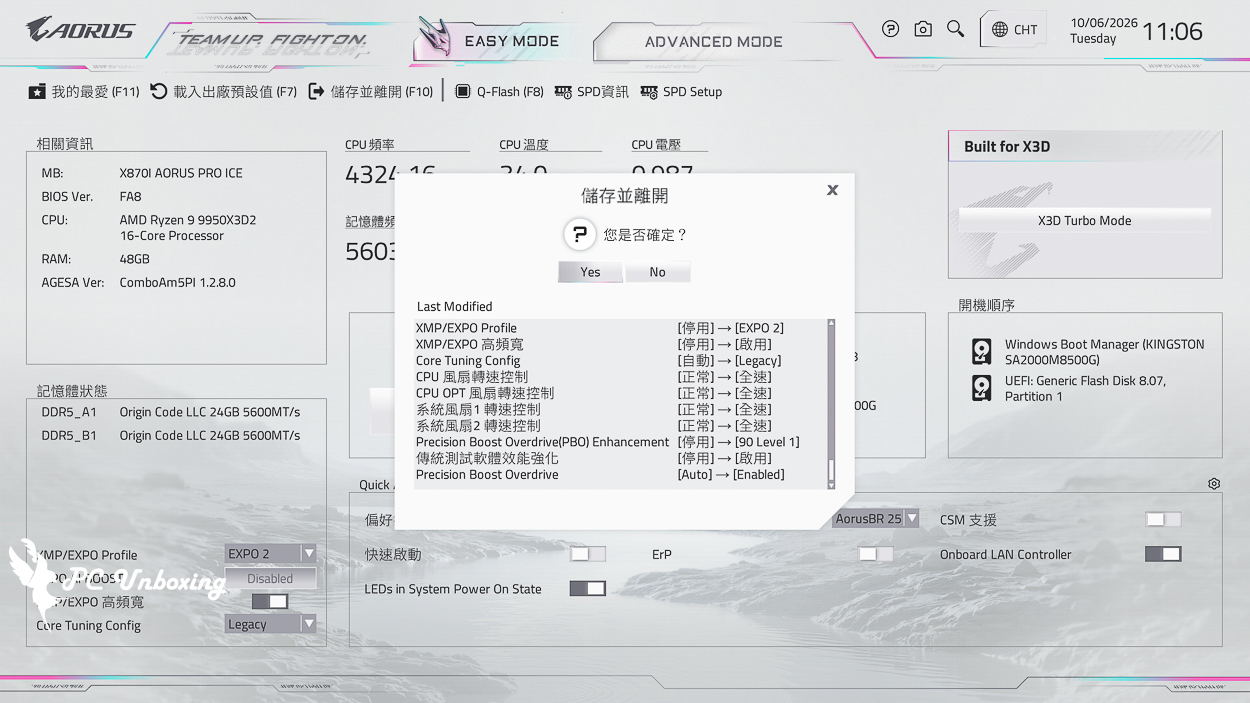
Extra On GIGABYTE High Bandwidth and Low Latency Features, as well as performance enhancements to traditional testing software; AMD PBO was manually set to "Enabled" at Level 1 (90) for testing.
Testing Platform
Processor:AMD Ryzen 9 9950X3D2(PBO activated)
Cooler: LIAN LI GA II Trinity SL-INF 360 (full speed)
Water-cooled fans: 3x LIAN LI P28 (full speed)
Thermal paste: Cooler Master MASTERGEL MAKER 40g (thermal conductivity 11W/mK)
Motherboard: GIGABYTE X870I AORUS PRO ICE (BIOS Version: FA8)
Memory:Origin code vortex DDR5 48 GB (24 GBx2) 8000 MT/s CL36-47-47-108 1.45V
Graphics: NVIDIA GeForce RTX 4060 Ti Founders Edition 8GB
Operating System: Windows 11 Professional 25H2
Chassis:Thermal Grizzly der8enchtable Bare Benchmark Stand
firstly CPU-Z View this testbed hardware information.AMD Ryzen 9 9950X3D2 The processor features 16 cores and 32 threads; codenamed Granite Ridge, it is manufactured using TSMC’s 4nm FinFET process. The motherboard supports PCIe 5.0 lanes, and the BIOS is the latest version available at the time of testing.
We also ran the CPU-Z internal tests for your reference.
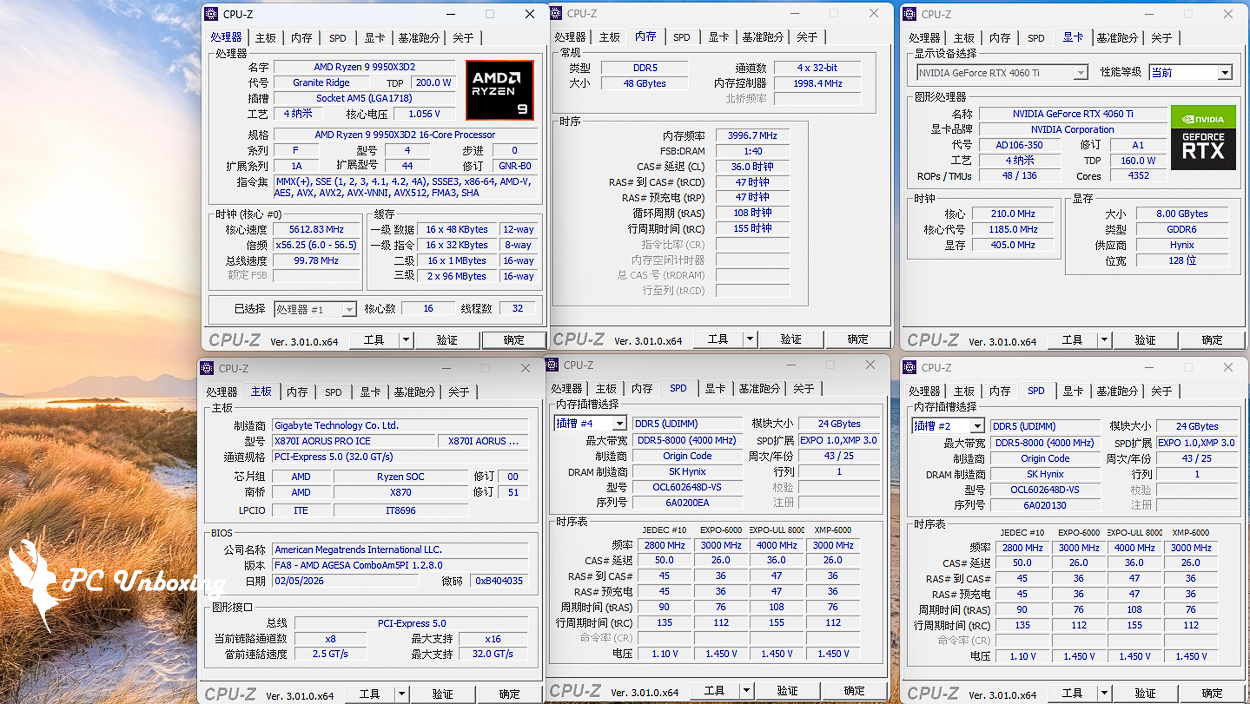
CPU-Z platform information at a glance.
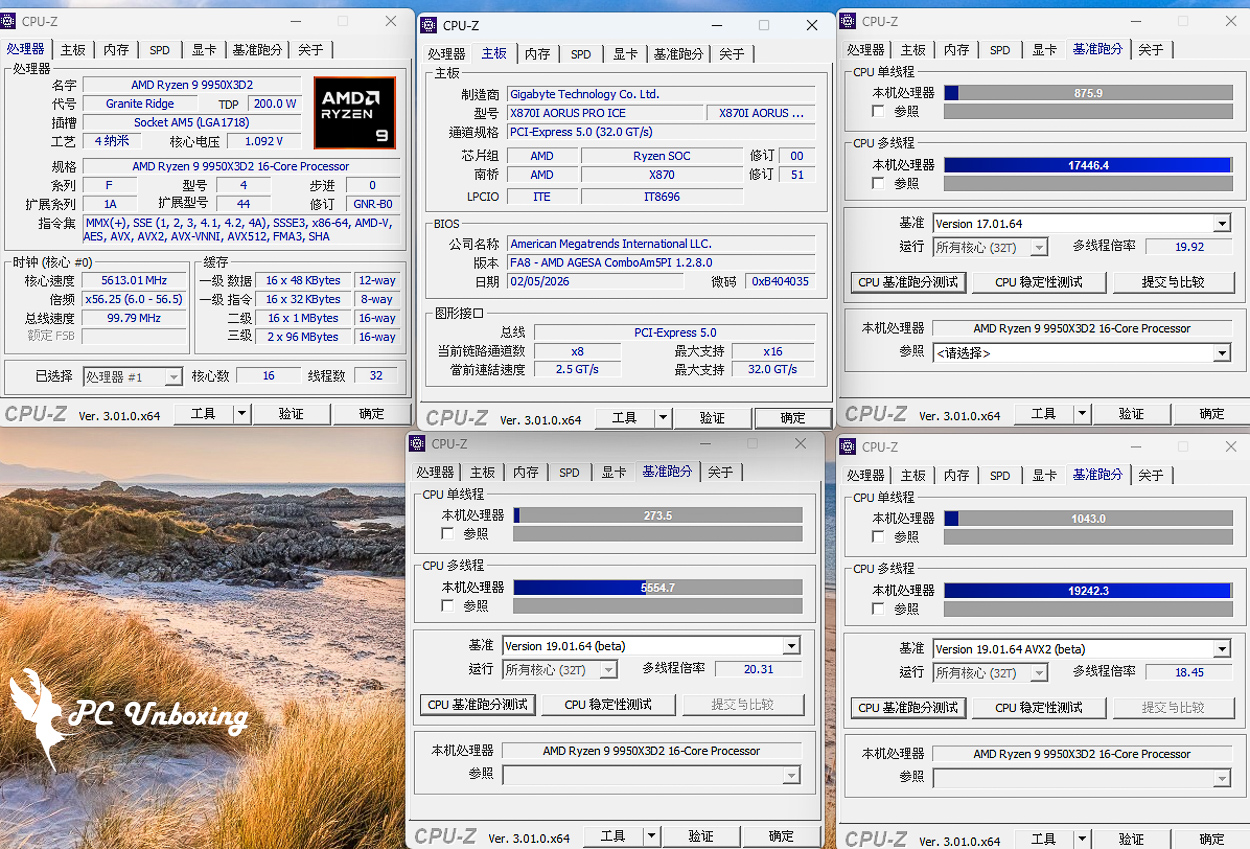
△ CPU-Z internal test score results.
AIDA64 Cache & Memory Benchmark It is mainly used to test the performance of processor caches and RAM. The read/write/copy bandwidth performance score represents the rate of transfer between CPU and memory, which means the efficiency of data throughput (the higher the score, the better), and the time delay score of accessing data indicates the responsiveness of the memory system.
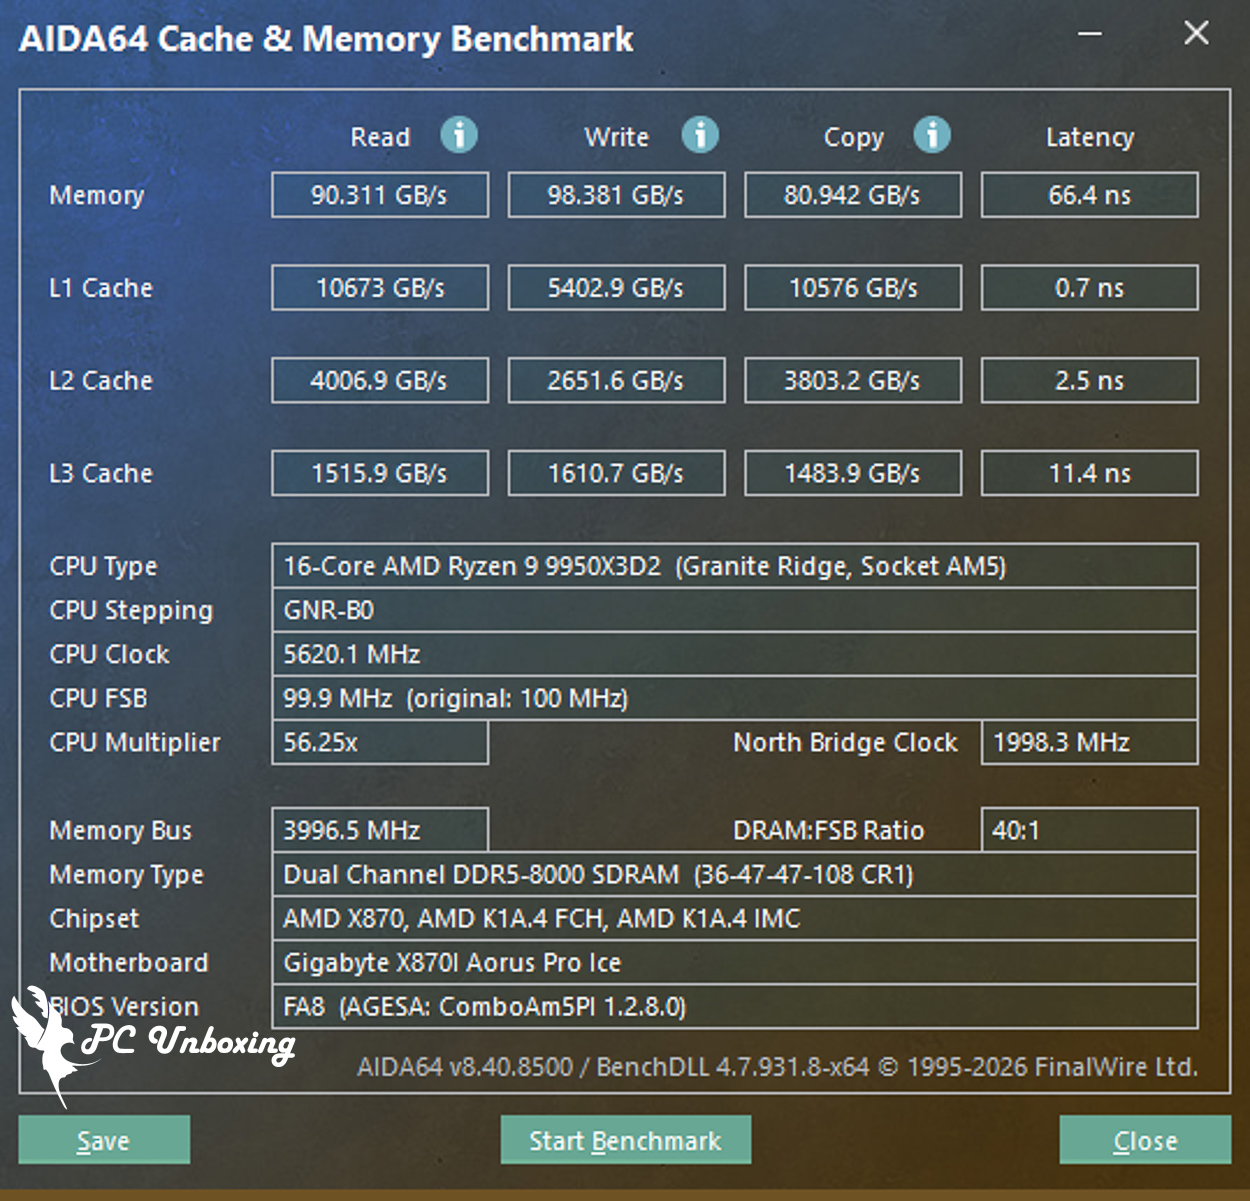
△ AIDA64 cache and memory test.
by Maxon Cinebench An industry-standard benchmarking software, Cinebench 2026 tests GPU and CPU performance using Maxon's powerful Redshift rendering engine.
The new version of Cinebench 2026 adds a test for evaluating the performance of SMT-enabled CPU cores, which means that it is now possible to test: GPU, processor full-core, processor single-core, and processor single-thread performance.
Based on the latest Cinema 4D 2026 and Redshift code, and using the updated Clang V19 compiler, the benchmarking accuracy of contemporary and next-generation processors has been improved to test whether the equipment is stable under high loads, whether the thermal solutions of the desktop or laptop are sufficient to cope with the demands of long-term operation in order to maximize the potential of the CPU, and whether the machine is capable of handling demanding 3D tasks. and whether the machine is capable of handling demanding 3D tasks.
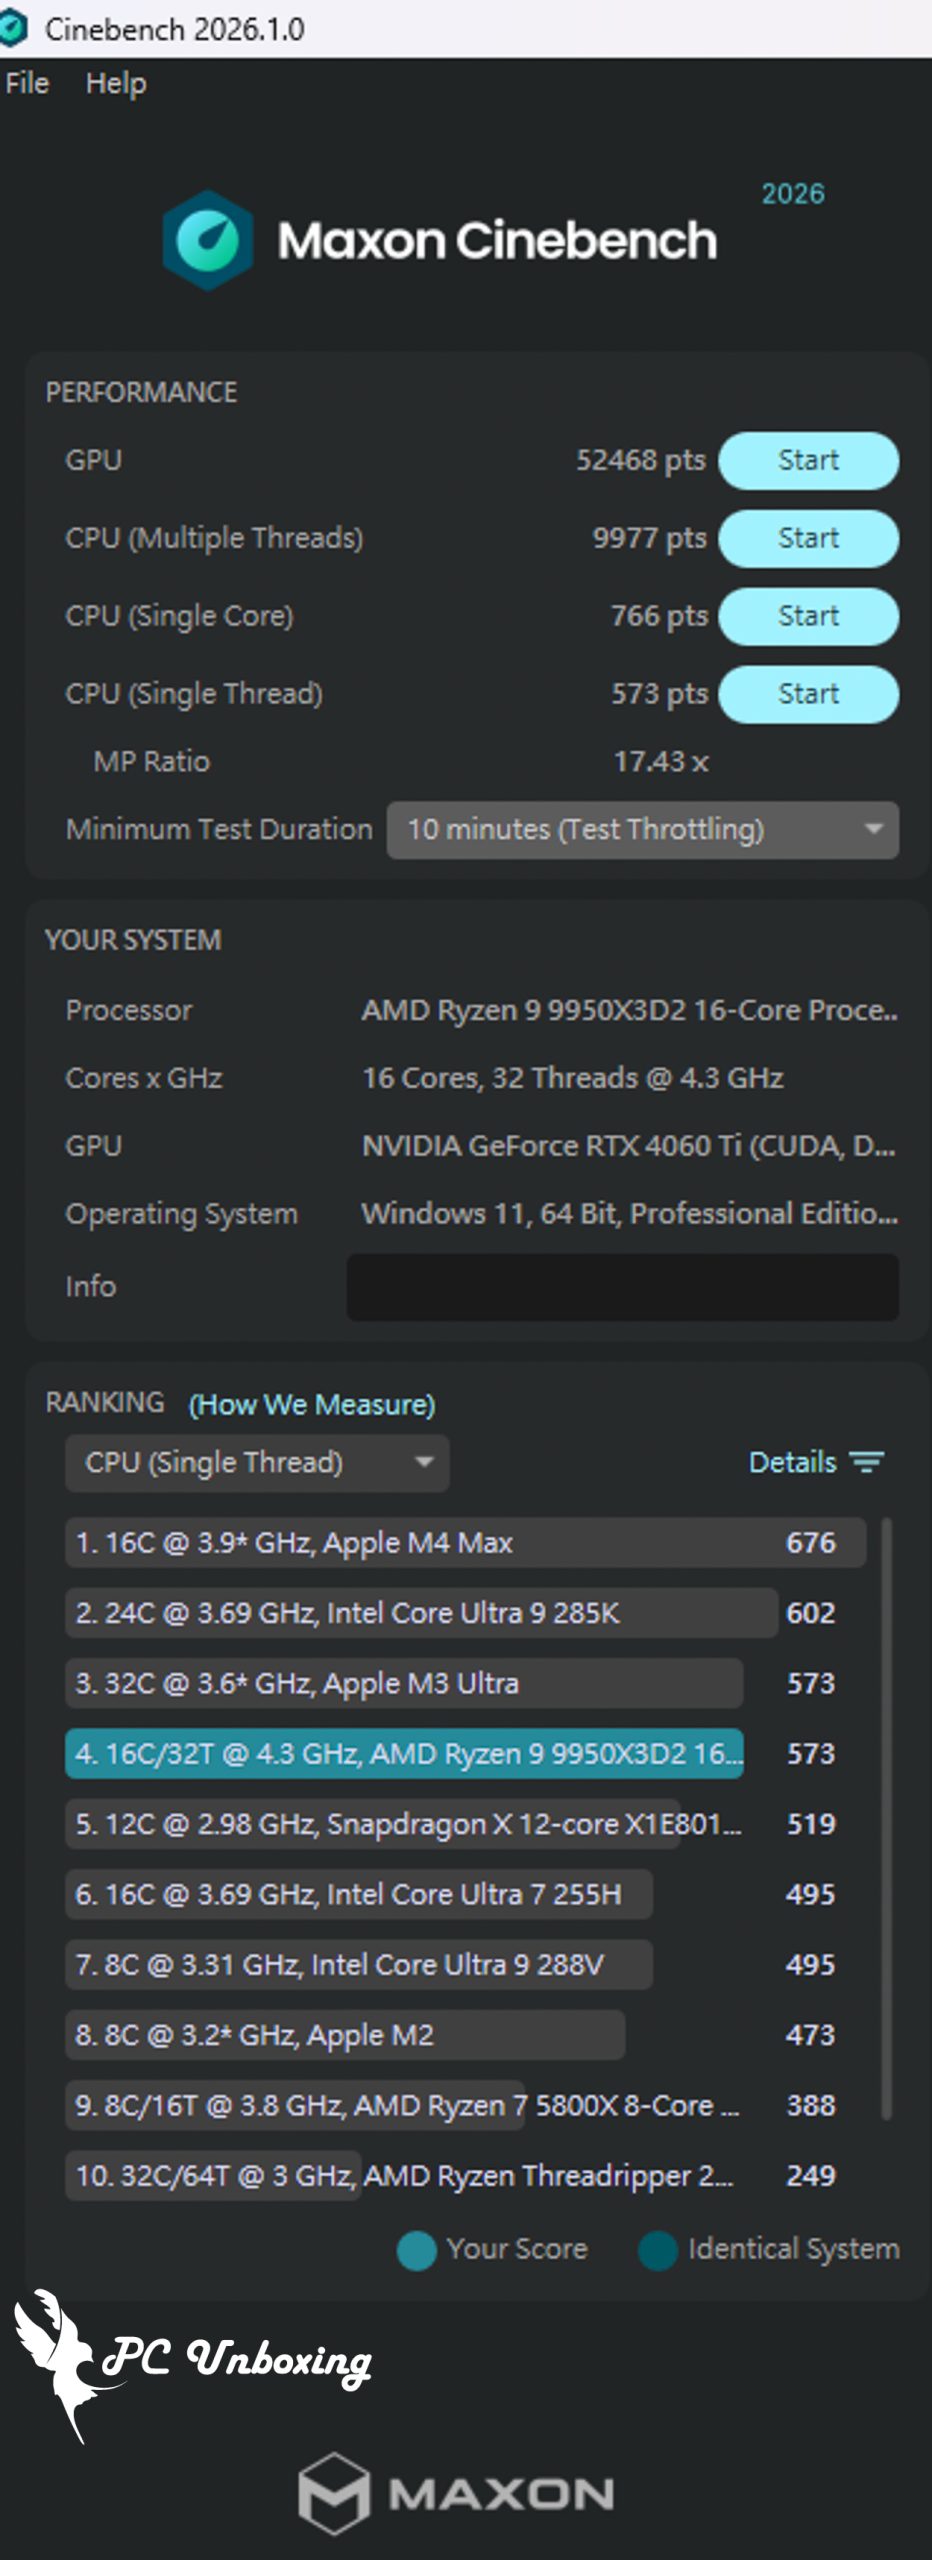
△ Cinebench 2026.
V-Ray 6 Benchmark V-Ray Engine Test Software is an image rendering program developed by Chaos Group. The free Benchmark examines the rendering speeds of the CPU and GPU on the V-Ray Engine, which tests the rendering performance of the processor.
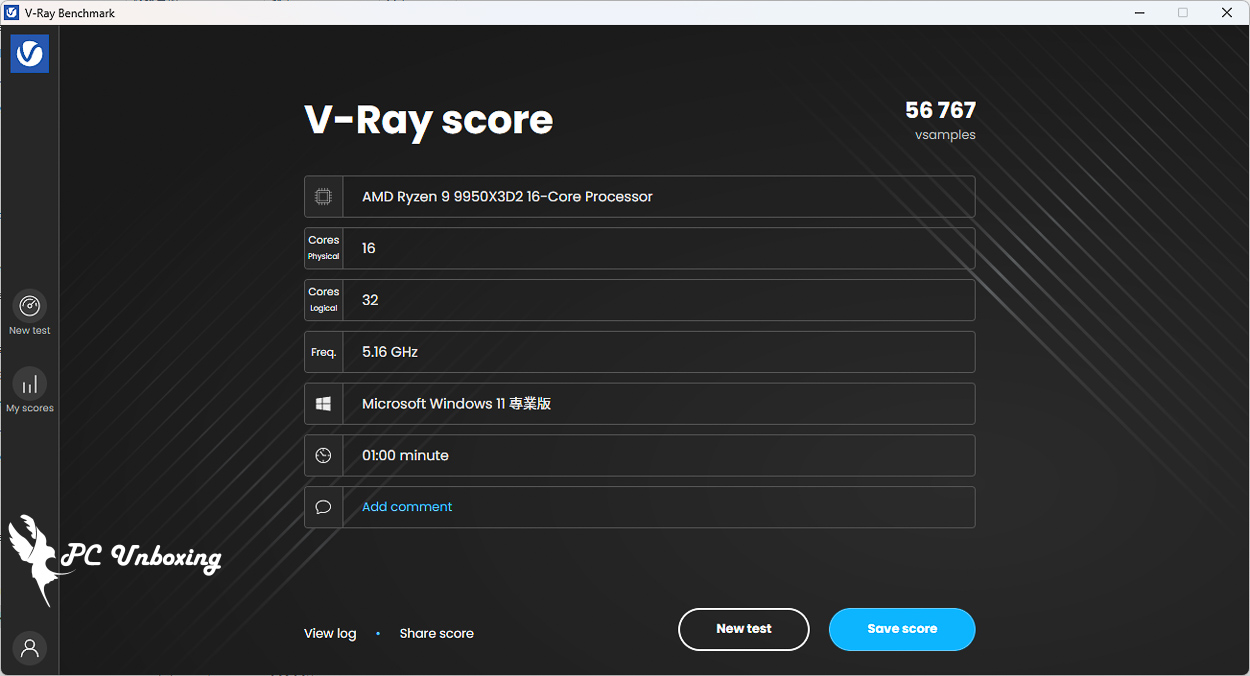
△ V-Ray 6 Benchmark.
Corona Benchmark is a free test software based on the Corona 10 rendering core that evaluates the performance of a system by using Corona 10 rendered scenes to measure the rendering speed of the system in terms of rays per second (rays/s). More rays per second means faster rendering, and the scores are linearly scaled. For example, a system with 6 million rays per second will have twice the rendering speed and performance of a system with 3 million rays per second.
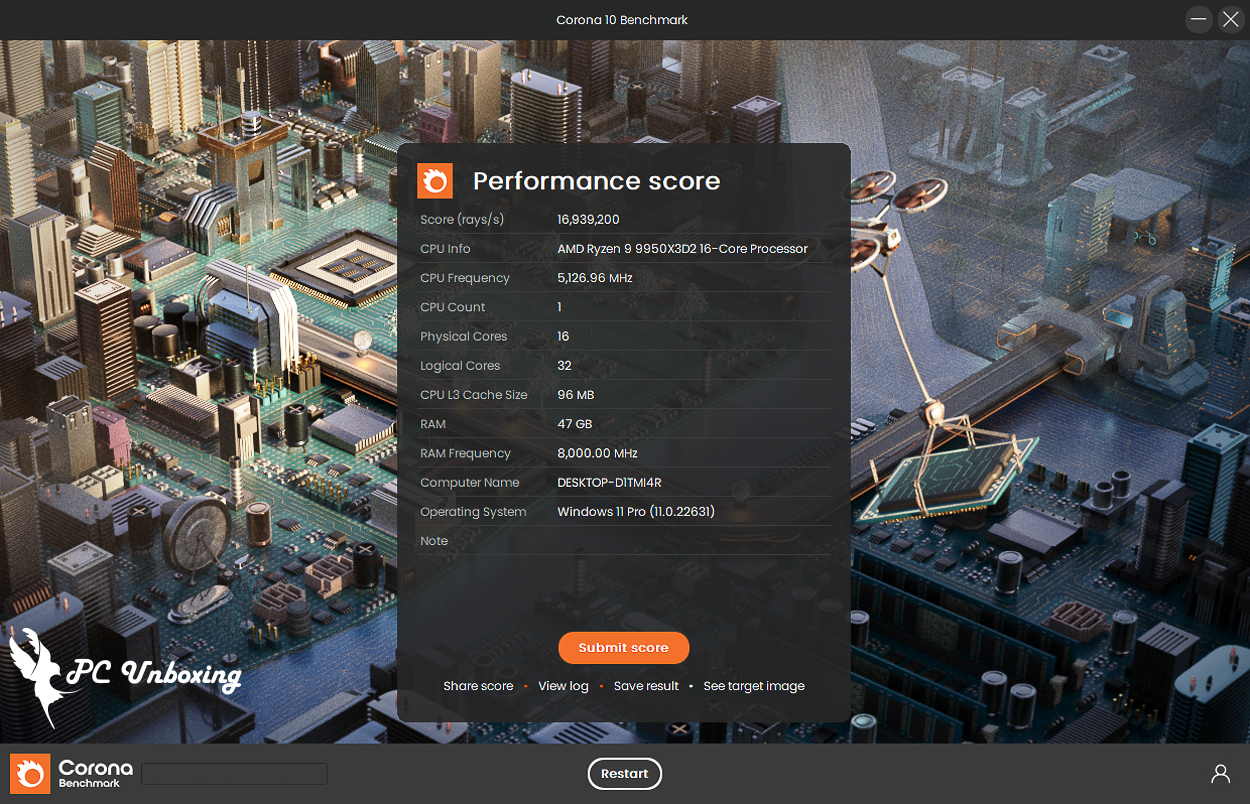
△ Corona Benchmark.
OCCT CPU BENCHMARK CONFIGURATION Single thread and Multiple threads will be tested using AVX and SSE instruction sets respectively.
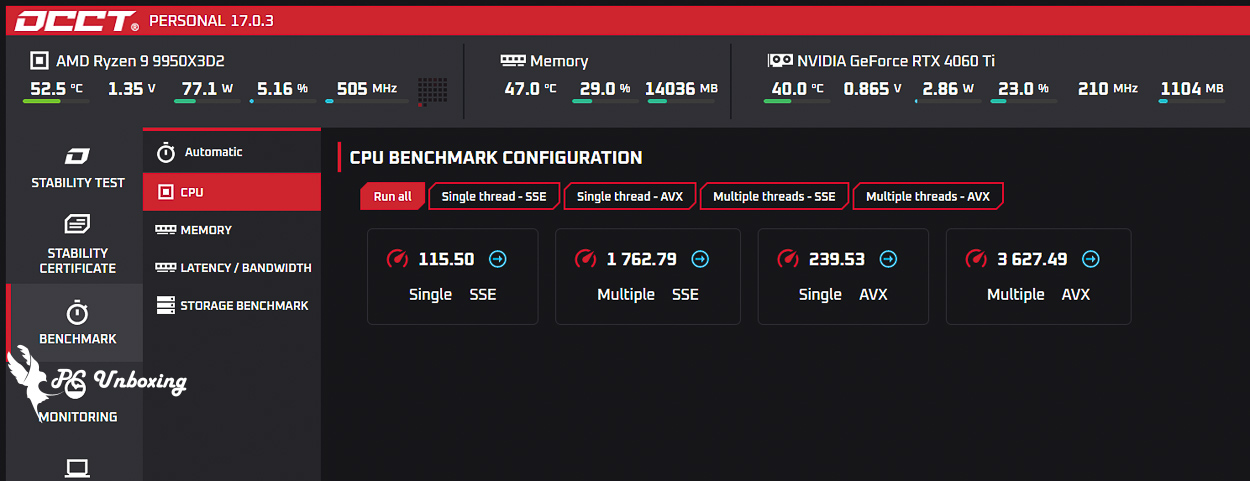
△ OCCT CPU BENCHMARK CONFIGURATION.
CrystalMark Retro It is a comprehensive benchmark software that measures CPU, HDD, 2D graphics (GDI) and 3D graphics (OpenGL) performance. Developed by hiyohiyo and koinec, the authors of CrystalDiskMark and CrystalDiskInfo, the results are individual scores and not in any common units.
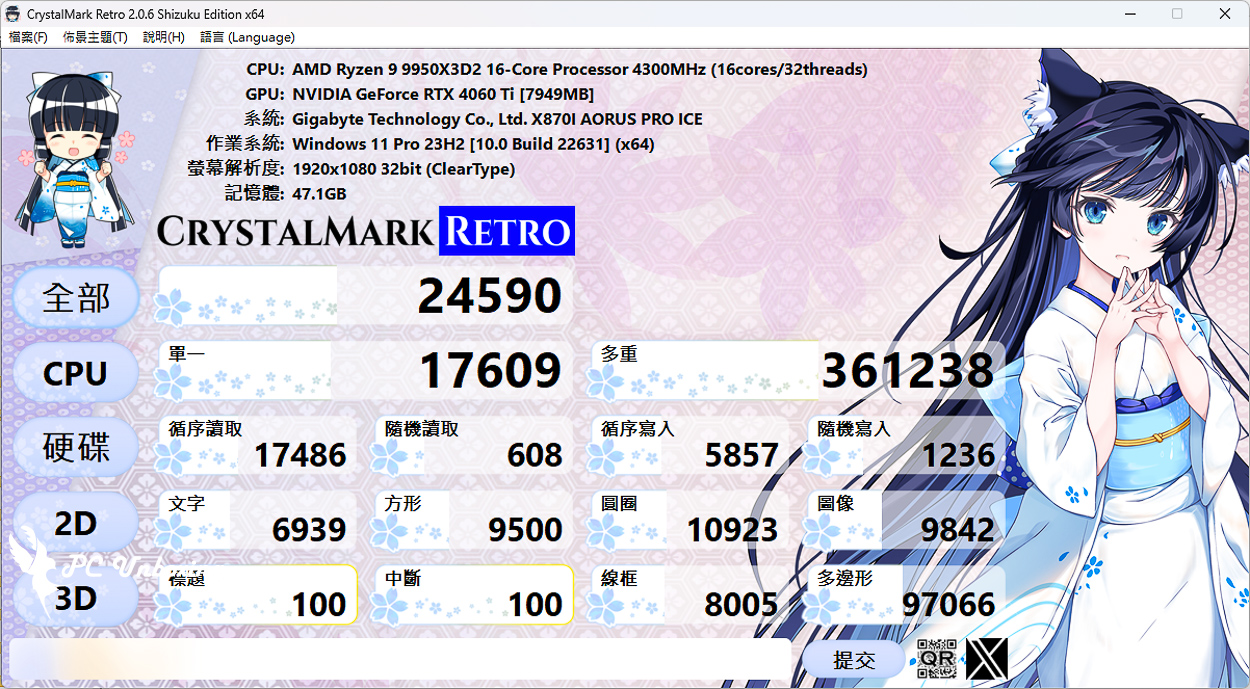
△ CrystalMark Retro.
Use with empty disk CrystalDiskMark Software to testMicron Micron Crucial T710 1TB PCIe Gen5 NVMe 2280 M.2 SSD Read and write performance on the motherboard was tested using the default profile.
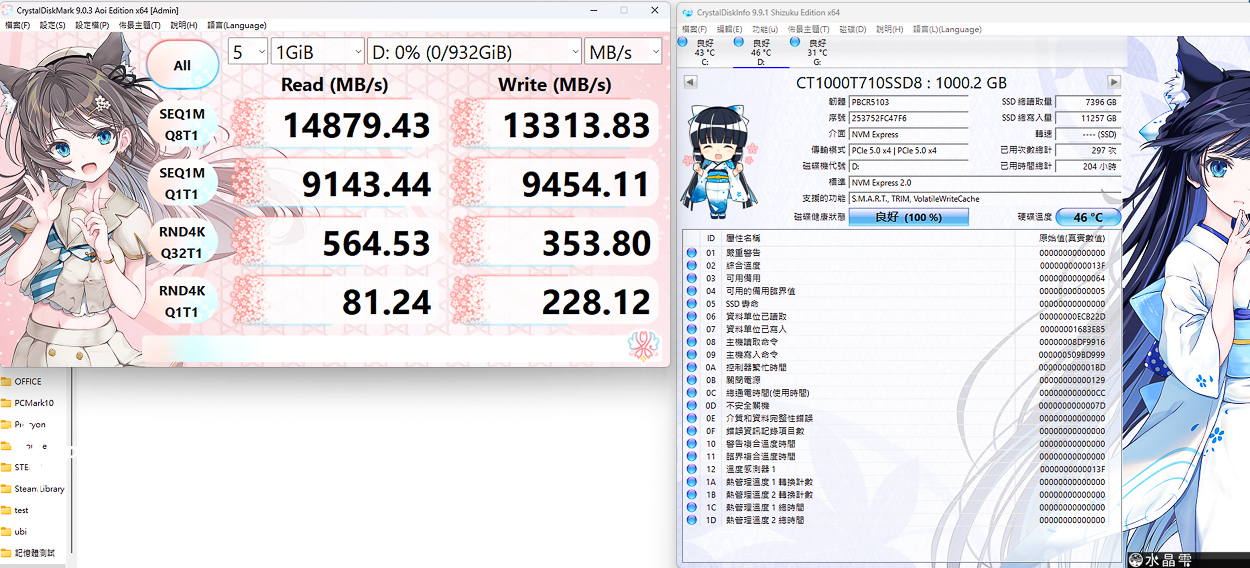
△ CrystalDiskMark Settings: NVMe SSD / Profile: Default, Sequential Read/Write and Random Read/Write test results.
GIGABYTE X870I AORUS PRO ICE Game Performance Testing: 3DMark Benchmark Scores and CPU Profile Grades
Next up, the 3DMark series, one of the most benchmarks for gaming scores, was used to compare the theoretical results of the same graphics platform with different processors through a series of tests with different picture quality and different GPU APIs.
3DMark CPU Profile This test will test the performance of MAX, 16, 8, 4, 2, 1 threads respectively, while the performance of 16 threads and above is more for 3D rendering or audio/video professional work, and most of the mainstream DirectX 12 game performance can refer to the score of 8 threads, while the score of 4 and 2 threads are related to the old games developed with DirectX 9.
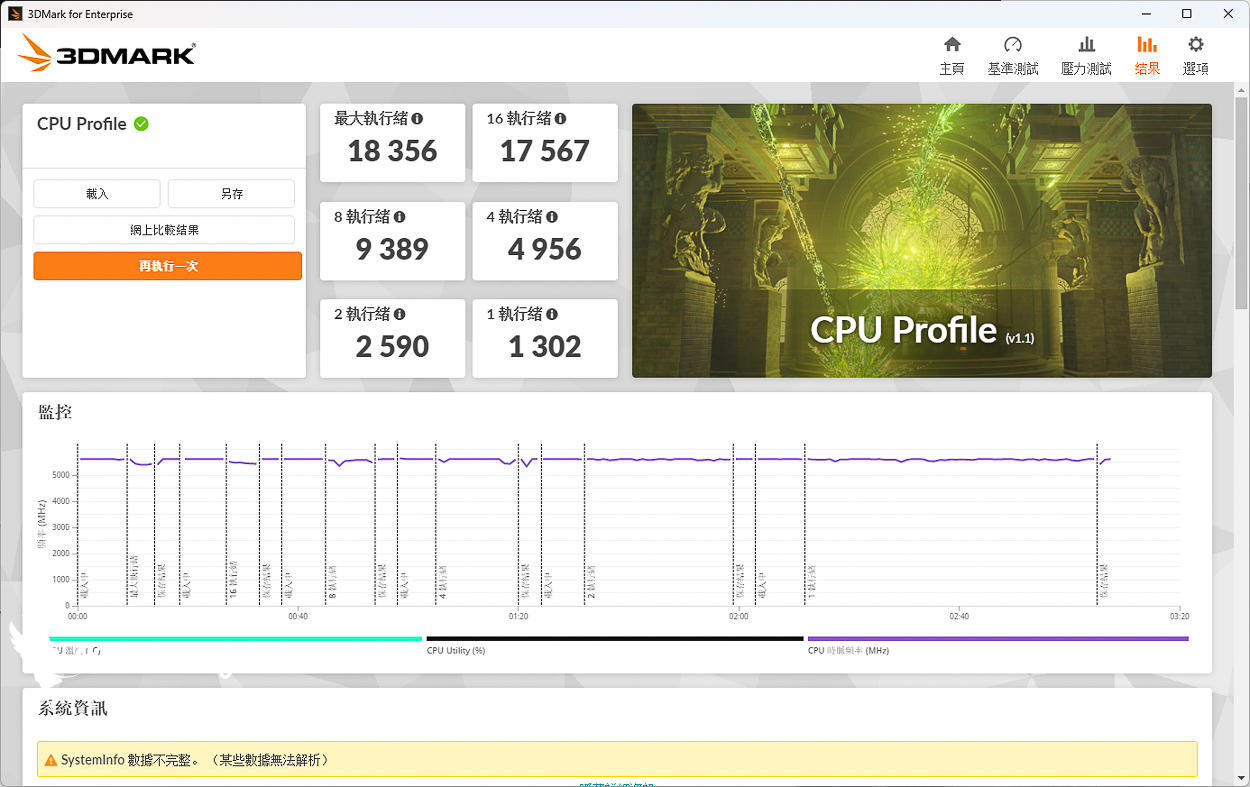
△ 3DMark CPU Profile.
In addition, the author has also used the commonly used game performance simulation test 3DMark Fire Strike。
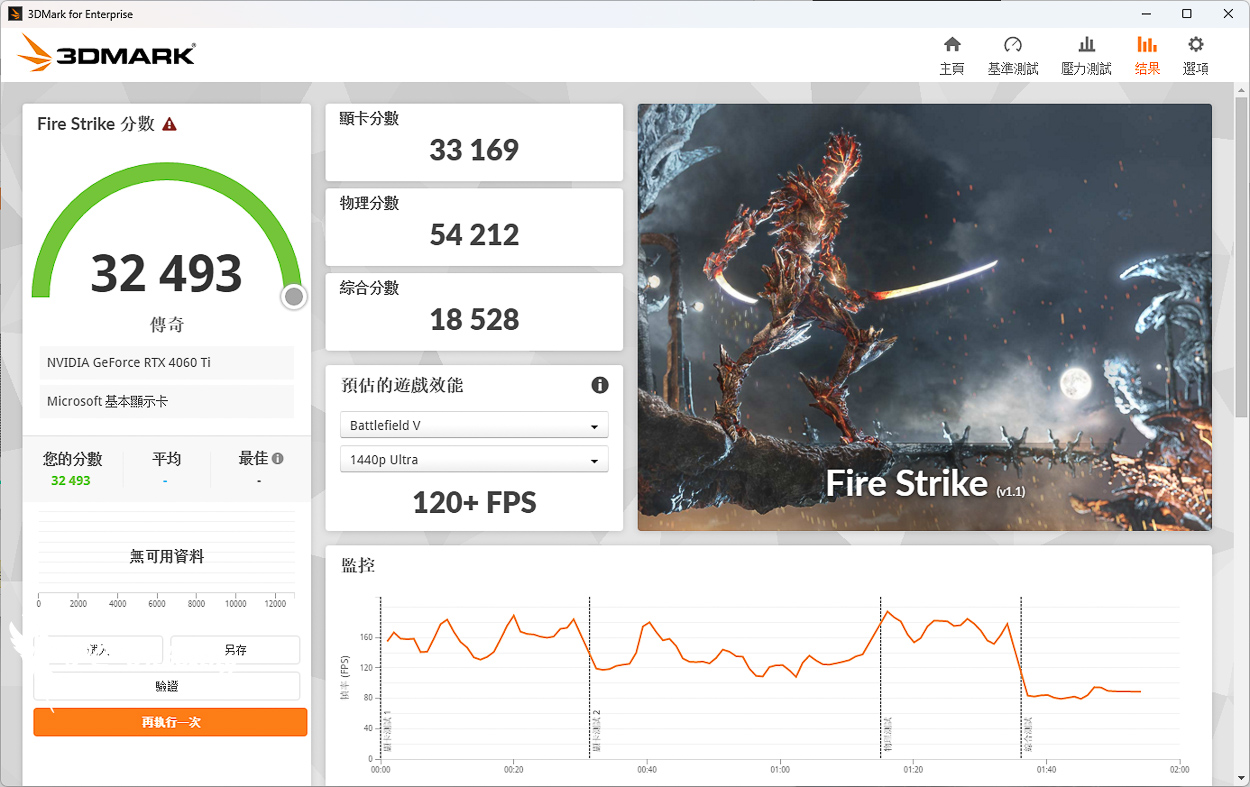
△ 3DMark Fire Strike.
GIGABYTE X870I AORUS PRO ICE Review Summary: Comparison of Specifications with the B650I AORUS ULTRA
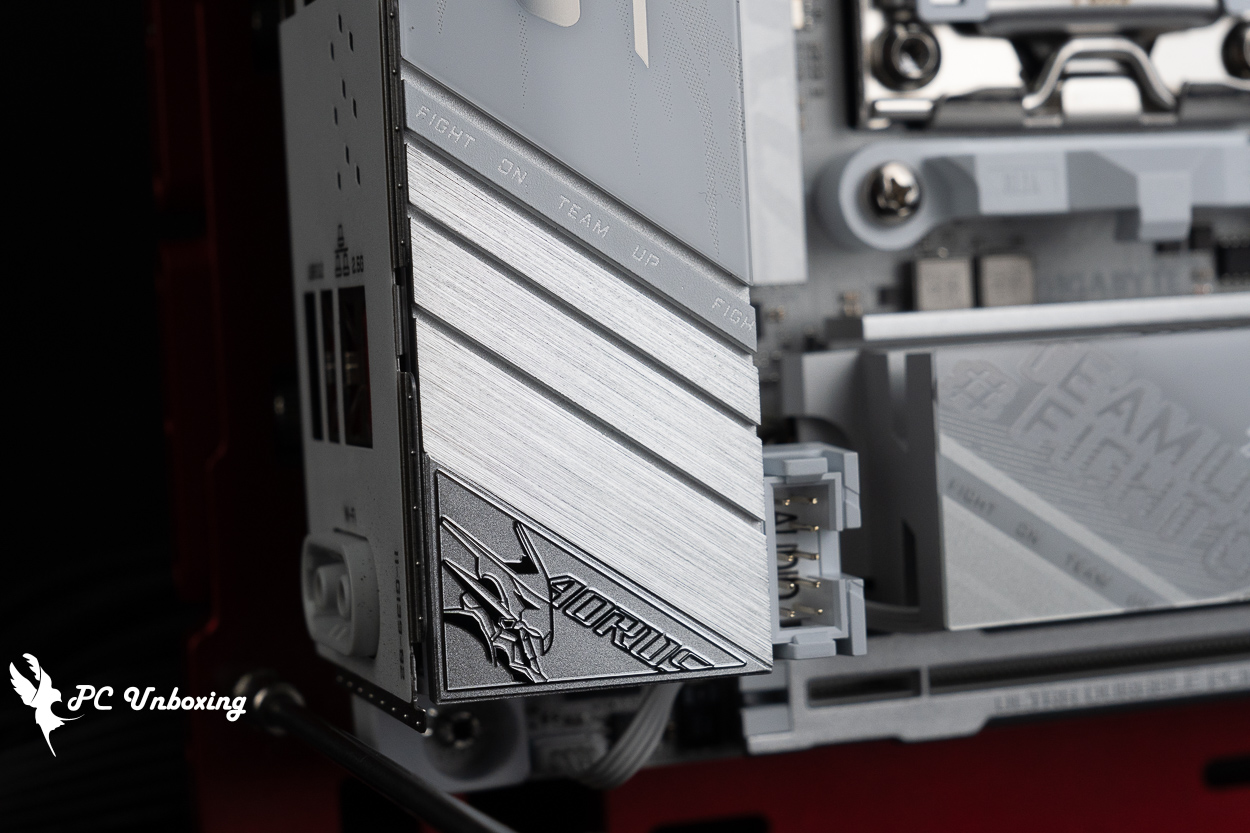
When comparing Gigabyte’s X870I AORUS PRO ICE to its predecessor, the AM5 ITX motherboard B650I AORUS ULTRA—setting aside differences in aesthetic design—what are the actual differences between them? In terms of storage expansion, the X870I features an additional USB4 Type-C port on the rear panel, allowing for the connection of USB4 expansion docks and hubs. However, due to total bandwidth limitations, the channel is reserved for USB4 use, the X870I has only two M.2 slots; the B650I, on the other hand, has three M.2 slots. However, I believe that for everyday use, an ITX mini PC is well-suited for use with a dock,
In terms of hardware specifications, the X870I features a 10-layer PCB, while the B650I has a 12-layer PCB; the X870I has a slight edge in the number of power phases. The X870I AORUS PRO ICE features the M.2 EZ-Latch Click design, which makes installation and removal more convenient, and it does not require the GC-B650I FRONT CARD expansion card, as all slots are already integrated onto the board, Personally, I’m not a big fan of the old expansion card design—it makes cable management quite inconvenient. However, the B650I AORUS ULTRA features a reinforced backplate to enhance PCB strength. Given these differences in specifications, whether or not to upgrade depends on your specific usage needs.

Yun
Drinks with less than full sugar are colored water. Crossing Turbid Creek, full sugar is not a crime!
Related articles

Gamer Specialization ASRock B860M Steel Legend WiFi Motherboard Unboxing Review
GIGABYTE B850 AORUS ELITE-P ICE Unboxing and Review | "Sculpted Maiden" Themed ATX Motherboard, Performance Tests, and Specifications Breakdown

 繁體中文
繁體中文  English