
Light & Shadow Aquarium LIAN LI O11D EVO RGB Chassis Unboxing Review
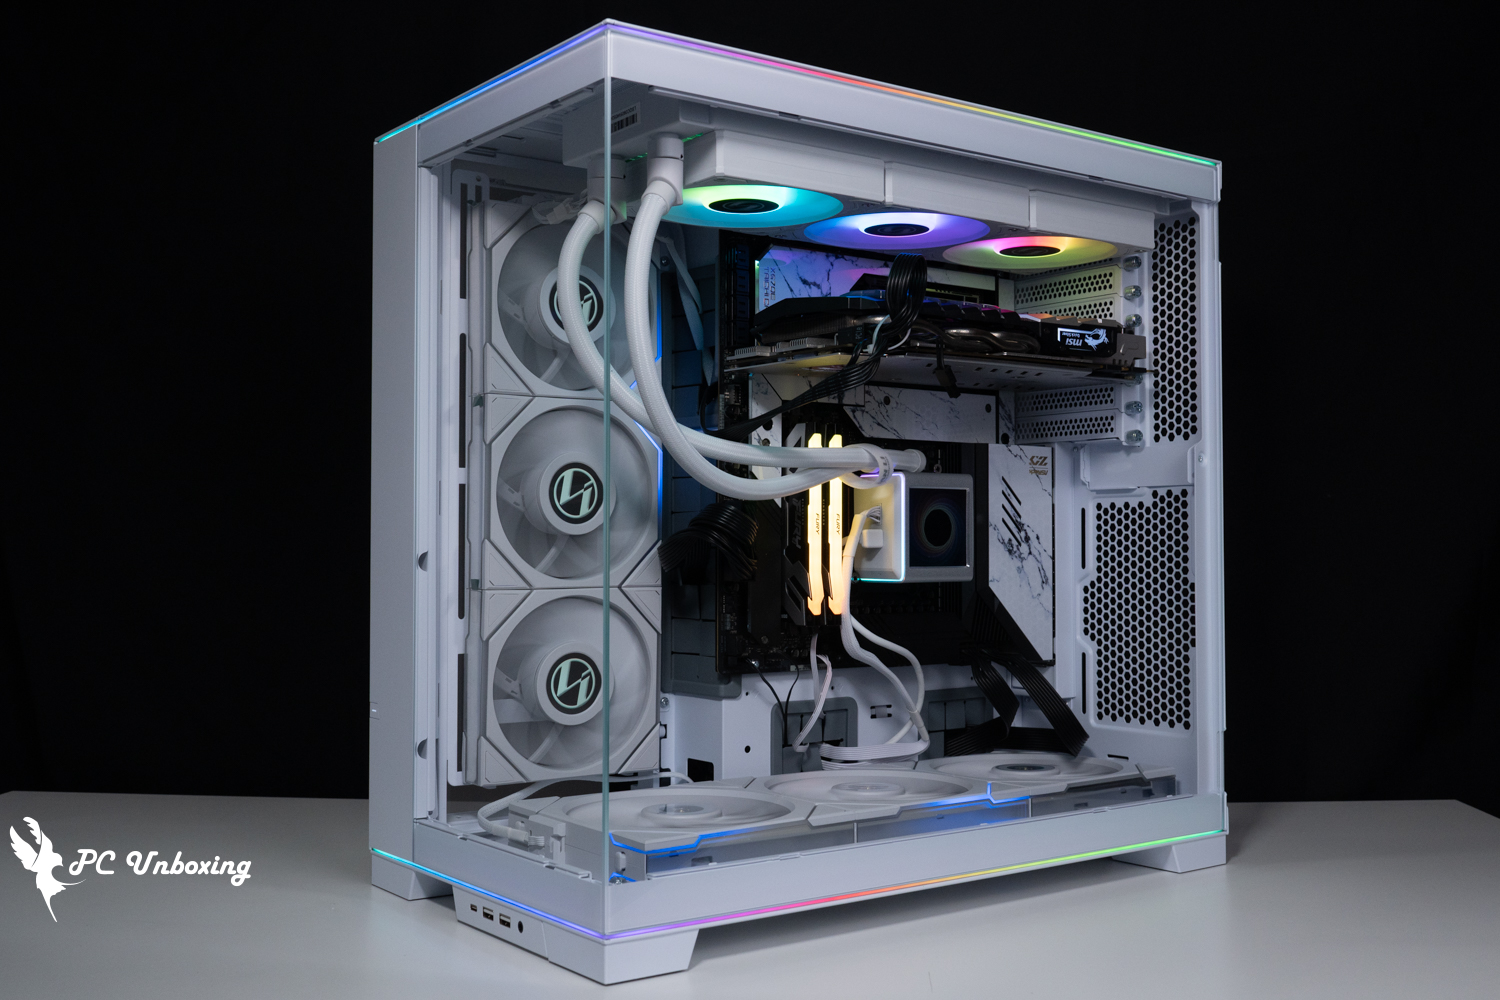
The O11 Dynamic series of chassis launched by LIAN LI has undoubtedly revolutionized the entire chassis market, and the next wave of chassis trend after the O11 Dynamic series of double-sided glass chassis structure is the "A-pillar-less design" that further achieves a better display, and the O11D EVO with the detachable A-pillar design has already existed as early as in 2023, but LIAN LI seems to not want to make a small update to sell the new model, and finally launched a more expandable, more beautiful, more playable, and with the detachable A-pillar design at the beginning of 2024. However, LI did not want to sell a new model with a small update, and finally released the O11D EVO RGB (O11 Dynamic EVO RGB) in early 2024, which is more expandable, more beautiful, more playable, and has a detachable A-pillar design.
LIAN LI O11 Dynamic EVO RGB Case Specifications.
Size: 478(L) x 290(W) x 471(H) mm
Color: Black, White
Material: Steel, 4.0 mm tempered glass, aluminum
Motherboard: E-ATX (up to 280 mm wide), ATX, Micro-ATX, Mini-ITX
CPU air cooling: up to 167 mm
Graphics card: L 455.7 mm / W 169 mm
Fan Mounting Positions (Top + Side + Bottom + Rear): 140 mm 3+3+3+0 pcs, 120 mm 3+3+3+1 pcs
Water cooler support: top 420 / 360 mm, side 360 / 280 mm, bottom 360 mm
Chassis I/O Ports: USB 3.1 Gen2 Type-C, 2x USB 3.0, Microphone Combo Jack, LED Color, LED Mode, Brightness
Hard drives and bays: two 2.5", four 3.5" or six 2.5" (composite)
LIAN LI O11 Dynamic EVO RGB Unboxing
The O11D EVO RGB, also known as the O11 Dynamic EVO RGB, is the latest addition to the O11 Dynamic series. Although LIAN LI still defines it as a mid-tower chassis, the size of the O11D EVO RGB, at 478 x 290 x 471 mm, is still not too small for most people, and therefore the author feels that it is still close to a full-tower size chassis in terms of definition.
The length, width, and height of the O11D EVO have increased slightly, but so has the expandability of the case itself and the playability of the case's usage modes.
The O11D EVO RGB is also available in black and white, and this time I also unboxed the white version, which is equipped with a transparent tempered glass, while the black version uses a tinted tempered glass. If you want to show off the details of the internal hardware, it is more recommended that gamers opt for the white version, but if you don't like the RGB so glaringly bright, then you can consider taking a look at the black model.

∆ O11D EVO RGB (O11 Dynamic EVO RGB) Length, width and height are 478 x 290 x 471 mm.

∆ In addition to the anti-scratch film, there are also tips on how to use it.

∆ Full transparency front panel glass view angle.
The chassis' Power On button, Reboot button, RGB Strip Mode switch, RGB Strip Color switch, RGB Strip Brightness switch, and so on, are all located on the right-hand corner of the front panel.
The O11D EVO RGB chassis is equipped with an L-shaped ARGB light bar at the top and bottom of the chassis, and each ARGB light bar has 47 LEDs at the top and bottom of the chassis. The 1.5mm-thick light bar can be switched to the default 14 lighting effects, and you can also set the color and brightness using the Color switch and Brightness switch, and synchronize the lighting effects with the motherboard after connecting the ARGB cable to the motherboard slots. When the ARGB cable is connected to the motherboard slot, it can synchronize the lighting effect with the motherboard.

∆ Chassis side controls.

∆ LED light bar control tutorial.
The O11 Dynamic EVO RGB case I unboxed this time is the white model, and the reinforced glass side panels are fully transparent, so you can clearly see the internal hardware design details even without powering up the device or RGB lighting effects.

∆ Fully transparent tempered glass.

The ∆ steel chassis structure has holes cut out for the user to hook out the glass side panels.

The ∆ is equipped with an anti-fall mechanism, but it is recommended that the user hold it with his/her hands.
The rear of the chassis is similar to the O11 VISION, with the same rearward protruding hard drive bays and power compartment design, which further allows for more cable depth on the interior while also assisting in cable routing with the additional protruding hook and loop.
However, the O11D EVO RGB only supports 120 mm fan mounts at the rear, which is not as expandable as the O11 VISION, with a reusable seven-slot PCIe board underneath.

∆ A view of the rear of the chassis.

∆ Screen outlet hole for the Display Card Pendant (O11DE-9X/O11DE-9W).

∆ There is a changeable plate in the main board file mounting area, which is reserved for the adjustable solution for the chassis reversing mode and the upper/lower mode.

∆ The power compartment protrudes outward 15 mm and leaves cable space on the side for bundling I/O cables behind the monitor and motherboard.
On the back of the motherboard is a steel side panel that uses large mesh holes. A large number of mesh holes are provided for side fans, power supplies, hard drives, and other devices, giving these hardware enough space for air intake and cooling.

The ∆ steel side panels also have small openings to assist in opening the side panels.

∆ Large mesh provides sufficient air intake space for the side fans and power supply.

∆ Accidentally found that the side panel snaps were replaced with screw-in ones.
The ample cable space on the back has always been the strongest advantage of dual-cabin chassis, and this is also true for the O11D EVO RGB. The cable space can be roughly divided into three main areas from left to right: the side fan/hard drive mounting area, the centralized cable routing area, and the hard drive and power supply mounting space.
Each of the three blocks can handle its own business without overlapping each other's work blocks, which is an advantage of the dual-cabin chassis.
The magnetic hinge swivel structure of the cable shield allows for the installation of two 2.5-inch hard drives, and the required screws and related accessories are clearly labeled in the manual.

∆ A view of the space on the back.

The ∆ wire shield can be flipped to the other side by means of a hinge structure and can be fixed, which is quite convenient during the wiring process.

∆Two 2.5" hard disks can be installed on the cable shield.
Two 2.5" / 3.5" composite HDD mounting plates are pre-fixed to the left-most fan bracket, each of which can hold either two 2.5" HDDs or one 3.5" HDD, meaning up to four 2.5" HDDs or two 3.5" HDDs can be mounted on the side.

∆ Composite hard drive mounting plates, each of which can hold either two 2.5-inch hard drives or one 3.5-inch hard drive.

∆ Composite HDD mounting is secured with snap fasteners for easy removal.
The side fan bracket supports up to three 120 / 140 mm fans or up to 360 / 280 mm water cooler exhaust.
The quick release fan bracket is easily removable for mounting water coolers or fans, and the bracket supports vertical and horizontal rotation to provide four different mounting modes, allowing you to adjust the left/right orientation depending on the depth of the side water cooling and the space required for the E-ATX motherboard.
For E-ATX motherboards, it is recommended to adjust the fan bracket towards the front panel (right side) to avoid the fan being covered by the motherboard and to gain more cable space.

The ∆ Quick Release Fan Bracket supports 360 / 280 mm water cooler mounting or expansion with three 120 / 140 mm fans.

∆ Side fan bracket quick release push button.
The center section has several devil's felt cable ties to help bundle cables, as well as a metal frame to hold thicker cables such as the motherboard 24-Pin, while thinner cables can be held in place with devil's felt.

∆ CPU power supply cable block alignment space.

∆ Pre-bundled wire.

∆ Chassis I/O Port cable.

∆The two ARGB light bars require SATA power, and the 5V 3-Pin ARGB cable can be connected to the motherboard slot to synchronize the lighting effects via the motherboard lighting control software.
Preset in the upper right corner is the composite cage, this cage can be installed two 2.5-inch or 3.5-inch hard drive, and there are hexagonal mesh holes to provide passive cooling space, although there is no native fan mounting locking holes, but there are so many hexagonal holes it should be possible to use a cable tie to fix the fan, it depends on the craftsmanship of the people.
The cage is held in place by a hand screw. After removing the hand screw, adjust the other screws to the corresponding positions to remove the cage alone.

∆ The hard disk cage can hold two hard disks.

∆ Remove the single hand screw to disassemble the hard disk cage.
A support bracket underneath the power supply mounting block reduces the load on the power supply mounting screws.
The O11D EVO RGB (O11 Dynamic EVO RGB) supports the design of swapping the power supply with the hard drive cage, which I think is a great way to decide how to route the cables, but unfortunately the O11D EVO XL doesn't have this design.

∆ Power installation space.

∆ Replacement position is to be dismantled together with the outer frame.

∆ Swap mounting display.
The bottom of the chassis is equipped with a full-area hexagonal mesh design, which provides the most complete cooling channel for the bottom fan, allowing the bottom fan to smoothly draw air to the interior of the chassis to dissipate heat.
The bottom of the chassis is equipped with a magnetic dust filter to prevent dust from entering the chassis, but the author feels that it is not very easy to disassemble the chassis, and the chassis has to be put down before it can be disassembled and cleaned individually.

∆ A view of the bottom of the chassis.

There are two I/O cable outlets on the bottom of the ∆ chassis for users to decide how they want to route the cables, and the I/O cables have their own fixing clips with screws to secure them.
The large mesh holes on the top of the chassis are much smaller than the diameter of the bottom, allowing the fan on the top to exhaust heat smoothly and preventing dust or other foreign objects from falling into the chassis.
The O11D EVO RGB (O11 Dynamic EVO RGB) has a top removable fan bracket that supports up to 420 / 360 mm fans and water coolers, but to install a 420 mm water cooler you will need to use the adapter bracket included in the kit.

∆ Large-area mesh cover.

∆ There is no additional dust filter inside.

∆ Supports fans and water coolers up to 420 / 360 mm.

∆ The upper fan bracket can be removed by removing two screws.
Core Hardware Installation Space Showcase
The O11D EVO RGB (O11 Dynamic EVO RGB) has slightly better expandability than the original version, but the motherboard also supports E-ATX sizes up to 280 mm wide.
The bottom and sides of the cooler can accommodate up to 360 mm water coolers, while the top can support up to 420 mm water coolers via adapters, and the fans can accommodate up to ten 12/14 cm fans in total.
The most special feature is the slightly retractable A-pillar, which is held in place by two screws at the top and bottom, allowing for optimal display and a solid physical structure once removed.

∆ Water-cooled exhaust expansion is slightly better, playability is better installation space is small upgrade.

∆ Removable A-pillar slightly retracted.

The ∆ is held in place by two screws, one at the top and one at the bottom.

∆ Easy disassembly.
The O11D EVO RGB supports E-ATX (up to 280 mm wide), ATX, Micro-ATX, and Mini-ITX installations, and the air-cooled tower supports up to 167 mm high mounting space. Unlike the O11D EVO, the O11D EVO RGB can be adjusted to the height of the motherboard according to the requirements of the top-mounted water-cooling installation.
The higher and lower modes are realized by adjusting the motherboard mounting brass pillars. The factory default lower mode (locking holes mounted in the lower position) is more friendly to top-mounted water coolers because the lower mode has a maximum of 103.8 mm of upper water cooling mounting depth, which is less likely to conflict with the motherboard even with the hamburger drain cooler mounting, but the bottom of the mounting is only left with a height of 30 mm (counting from the lowest PCIe plate). However, there is only 30 mm of height left at the bottom (counting from the bottom PCIe board), so it is recommended to install only the fan to avoid the possibility of conflict with the motherboard.
Higher mode is a more balanced mode, with 83.5 mm above the motherboard and about 50 mm below the motherboard for water cooling.
Therefore, for most users, the default lower mode is sufficient, but if a split water cooler is installed and one of the cooling rows is mounted on the bottom, it can be adjusted to a higher mode.

∆ supports E-ATX installation and has multiple cable routing holes for use.

∆ The side fan bracket has a fairly sufficient depth.

∆ There is quite enough space to install water cooling with a raised ceiling!

∆ Height adjustment is achieved by mounting the motherboard brass posts up and down.
The detachable fan on the bottom supports three 120 / 140 mm fans and 360 / 280 mm water cooler mounts, and is secured by a single turn-screw for quick and easy disassembly.

∆ supports 360/280 water-cooled installations.

∆ Single hand screw fixing.

∆ The fan mounting bracket can be detached separately, so that the fan or water-cooling exhaust can be mounted on it first.
Inside the box you will find a 420 mm water cooler mounting adapter, graphics card bracket, mounting screws, and the LIAN LI x der8auer sticker logo.

∆ Accessories box at a glance.

∆ This adapter is required to install the 420 mm water cooler top.

∆Partitioning screws.

∆ Displays the card holder.

∆ Graphics card holder installation instruction.
Inverted Mode Installation Rotating display with no dead angle
Dual-sided glass cases like the O11D EVO RGB (O11 Dynamic EVO RGB) are mostly bought for display purposes, so most people place the case on their desktop to fire up the display. However, the regular case mounting configuration is better suited for displaying the case on the right side of the desktop (so that the glass side view faces the left side), but this is not so friendly for users who need to place their PCs on their left hand side. This is not so friendly to users who need to place their PC on the left hand side.
The O11D EVO RGB allows users who are accustomed to placing their PCs on their left hand side to enjoy their computers through the full-module design "Inverted Mode".

∆ First, loosen the two hand screws at the back of the base.

∆ Remove the base, upper/lower fan mounting bracket, upper cover trim, I/O cables, and base.

The whole process is actually quite fast. ∆ And then install it all upside down and then it's done.
Chassis Installation Demonstration
Because of the rare opportunity, this O11D EVO RGB (O11 Dynamic EVO RGB) case installation is inverted to show you.
Installation Platform
Processor: AMD Ryzen 9 7950X
Cooler: LIAN LI Galahad II LCD 360
Motherboard: ASRock X670E Taichi Carrara
Memory: Kingston FURY Renegade DDR5 RGB 6000 MT/s 16GB x2
Display Card: MSI GeForce GTX 1070 Quick Silver 8G OC
Chassis: LIAN LI O11D EVO RGB(O11 Dynamic EVO RGB)
Fan: LIAN LI UNI FAN TL Series FAN
Power Supply: MONTECH Century 850W

∆ Rotary mount plus A-pillar removal.

∆ Please forgive me for not finding a place to fix the UNI FAN TL Series FAN controller.

∆ Anyway, once it's covered, you can't see anything.

∆ Lower Mode Installation of water cooling using Flip Mode will block the slots underneath the motherboard.

∆ but the wire will not be extruded.

∆ The inverted mode is fun, but the wind flow part of the planning requires more brain power.

∆ ARGB light bar display.

∆ light bar with TL fan side light bar lighting effect combo.

∆ LIAN LI TL LCD fan display.

∆ Flip front view.

The ∆ chassis I/O can also be flipped to match!

∆ Glass side view with ARGB light bar.

∆ The chassis is a bit big.

∆ Full transparency glass display details.

∆ Lighting effect display.

∆ It seems like a good idea to add more light bars to the interior.
Conclusion
LIAN LI and der8auer's newest creation, the O11D EVO RGB (O11 Dynamic EVO RGB), has been upgraded in some of the smaller details, as well as in the appearance and expandability, but the overall structure is still similar to the original O11D EVO.

The O11D EVO RGB has done a good job in all aspects, and the water cooling support has been upgraded to 420 mm, which is the largest size that most all-in-one water cooling brands will use in their flagship specification, and supports E-ATX motherboards, 420 AIOs, and 455 mm of graphics card mounting space, which is enough to satisfy PC DIY consumers with sufficient budgets to purchase flagship hardware for their PCs. This expansion is enough to satisfy PC consumers who have enough budget to purchase flagship hardware for their PCs.

Supporting various modular designs such as inverted mode, power/hard drive cage, motherboard height mode, etc., the O11D EVO RGB maintains a competitive edge in the price range of around $5,000. In most cases where there is no special need for use, the author actually thinks the O11D EVO RGB is more worthy of recommendation than the O11D EVO XL because the O11D EVO RGB has achieved a good balance of price, practicality, expandability, and fun; while the O11D EVO XL is more for a small number of extreme gamers. The O11D EVO RGB has a well-balanced performance in terms of price, practicality, expandability, and fun; while the O11D EVO XL is more of a product for a small number of extreme gamers.

Yun
Drinks with less than full sugar are colored water. Crossing Turbid Creek, full sugar is not a crime!

 繁體中文
繁體中文  English