Montech HS01 PRO, HS02 PRO Chassis Unboxing Review

The Montech HS01 PRO and HS02 PRO chassis are unboxed. Both chassis support ATX, Micro-ATX, Mini-ITX, and back-plug ATX and Micro-ATX motherboards, with a unique reversible chassis structure and a sunken structure, and five built-in GF120 V2 ARGB PWM fans for good cooling planning. What are the differences between these two chassis? This unboxing article will bring you to find out.
MONTECH HS01 PRO Chassis Specifications: (Differences between the two models are in red)
Size: 480(L) x 240(W) x 480(H) mm
Color: Black, White
Material: steel, tempered glass
Motherboard: ATX, Micro-ATX, Mini-ITX, ATX (back plug), Micro-ATX (back plug)
CPU Air Cooling: Max. 170 mm
Display card:400 mm
Power supply: ATX 200 mm, SFX
Fan Installation Position (Top+)前(+ bottom + back): 140 mm 0+2+0+0, 120 mm 3+3+3+2 cases
Water-cooling support: 360 mm above, 240 mm below, 120 mm behind
Chassis I/O Ports: 2x USB-A 5Gbps, USB Type-C 10Gbps, TRS Microphone Hole, TRS Headphone Hole, LED Setup Button
Hard drives and bays: Up to four 2.5 or two 3.5-inch composite mounts
MONTECH HS02 PRO Chassis Specifications: (Differences between the two models are in red)
Size: 480(L) x 240(W) x 480(H) mm
Color: Black, White
Material: steel, tempered glass
Motherboard: ATX, Micro-ATX, Mini-ITX, ATX (back plug), Micro-ATX (back plug)
CPU Air Cooling: Max. 175 mm
Display card:420 mm
Power supply: ATX 200 mm, SFX
Fan Mounting Positions (Top+Bottom+Rear): 120 mm 3+3+2 pcs.
Water-cooling support: 360 mm above, 240 mm below, 120 mm behind
Chassis I/O Ports: 2x USB-A 5Gbps, USB Type-C 10Gbps, TRS Microphone Hole, TRS Headphone Hole, LED Setup Button
Hard drives and bays: Up to four 2.5 or two 3.5-inch composite mounts
Montech HS01 PRO, HS02 PRO Chassis Unboxing
Montech has launched HS01 PRO and HS02 PRO cases in the HS series, and will unbox these two models to show you the difference.
The HS01 PRO and HS02 PRO chassis dimensions are both 480 (L) x 240 (W) x 480 (H) mm, so there is no difference in volume size, and they are synchronized with their respective black and white colors to choose from.
Visually, the difference is more intuitive: HS01 PRO has a mesh front panel with an adjustable front fan bracket, so a fan can be installed on the front of the chassis to enhance air intake; while HS02 PRO is equipped with an 8-degree curved glass on the front panel, which emphasizes on the external appearance.

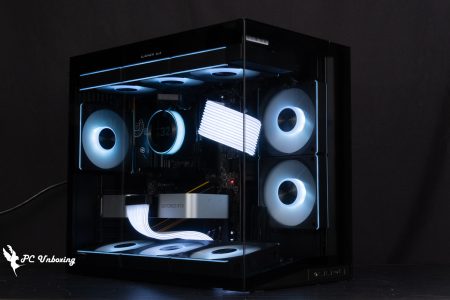
∆ I unboxed HS01 PRO (white color model on the left) and HS02 PRO (black color model on the right) at one time.

∆ Montech HS01 PRO white model.

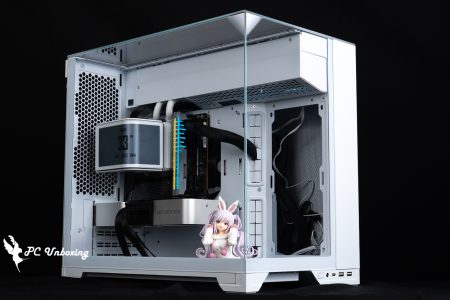
∆ Montech HS02 PRO in black.
The HS01 PRO, which has a mesh front panel for better air intake, can be fitted with three 120 mm or two 140 mm fans at the front of the chassis, but it is not possible to install a split or one-piece water cooler.
The front panel does not come with any dust protection measures, so if you need dust protection, you need to install a filter. The front fan bracket is an adjustable design that is fixed by two screws on the top, and when removed, it can be shifted to the right to allow the front airflow to be planned according to the radiator.

∆ Montech HS01 PRO with mesh front panel.

∆ There is no dust protection plan attached to the inside of the front panel.

∆ The adjustable front fan bracket is secured by the top two screws.

The ∆ can be offset to the right to allow the front intake airflow to blow directly on the air-cooled radiator.
The HS02 PRO features an 8-degree curved glass front panel, somewhat similar in style to the previously unboxed HS02 PRO. KING 95 HS02 PRO focuses on the exterior display, if you want more aesthetic presentation, you can consider this model, especially with the scenery model to display.

The ∆ HS02 PRO is equipped with a glass front panel.

Close-up of a ∆ octave surface.
The chassis I/O slots are located underneath the front panel, so both chassis are more suitable for platforms above desktop height. Both models also offer 2x USB-A 5Gbps, USB Type-C 10Gbps, TRS microphone jacks, power on button, TRS headphone jacks, and LED setup buttons.

∆ HS01 PRO Chassis I/O.

∆ HS02 PRO Chassis I/O.
Both models are equipped with glass side panels, with the white model being fully transparent and the black model having a matte black effect.

∆ The white version is fully transparent glass.

∆ The black model has a matte black effect.

∆ The other side panel of the case has a large mesh hole for the power supply fan.

∆ No dust control measures are provided on this side of the road.
The rear of the chassis has a unique layout, with two 120 mm exhaust fans pre-installed at the rear of the chassis, which are connected to the internal ARGB fan hub for power and control through a small inlet on the side, and an extension connector for the internal power supply next to the inlet.
Although this position supports two 120 mm fans, it is not compatible with 240 mm water cooler; only 120 mm water cooler can be installed, the author speculates that the length of the water cooler is limited by the groove mounting position.
The lower half of the panel features a seven-slot PCIE device mounting position, which is set up without a crossbar and supports painless upright vertical mounting, allowing users to easily switch to upright mounting without the need to install additional graphics card holders.

∆ A view of the rear of the chassis.

∆ In the upper left corner is the power extension connector and the rear fan cable entrance.

∆ PCIE file board.

∆ Painless switching to upright mode, but with the additional purchase of a display card-free upright cable.
The upper part of the chassis is equipped with a full-area mesh to allow for internal airflow, and a 360 mm fan and water cooler can be installed on the upper part of the chassis, but the width of the water cooler on the upper part of the chassis can only be supported up to 123 mm.

∆ A view of the top of the chassis.

∆ A small leather label on the top?

A 360 mm fan and water cooler can be installed on top of the ∆.
Three GF120 V2(120 mm) reverse fan blades are pre-installed at the bottom of the chassis to provide chimney style cooling airflow to the internal graphics card. The bottom fan has a magnetic dust screen to prevent dust from entering the chassis, but due to the deep location, it is recommended to disassemble the chassis by putting it upside down to clean it.

∆ A view of the bottom of the chassis.
The Montech HS01 PRO and HS02 PRO chassis both support the flip mode. In addition to the regular use of placing the PC on the right side of the display, if you want to place the PC on the left side of the desk, it can be used with the flip mode. If you want to switch to the flip mode, you only need to remove the "two screws in the corners on the bottom of the four edges", and then replace them with the top to install. Note that the fan airflow should also be changed.

∆ Two screws in the corner holders at the bottom of each side.

∆ Flip Mode Demonstration.
MONTECH HS01 PRO, HS02 PRO chassis core hardware installation space display
MONTECH HS01 PRO, HS02 PRO support ATX, Micro-ATX, Mini-ITX sized motherboards, but not the E-ATX motherboards used in the consumer flagship models. Recently, the emerging ATX (back-plugged) and Micro-ATX (back-plugged) motherboards are also able to support the installation, with five GF120 V2 pre-installed. Five GF120 V2 ARGB PWM fans are pre-installed, with three intake fans at the bottom and two exhaust fans at the back to direct cooling airflow through the chassis.
The two chassis differ in terms of compatibility between the air-cooled tower and the graphics card, with the HS01 PRO supporting a smaller form factor, while the air-cooled cooler is compatible with a height of 170 mm and a length of up to 400 mm for graphics card mounting.
The HS02 PRO air-cooled cooler is compatible with heights up to 175 mm and lengths up to 420 mm for graphics card mounting, leaving more room for high-end air-cooling and graphics card mounting.

∆ HS01 PRO chassis bare.

∆ HS02 PRO chassis bare.
The internal structure of the two chassis is basically the same, the motherboard mounting area is sunken, featuring a clean and simple internal aesthetics, the motherboard is surrounded by the cable storage area on the top, and the power supply "dual-compartment side-mounted" installation space on the right.
There is a cable mask below the motherboard, which is secured by two screws on the back of the board, and does not need to be removed for M-ATX / ITX motherboards; longer ATX motherboards will need to remove the lower panel to install the motherboard.

∆ HS01 PRO internal mounting block.

∆ HS02 PRO internal mounting block.

∆There is a space above the motherboard for the top water-cooling cable routing holes and mounting height, and there is a ceiling height of 80 mm, so you don't need to worry about the water-cooling of the hamburger row.

∆ The right side of the motherboard is also left with cable routing holes, so it is recommended that you pull the cables to an approximate position before placing the motherboard down.

∆ Supports back-plug motherboard installation.
The two pre-installed GF120 V2(120 mm) forward fans at the back of the chassis exhaust air, but the locking holes of the fans are covered by the back cover, so if you want to replace the fans, you need to remove the two screws on the top cover and then take down the whole set of fans to replace them.

∆ Two exhaust fans at the rear.
The fan at the bottom of the chassis also uses the same sunken design as the motherboard, whether it has a simpler aesthetic effect is a matter of opinion, but the biggest advantage for the author is that the bottom of the model can be placed more smoothly when placing the scenery model.

∆ A view of the fan at the bottom of the chassis.
The back of the motherboard has a relatively complex layout of cable hiding spaces, such as the power supply mounting location on the left side of the screen and the cable hiding spaces above the screen with cable masks.
The left half of the power strip can be used to install either two 2.5" hard drives or one 3.5" hard drive in an optional composite mounting position, and there is another set of composite mounting brackets on the front and back of the motherboard, which also supports two 2.5" hard drives or one 3.5" hard drive.

∆ A view of the hidden line space on the back.

∆ Chassis I/O and the rest of the related cables are listed.

∆ The power supply file plate is removed, and there is a hard disk mounting location on the back.

∆ There is another set of composite mounting brackets on the front and back of the motherboard.
Dual-cabin side-mounted power supply mounts are compatible with ATX and SFX power supplies up to 200 mm in length. The L-shaped upside-down power supply mounting bracket is preset for ATX installation, while SFX power supplies must be installed with the bracket rotated 90 degrees.

∆ The left half is the power supply mounting block, and the accessories are tied to this side at the same time.

∆ Power supply mounting bracket, default is ATX mounting mode.

∆ Matching MONTECH CENTURY II 850W Fully modular power supply installation demonstration.

The ∆ power supply should be used with extension cables, except that this installation will block the power switch, and the ATX power supply cannot be exchanged for the air intake surface mounting position.
The upper area houses the ARGB fan hub and power extension cables, and after the rest of the equipment is installed, the area will need to house at least one more CPU cooler and CPU power cable.

∆ Upper part of the hidden line space.

The ∆ hub can also be used to install four PWM fans and three ARGB devices. The HUB requires an additional SATA power supply that must be connected, the ARGB lighting can be set via the chassis buttons or by connecting to the motherboard, and the PWM can be set by connecting to the motherboard for the speed setting.
Chassis extras include: a large pack of screws, a display card holder, a devil's blanket harness, and a disposable harness.

∆ Accessories supplied with the chassis.

∆ The graphics card support bracket is used with the locking hole at the lower right corner of the motherboard mounting location, but it is only used for three-fan graphics cards, and there is no need for a dual-fan graphics card to be touched.
MONTECH HS01 PRO Practical Installation Demonstration
Let's show you the actual installation of the MONTECH HS01 PRO chassis.

∆ Montech HS01 PRO chassis mounting.

∆ ARGB light bar on the bottom of the case.

∆ Full Transparency Glass Side-by-Side Glass Display.

∆ You can see that there is plenty of space for top-mounted water cooling.

∆ Bottom fan lighting display.

∆ Side motherboard alignment shown.
Chassis Thermal Performance Test

Then we also tested the cooling performance of the chassis, with the Intel Core Ultra 9 285K The processor and the ASRock B860 Steel Legend WiFi motherboard were tested in a closed air-conditioned room at 24°C with the fan slots set to full speed in the motherboard BIOS, for reference only as it is difficult to control the ambient temperature in a normal room.
The software uses AIDA64 FPU and Furmark 2 to simulate the temperature data of the processor and graphics card under high load stress, Black Myth: Wukong 1080P to run the test scenarios, and HWiFO64 to collect and record the maximum temperature and power consumption.
Testing Platform
Processor:Intel Core Ultra 9 285K QS
Radiator:LIAN LI GA II LITE 360 RGB (full speed)
Motherboard: ASRock B860 Steel Legend WiFi (BIOS version: 1.25)
Memory:Kingston FURY Renegade DDR5 RGB CUDIMM 8400MT/s 48GB (2x24GB) cl 40-52-52-132 1.45v
Graphics: NVIDIA GeForce RTX 4060 Ti Founders Edition 8GB
Operating System: Windows 11 Professional 24H2
Power supply:MONTECH CENTURY II 850W
Case: Montech HS01 PRO
Graphics driver: GeForce Game Ready 572.83
I would like to add a few things to you, the first one is that I have updated the BIOS version of ASRock B860 Steel Legend WiFi to version 1.25, and set the rest of the settings: XMP_on, and all fan slots to full speed.
In the test program AIDA64 FPU, the maximum processor package temperature was 86 °C, and the maximum temperature of the RTX 4060 Ti FE graphics card was 64.2 °C in the Furmark 2 test.
The maximum processor and graphics card temperatures during Black Myth: Wukong games are only 74 °C and 57.2 °C. The maximum temperature of the game is only 74 °C and 57.2 °C.
- Black Myth: Wukong_Black Myth: Wukong_Performance Test Tool 1920 x 1080(FHD)_1 round
- Graphics Test Furmark 2_30 Minute
- Processor Test AIDA64 FPU_30 Minute
- CPU Package temperature is recorded by all Digital Temperature Sensors (DTS) in the package as the average of the maximum temperature over 256 milliseconds, and is the HWiNFO64 recommended CPU temperature observation value, which is also used as a benchmark for overheating and downclocking of the processor.

∆ Chassis thermal performance chart.
Conclusion

This time we bring Montech HS01 PRO, HS02 PRO two chassis unboxing, the actual installation is not a big problem, the chassis itself left some changeable design but at the same time is also a double-edged blade, although you can change according to the needs of the installation, but the design of most of these screws only fixed, so in the process of installing a lot of screws to keep good.
In the case of the HS01 PRO, from the sunken motherboard design and the adjustable front fan bracket, the HS01 PRO model is more suitable for air-cooling tower coolers, but it is recommended that the front fan should be added to give the air-cooler more airflow.

The HS02 PRO chassis with 8° curved glass front panel lacks the front fan for better presentation than the HS01 PRO, so the cooling performance is a bit weaker, but the chassis becomes a more pure chimney style airflow, but if you are going to use it with top-mounted water-cooling, it is more recommended that the rear fan be an intake fan to increase the intake airflow.
Yun
Drinks with less than full sugar are colored water. Crossing Turbid Creek, full sugar is not a crime!