Monarch MONTECH SKY 3 Chassis Unboxing + BETA 2 850W Power Supply|Heat Dissipation, Installation, and Temperature Analysis
The Monarch MONTECH SKY 3 chassis features a modular under-mounted fan and power supply bracket that provides two mounting modes for optimal chimney airflow cooling for the CPU and GPU, as well as a 13° elevation design with updated ARGB lighting for the horizon chassis. The entry-level BETA 2 850W Bronze Direct Output Power Supply features 80 PLUS Bronze conversion rate, ATX 3.1 standard, native 12V-2X6 power connectors and crimped cables, and is available at a lower price point for consumers on a budget.
MONTECH SKY 3 Chassis Specifications:
Body size: 467(L) x 240(W) x 490(H) mm
Available colors: black, white
Chassis Material: Steel, Tempered Glass
Supported motherboard sizes: ATX, Micro-ATX, Mini-ITX, ATX (backplane), Micro-ATX (backplane)
CPU Cooling Support Height: Up to 185 mm
Graphics card support length: 445 mm
Power supply support length: Swivel side-out mode ATX 160 mm
Fan Mounting Positions (Top + Side + Bottom + Rear): 140 mm 2+2+0+1 pcs, 120 mm 3+2+2+1 pcs
Water-cooling support: 360 / 280 mm at the top, 240 / 140 mm at the side, 120 mm at the rear.
Chassis I/O Ports: 2x USB-A 5Gbps, USB Type-C 20Gbps, TRRS Composite Headphone Microphone Hole
Maximum hard drive mounts: Two 2.5 or 3.5-inch composite mounts
montech beta 2 850w Power supply specifications:
Specification: ATX 12V Ver. 3.1
Input Voltage: 100-240Vac
Input Current: 12A MAX
Input Voltage Frequency: 50-60Hz
Size: 140 x 150 x 86 mm
Fan: 120 mm HDB Fan
Conversion Rate Certification: 80 PLUS Bronze
Power Cord: Straight Outlet Embossed Cord
Warranty: 5 years
Protection System: OPP / OVP / UVP / SCP / OCP / OTP
Cable connectors: 1x 24 Pin motherboard connector, 2x 8(4+4) Pin CPU connectors, 1x 12+4 Pin 12V-2X6 connector, 4x 6+2 Pin PCIe connectors, 6x SATA connectors, 4x Molex(Peripheral) connectors.
MONTECH SKY 3 Unboxing|Horizon Light Bar Design & Appearance
MONTECH's SKY series of chassis is three years out of date, despite the fact that there's a 2024 "SKY" series of chassis.MONTECH SKY TWO GX", but the original "TheMONTECH SKY TWOIt's been over three years since the end of 2022, and the SKY 3 is back with a modular architecture and horizon lighting.
The chassis is available in black and white, with a one-year warranty. The white model has an additional $100 whitening tax compared to the black model, and both colors of the SKY 3 are in the 2,500 price range, with a relatively restrained choice of colors, unlike the previous generation which had a special color option, the previous Moroccan Blue which I thought was very special.
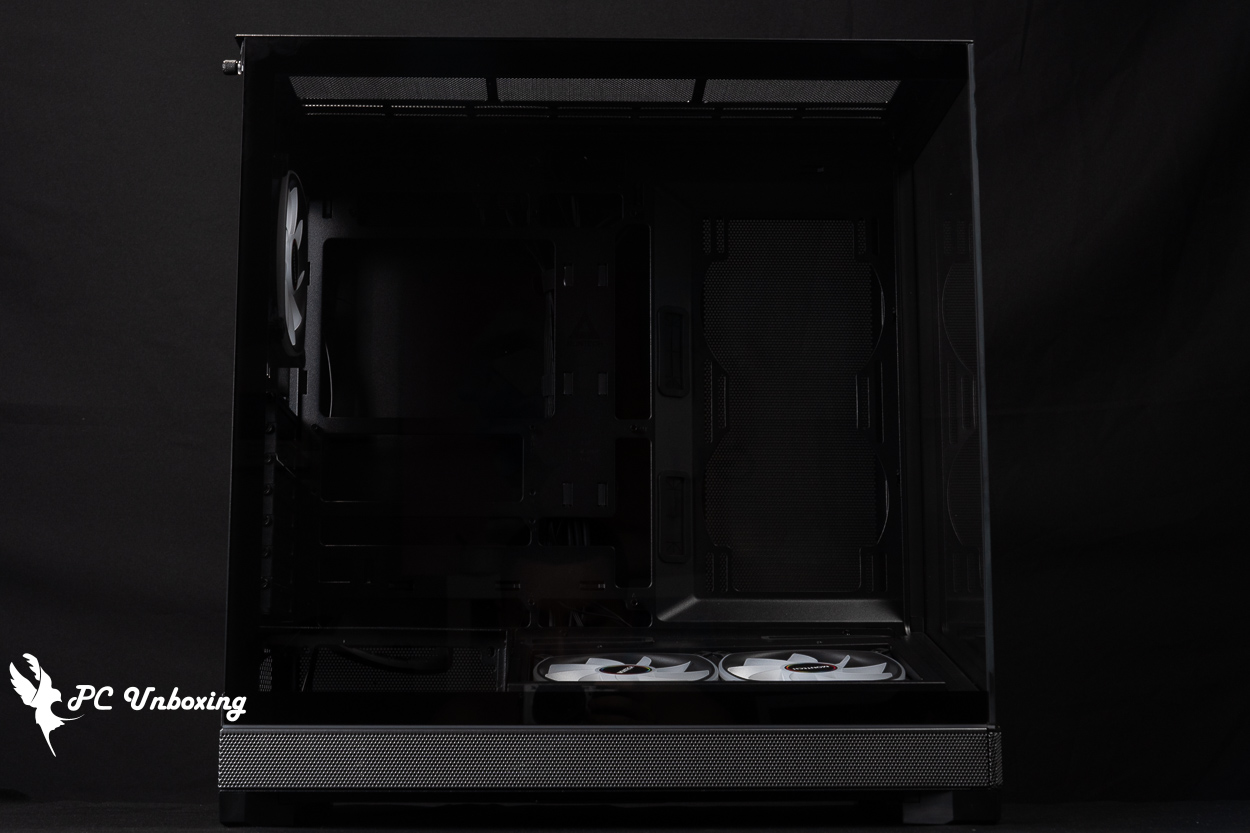
The front and sides of the chassis use glass panels that are joined at 90°. The chassis measures 467 x 240 x 490 mm in length, width, and height, placing it in the mid-tower category of gaming chassis, with dimensions that are slightly longer than its predecessor, by 3 cm, and slightly wider, by 1.5 cm.
This chassis has a 13° angle of elevation design for the bottom fan, similar to the elevation fan plan in the previous KING 45 PRO, KING 15 PRO It has been seen on chassis, but SKY 3 has a special visual effect when viewed from the front.

The dimensions of the chassis are 467 x 240 x 490 mm.
△ At the same time out of the black and white two colors can choose, the black model is cheaper one hundred dollars.
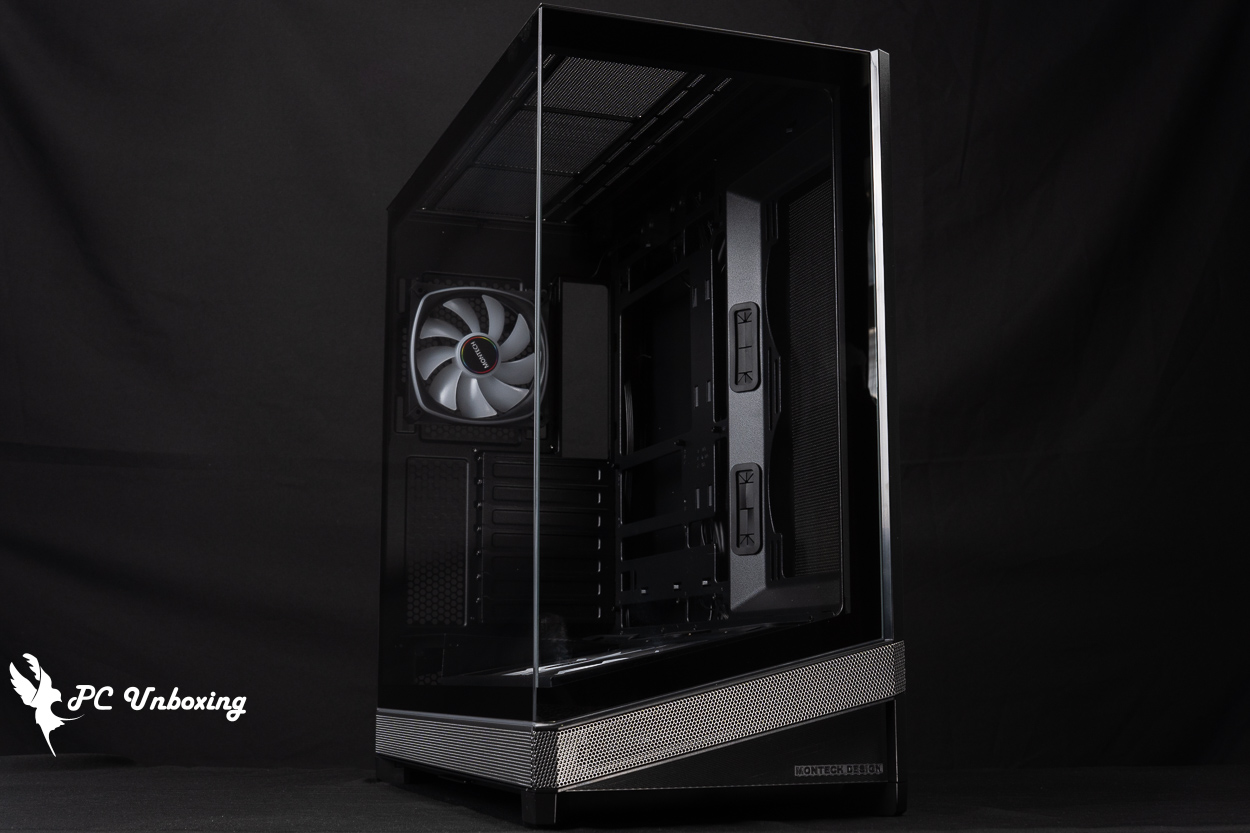
△ Front glass view of the chassis.

△ Front panel 13° elevation visualization.
The glass side panels are held in place by hand screws at the rear, which open outward to remove the entire glass after removing the screws, but it's a pity that the hand screws are not designed to prevent them from falling out.
When removing the glass side panels, be careful not to hit the metal contact points at the corners where the chassis light bars are located.

△ White glass side panel.
△Glass side panel for black model.

△ Side panel manual fixing screw.
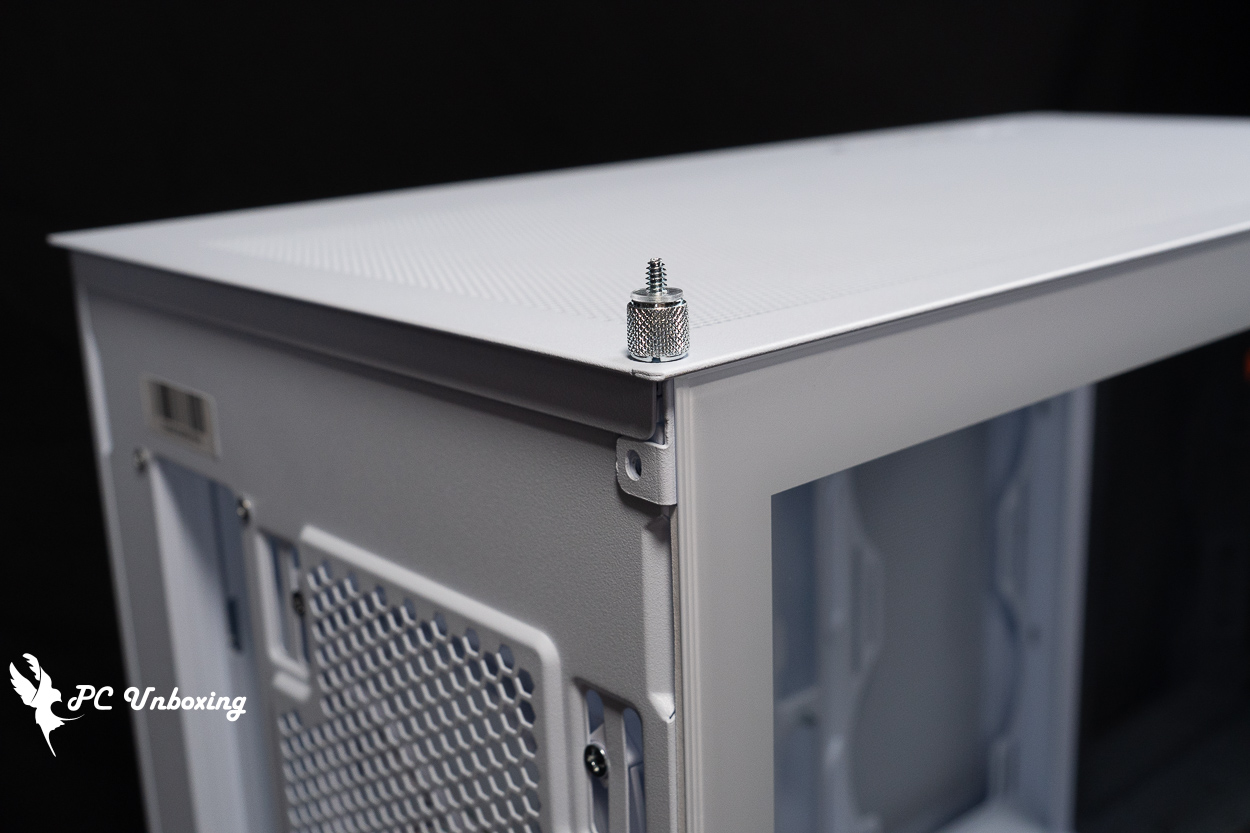
It's a pity that it's not a drop-proof design.
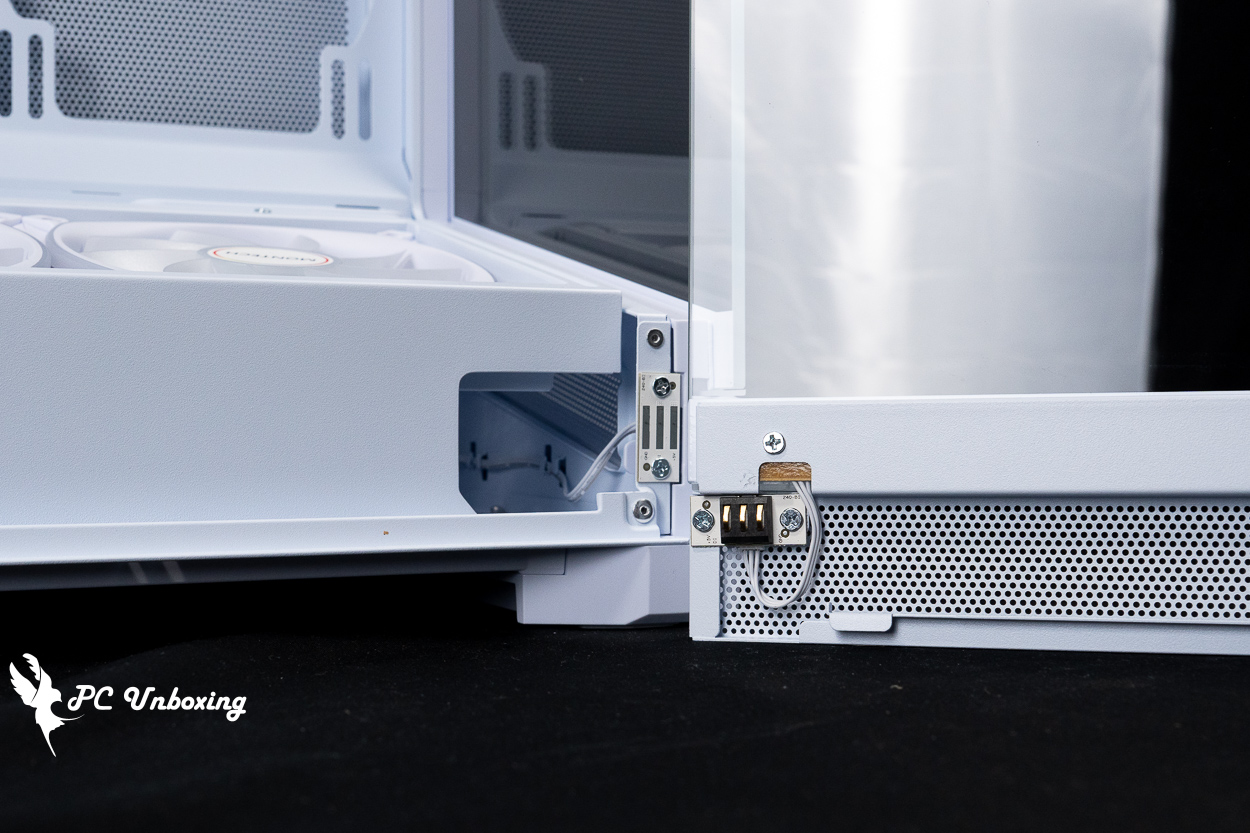
△ Light bar power supply contact of the side panel.
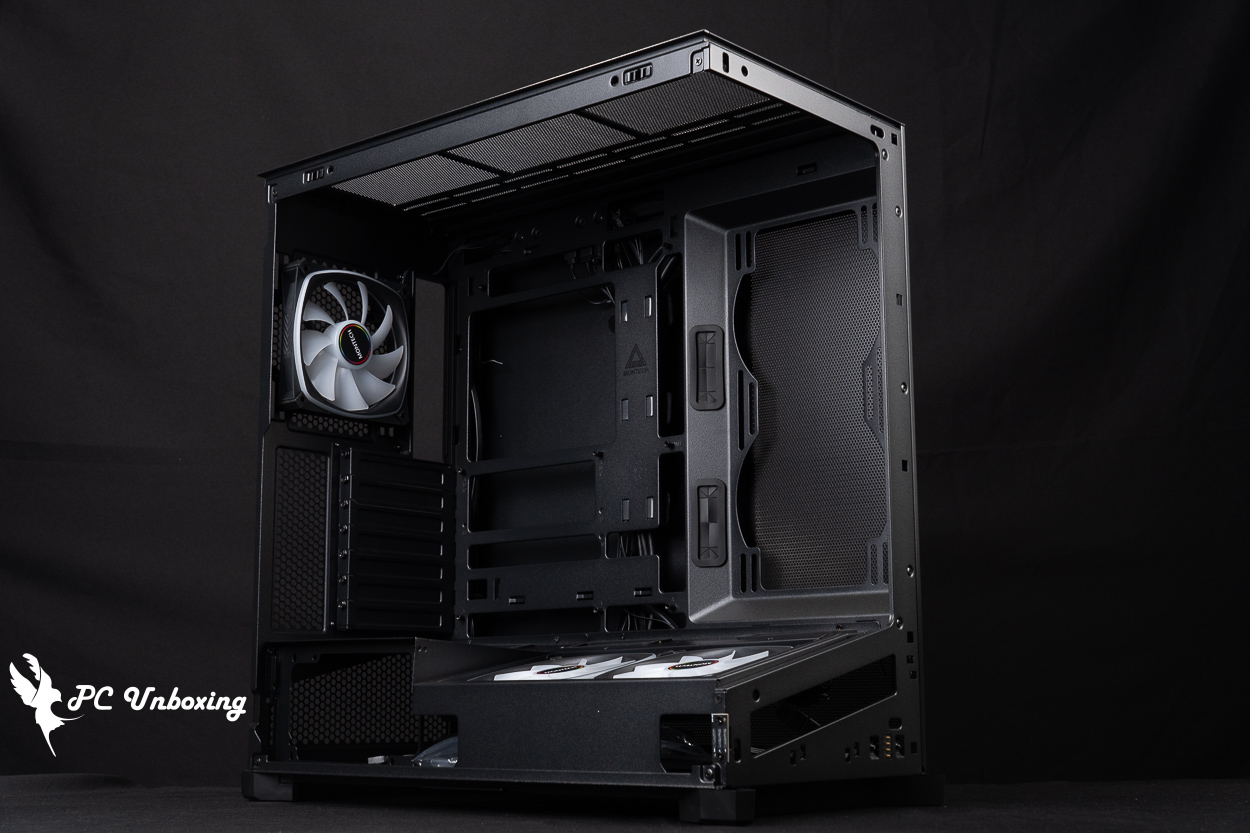
The rear of the chassis can support either a 120 mm fan and water-cooling exhaust, or a larger 140 mm fan, but a 120 mm diameter AX120 PRO fan is pre-installed to remove waste heat, with a maximum speed of 1600 RPM ±10%, a maximum airflow of 72.3 CFM, and a maximum air pressure of 1.85 mmH₂O. The maximum air pressure is 1.85 mmH₂O and the maximum noise level is ≤25.4 dB(A).
There are seven PCIE device mounting positions underneath, with reusable baffles and no crossbars. The PCIE slots are designed without crossbars, so they are compatible with graphics card upright adapters, but gamers will have to purchase additional upright brackets on their own in order to complete the uprighting of their graphics cards.
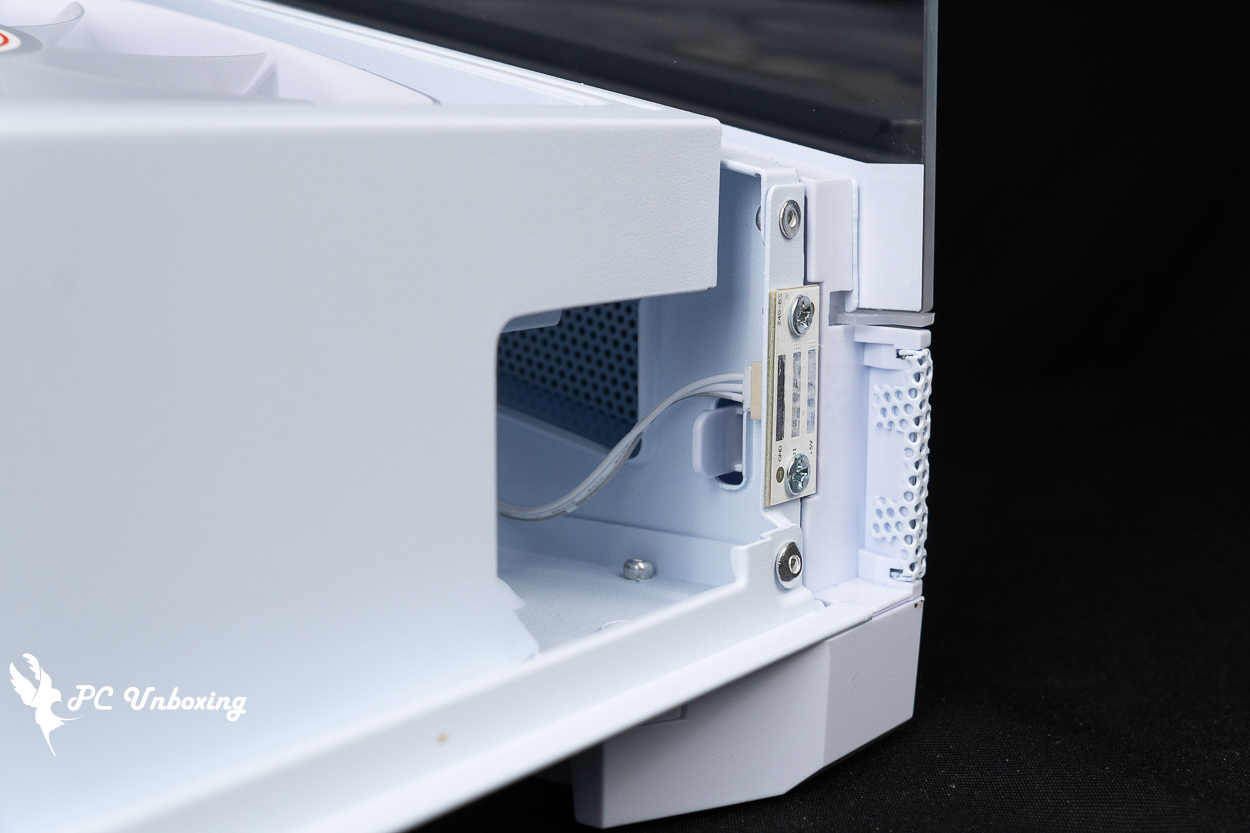
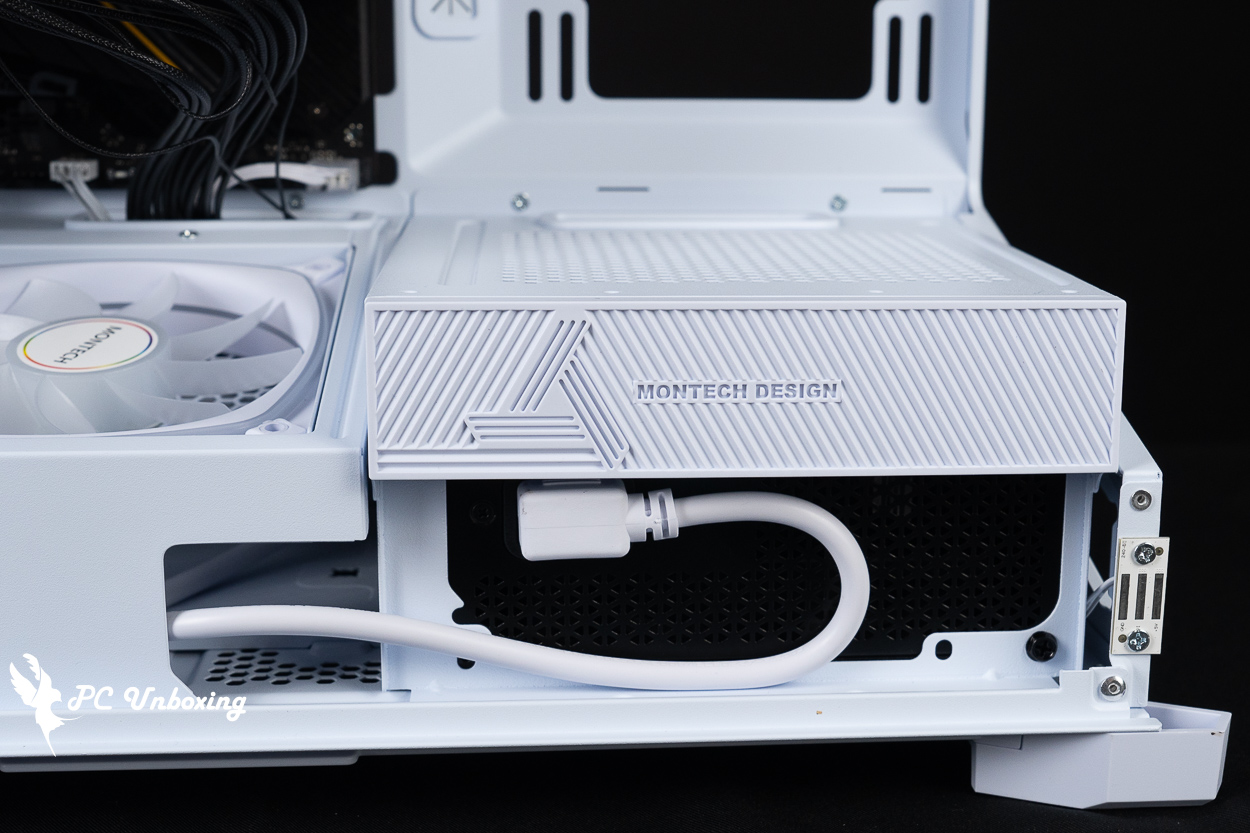
The special feature of this chassis is the rotating side-mounted model with the AC slot facing the glass side panel, which is different from the common lower-mounted model in terms of installation. The internal power supply is connected to the rear of the chassis through the AC extension cable, and then connected to the external socket through the rear.

△ The rear view of the chassis.
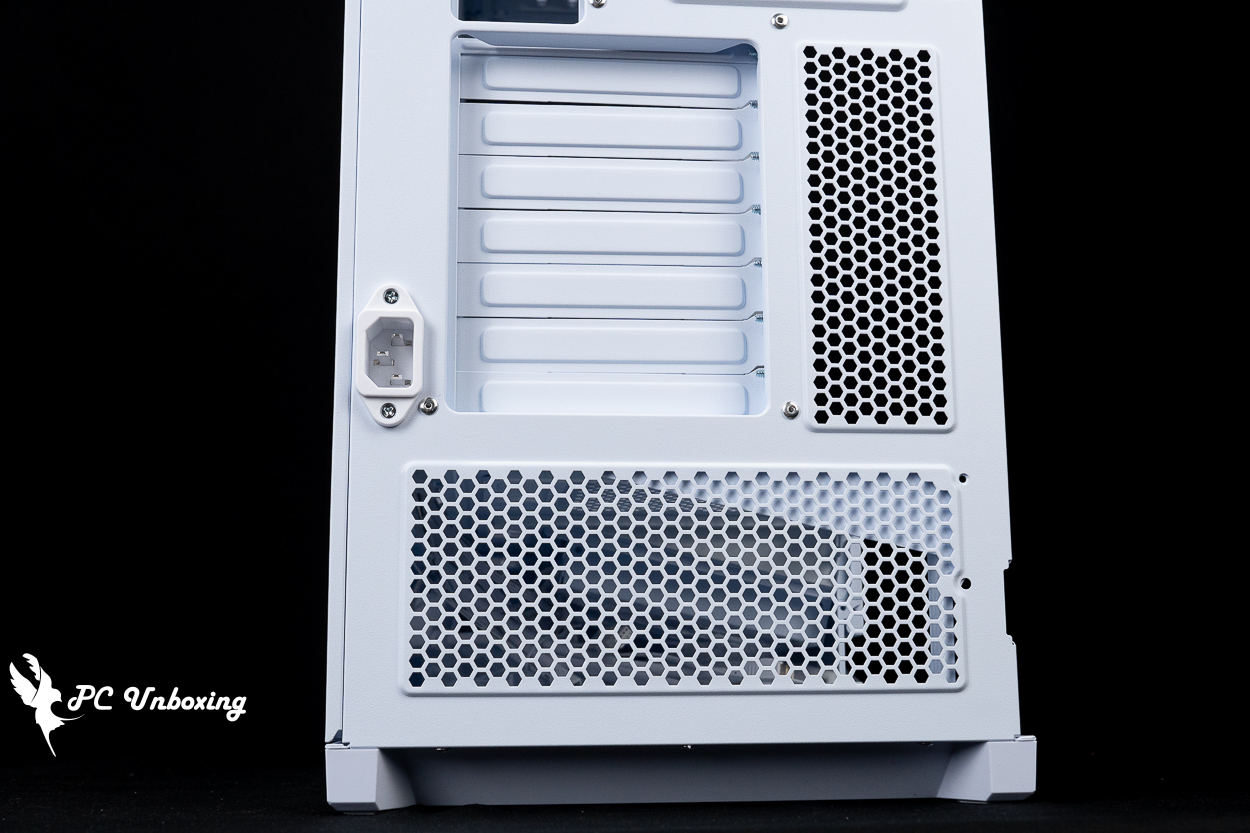
△ PCIE device and power AC extension socket installation position.

An AX120 PRO fan is already installed at the rear, but it can be replaced with another 120 mm fan and water cooling exhaust, or with a larger 140 mm fan.
The back side of the motherboard provides mesh holes for the two fan mounts on the side for intake or exhaust purposes, but there is no magnetic filter underneath, so those who care may want to add their own.
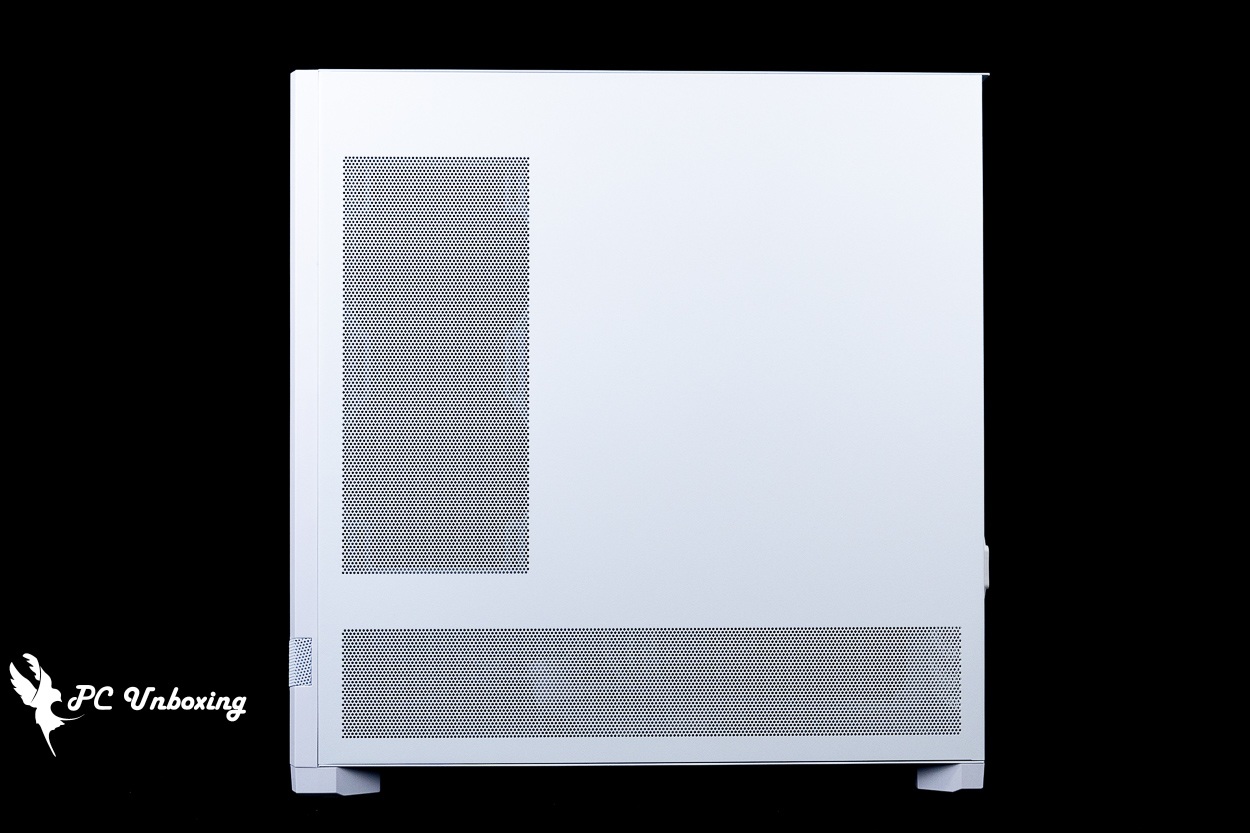
The steel side panels on the line space side are equipped with ventilation grills.

△ There is no dust screen underneath.
The upper part of the chassis supports 360 / 280 mm fan and water cooler, also without the magnetic dust filter, and the upper fan bracket is removable, so it can be disassembled separately to facilitate the installation process. However, during the actual installation of the upper 360 AIO, I felt that there is enough space inside the chassis and it is not necessarily necessary to remove it, it depends on the actual installation requirements.
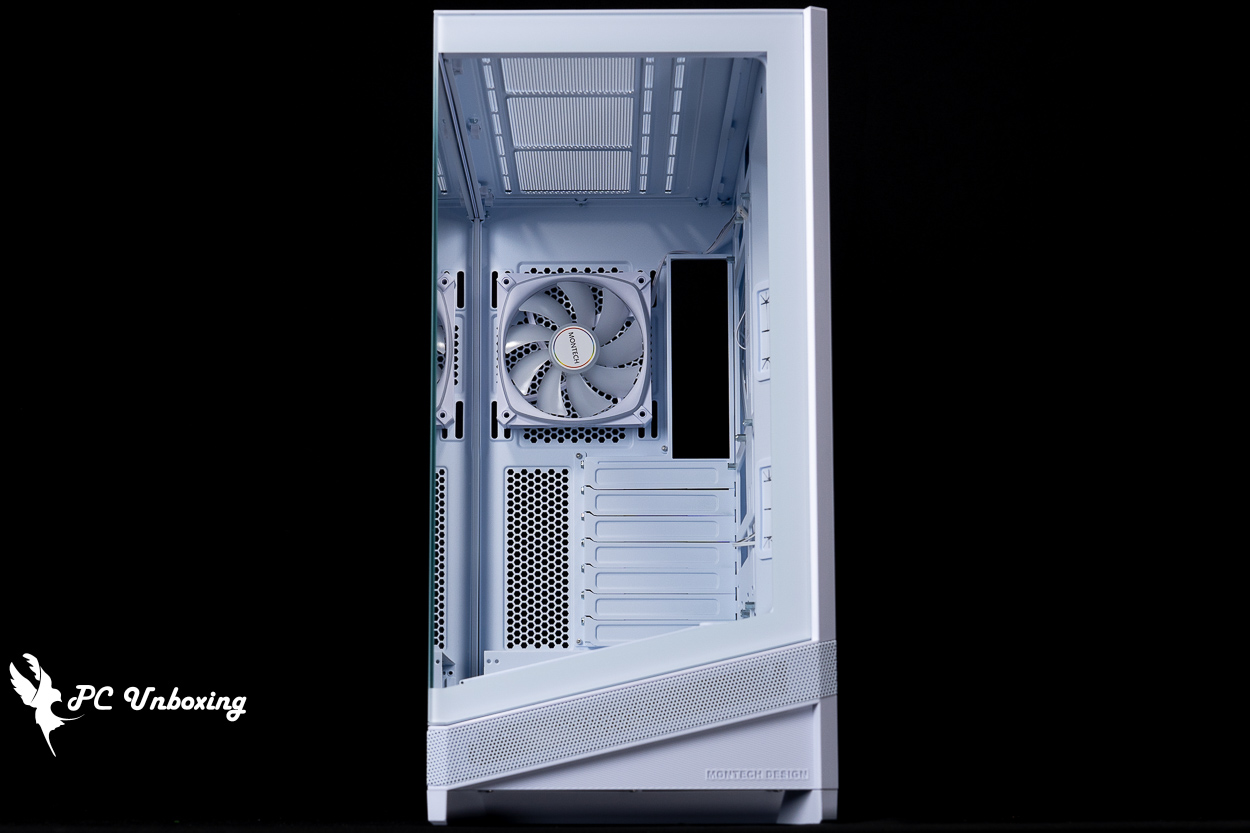
△ Mesh hole on top of the chassis.
△ There is no additional dust control plan internally.
△ Maximum 360 / 280 mm fan and water cooler installation on top of the chassis.
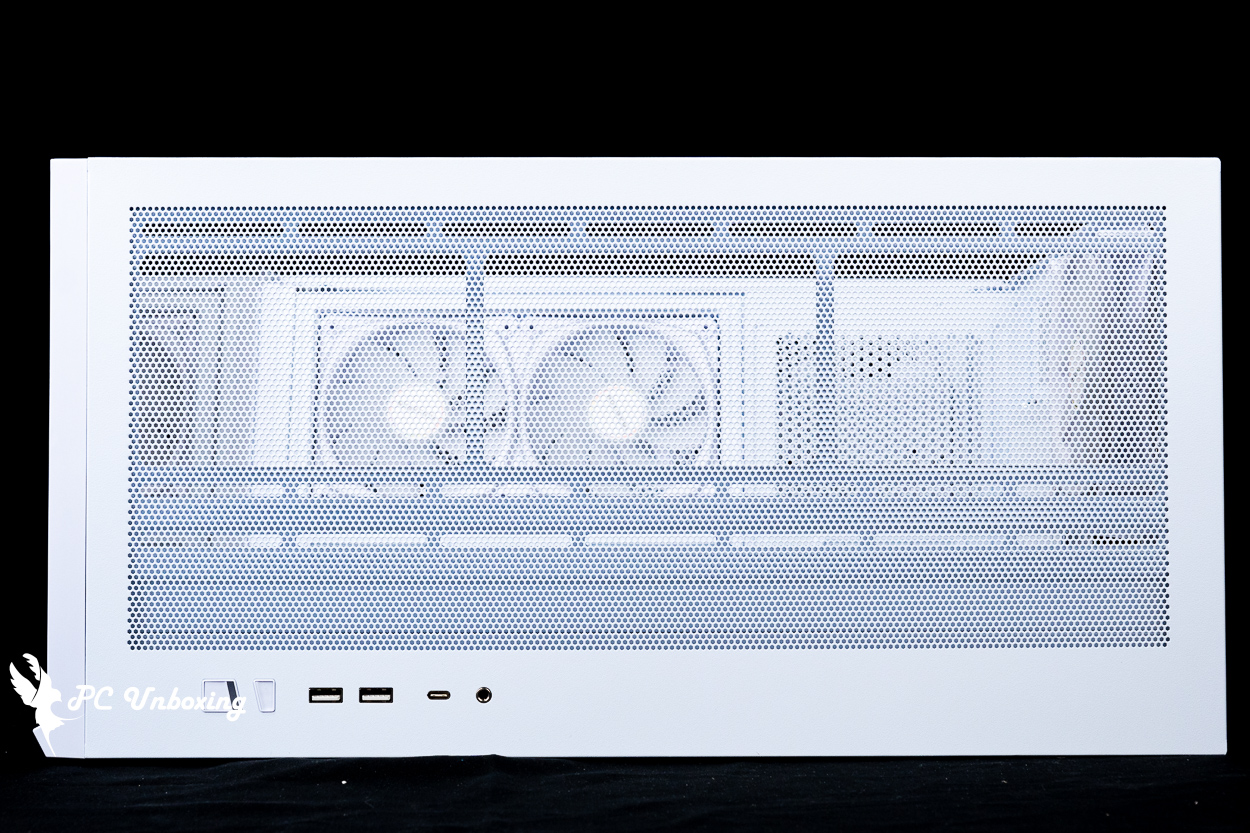
The chassis I/O slots are located at the top of the chassis, so this chassis is more suitable to be placed at a height below the desktop (e.g., on the floor) for more convenient use. It provides: Power On button, Lighting Control button, 2x USB-A 5Gbps, USB Type-C 20Gbps, TRRS composite headphone microphone jack.
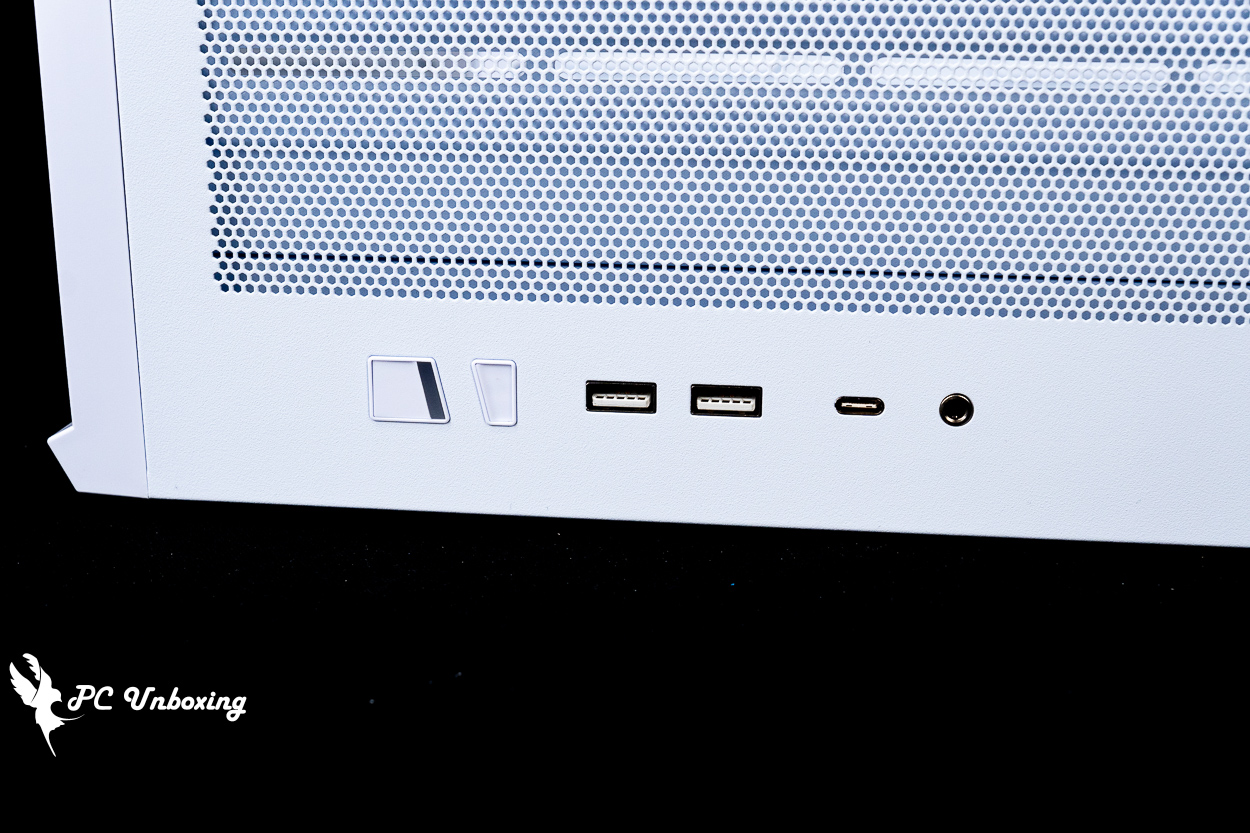
△ List of chassis I/O ports.

△ I/O cable list.
MONTECH SKY 3 Chassis Mounting Space|Graphics Card Length, Fan & Water Cooling Support
The SKY 3's glass front panel can be removed separately, but after installing the device, I don't think it's necessary to remove it. The front panel is secured by the bottom and top internal clips, and the glass front panel can be removed by pressing the clips.
△ Fixing clips at the bottom of the front panel.

△ Fixing clips on the top of the front panel.
The MONTECH SKY 3 supports ATX, Micro-ATX, Mini-ITX sized motherboards, and more recently ATX and Micro-ATX motherboards. Recently, MONTECH chassis have begun to come standard with back-pluggable motherboards. GIGABYTE X870 AORUS STEALTH ICE It's a great development that more and more people are installing these back-plug motherboards, and chassis brands are adapting accordingly.
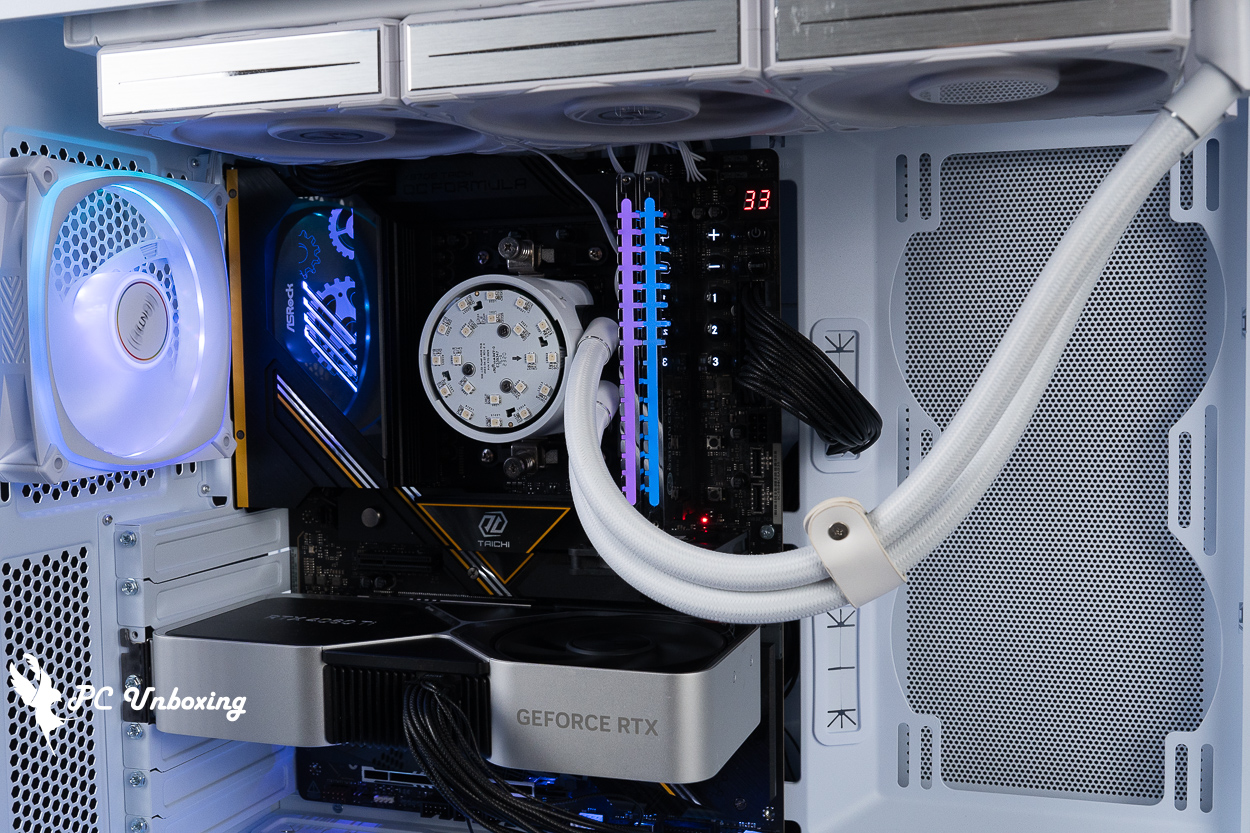
The air cooler is compatible with heights up to 185 mm and lengths up to 445 mm for graphics card mounting, leaving plenty of room for the flagship air cooler and graphics card to be mounted.
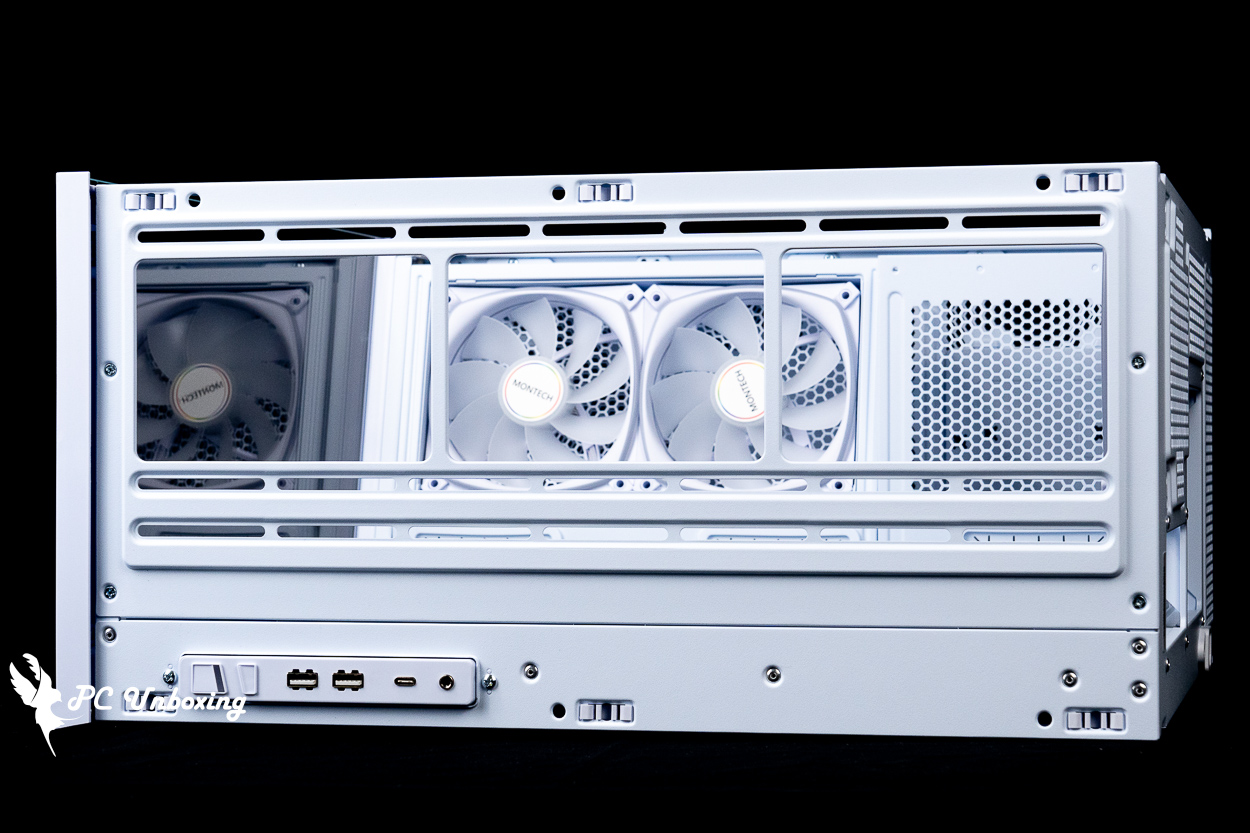
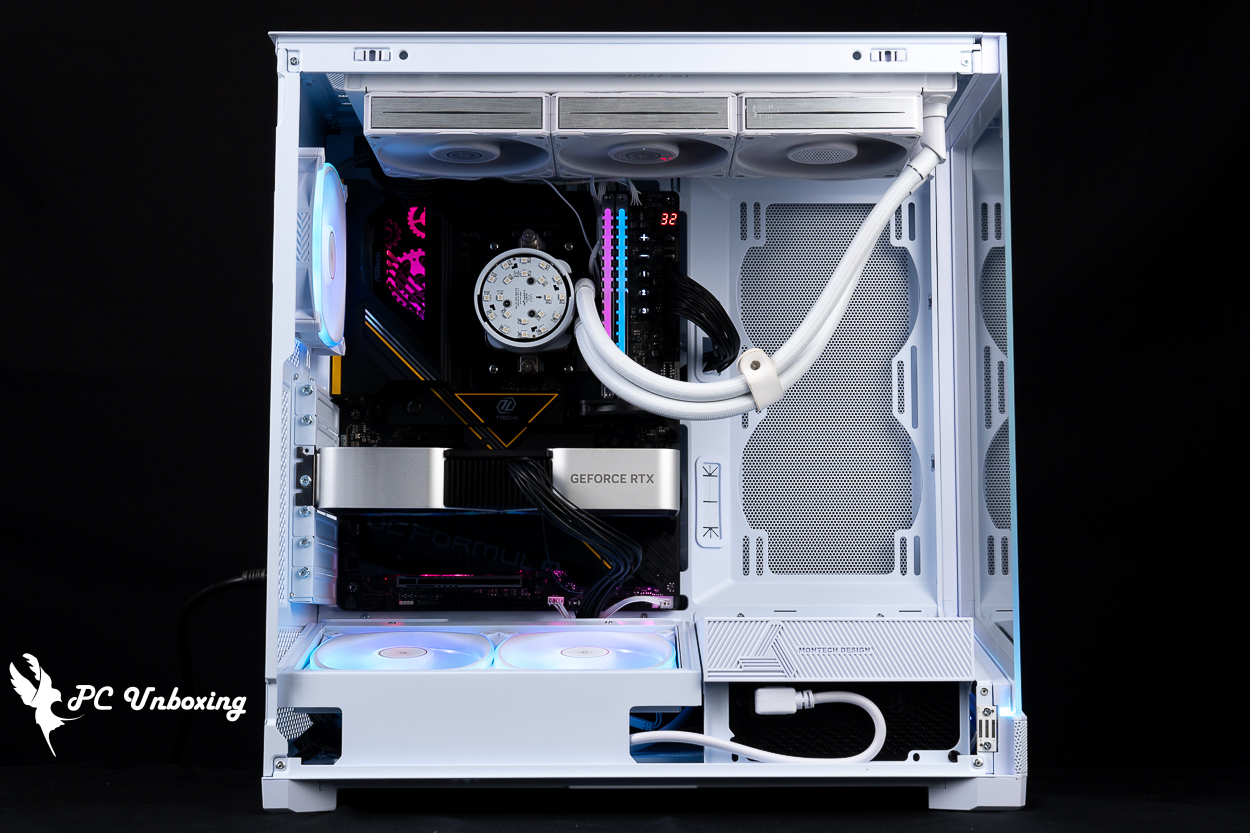
The 120 mm ARGB fan is pre-installed on the bottom two back of the chassis to complete the chassis cooling airflow planning. Officially, the chimney effect is used to plan the cooling airflow, but if you want to enhance the internal cooling effect of the chassis, the right side of the motherboard is equipped with two 120/140 mm fan mounting positions that can be expanded, and the water-cooling part is compatible with the 240/140 mm water-cooling exhaust mounting.
The three pre-installed fans are pre-wired, so all you need to do is connect a 4-Pin PWM power supply and a 5V 3-Pin ARGB connector to the motherboard slot to complete the synchronization, but you can also control the lighting via the chassis I/O buttons, which is convenient and doesn't need to be configured via software.

△ Pre-installed bottom two followed by one fan.
△ Compatible with 185 mm high air-cooled towers and 445 mm long graphics cards.

△ Top-mounted water cooling installation space display.
△ The two fan mounting positions on the side allow for the installation of two 120/140 mm fans or a 240 water-cooled exhaust.
△ Multiple alignment holes are provided for use.
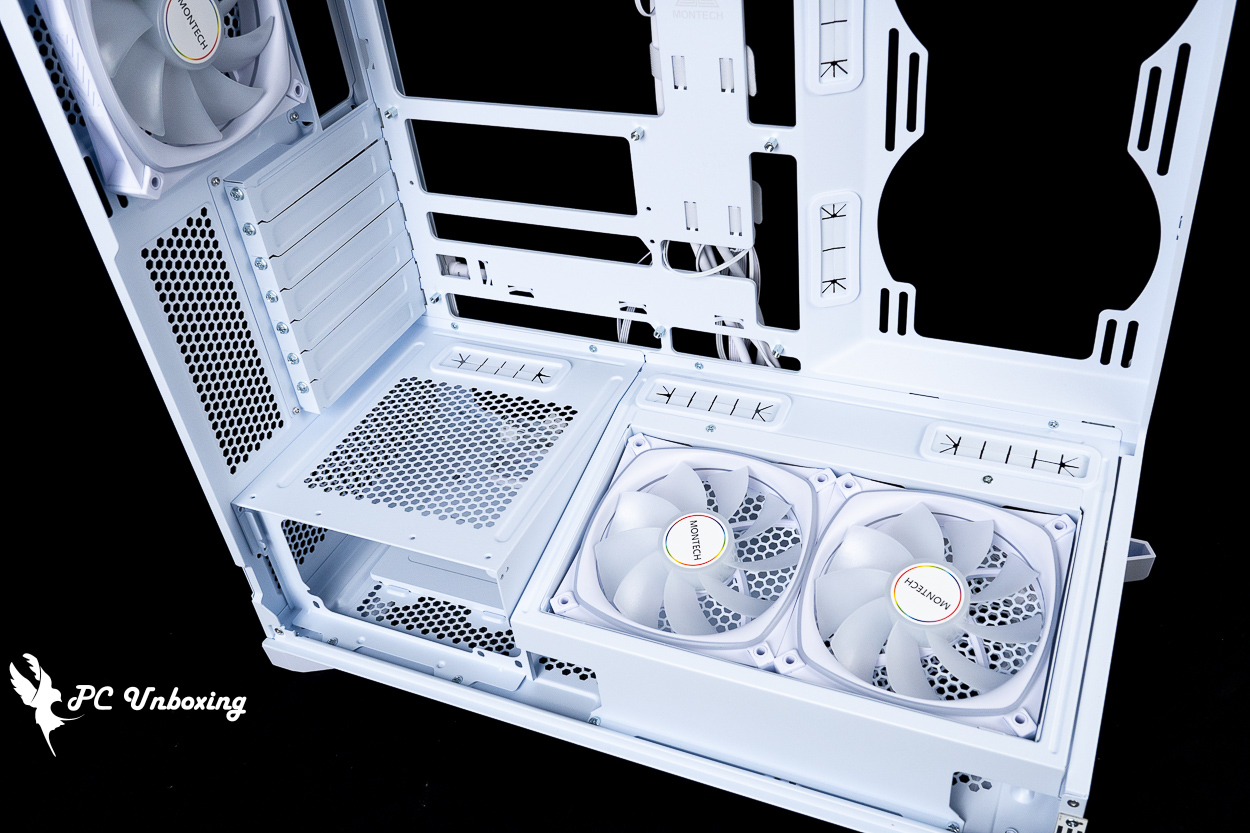
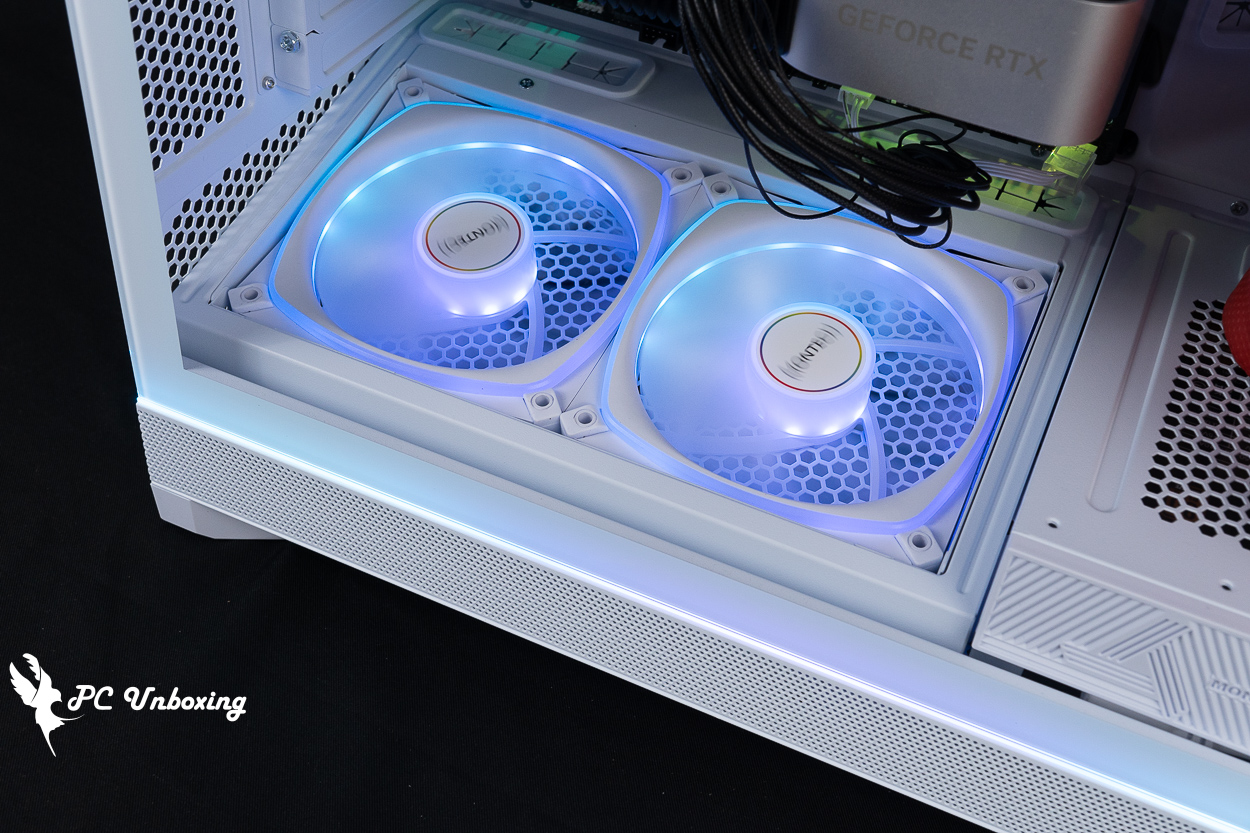
Two RX120 PRO fans are pre-installed directly above the power compartment with a maximum speed of 1600 RPM ± 10%, a maximum airflow of 72.3 CFM, and a maximum air pressure of 1.66 mmH2O, which is drawn from the bottom and both sides of the chassis to help provide an additional intake of air to enhance the cooling performance of the chassis.
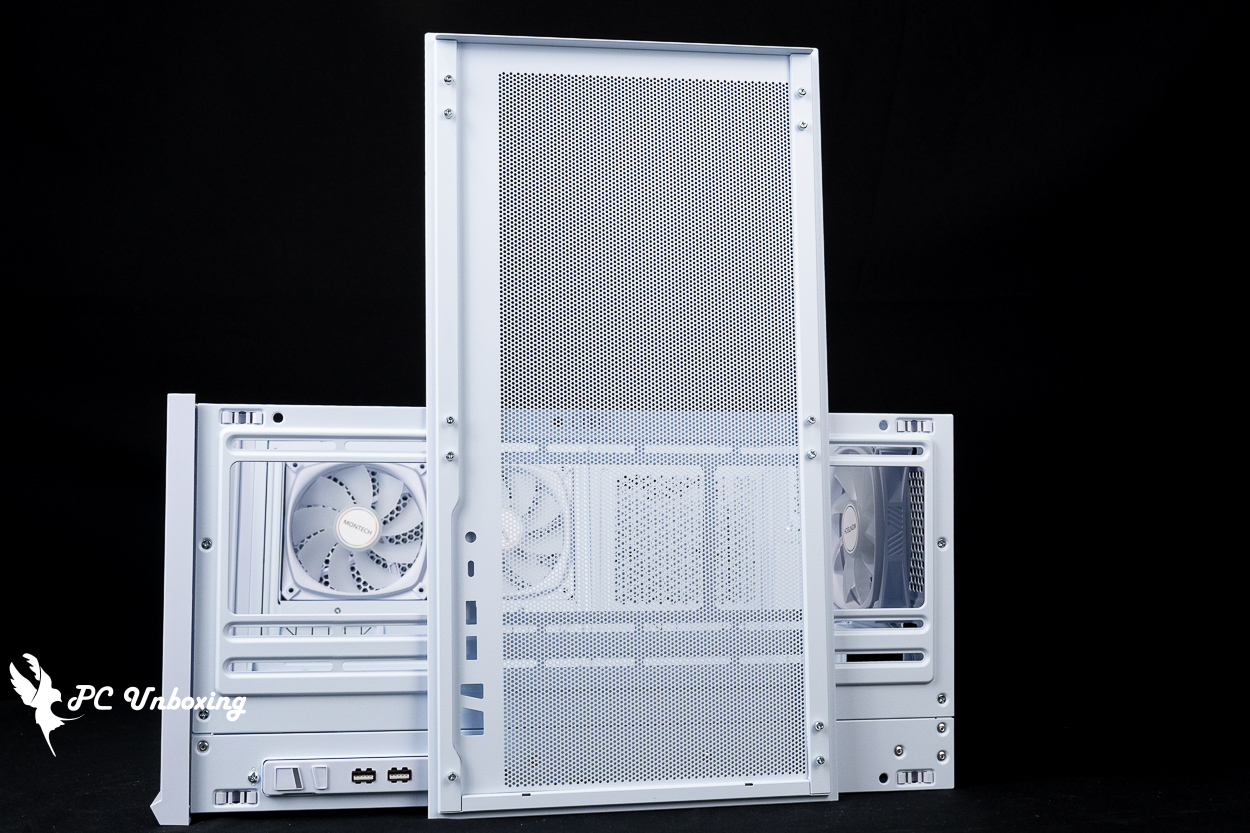
One of the features of the SKY 3 is the 13° angle of elevation of the bottom fan. This sunken fan mounting block supports only 120 mm fan mounting, and it is modular and can be adjusted to either CPU Mode for enhanced air cooling or GPU Mode for enhanced graphics card cooling depending on the needs of the user.
By factory default, the CPU mode is power on the left and fan on the right. This mode allows the airflow from the bottom fan to bypass the end of the graphics card, allowing the CPU cooler to utilize more cold airflow, but I'm not sure if it would work with a larger and wider triple-fan rated graphics card.
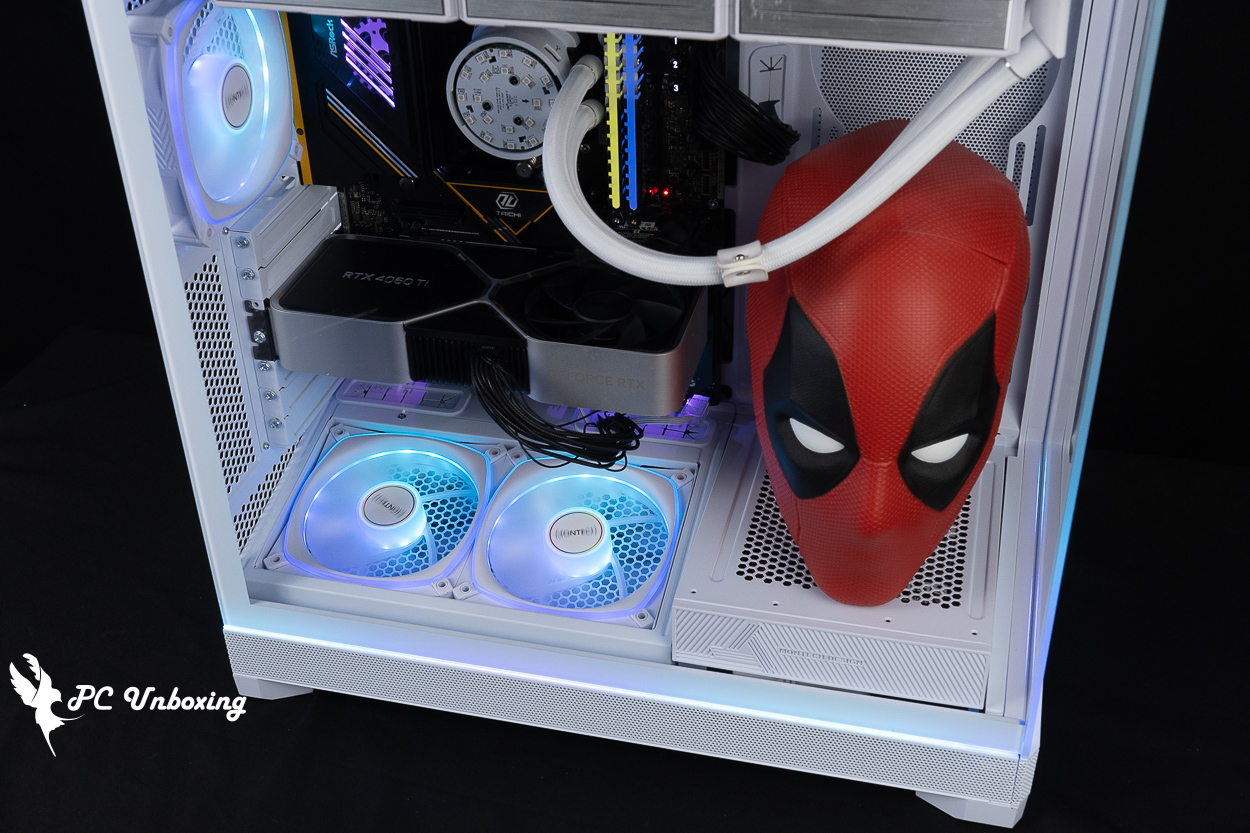
If you want to enhance graphics card cooling (especially for dual-fan cards), you can use GPU Mode to enhance graphics card cooling. In this mode, the power supply is mounted on the right side, and the two fans are on the left side, so that the airflow is completely direct to the graphics card.

△ The factory default setting is CPU mode with the power supply on the left side and the fan on the right side, and there are four locking holes on the top of the power supply compartment.

The power supply and fan mounting bracket are each secured by four screws, and the fan mounting tray is secured by two screws.
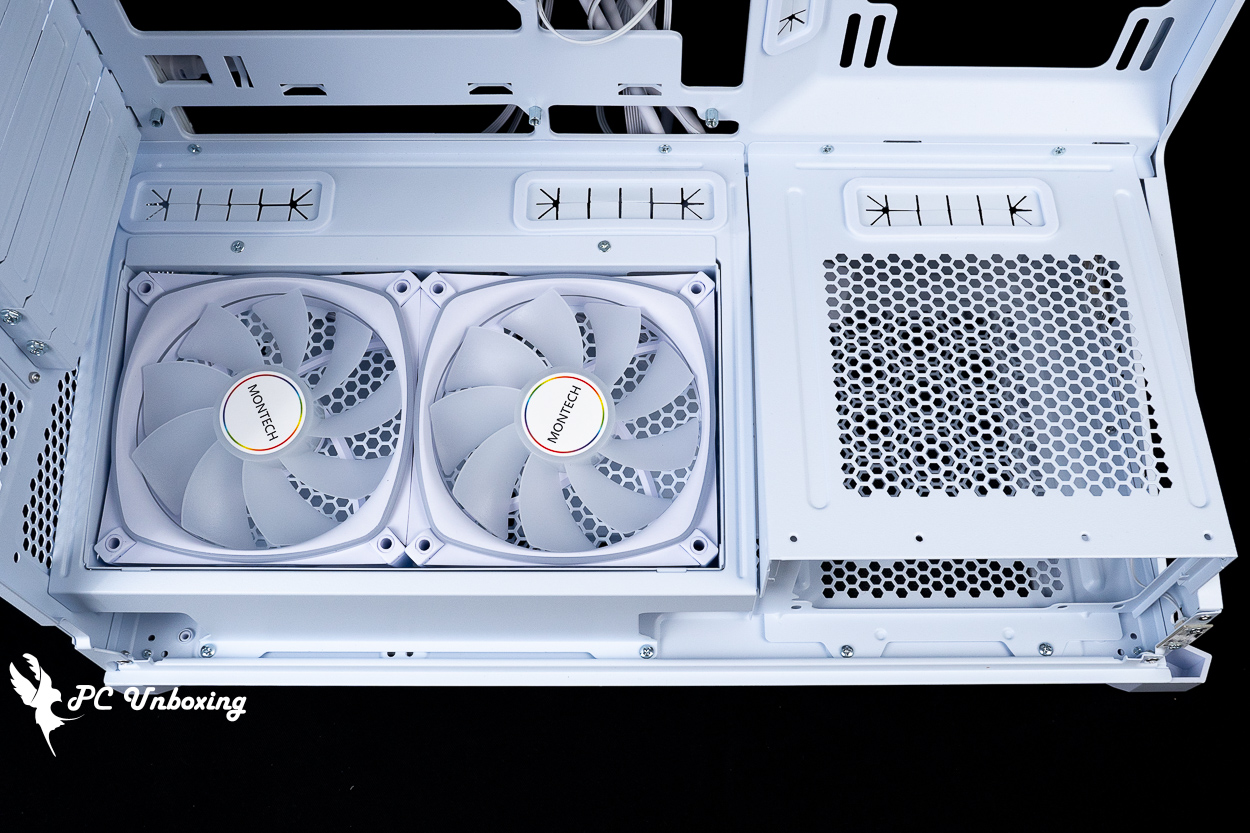
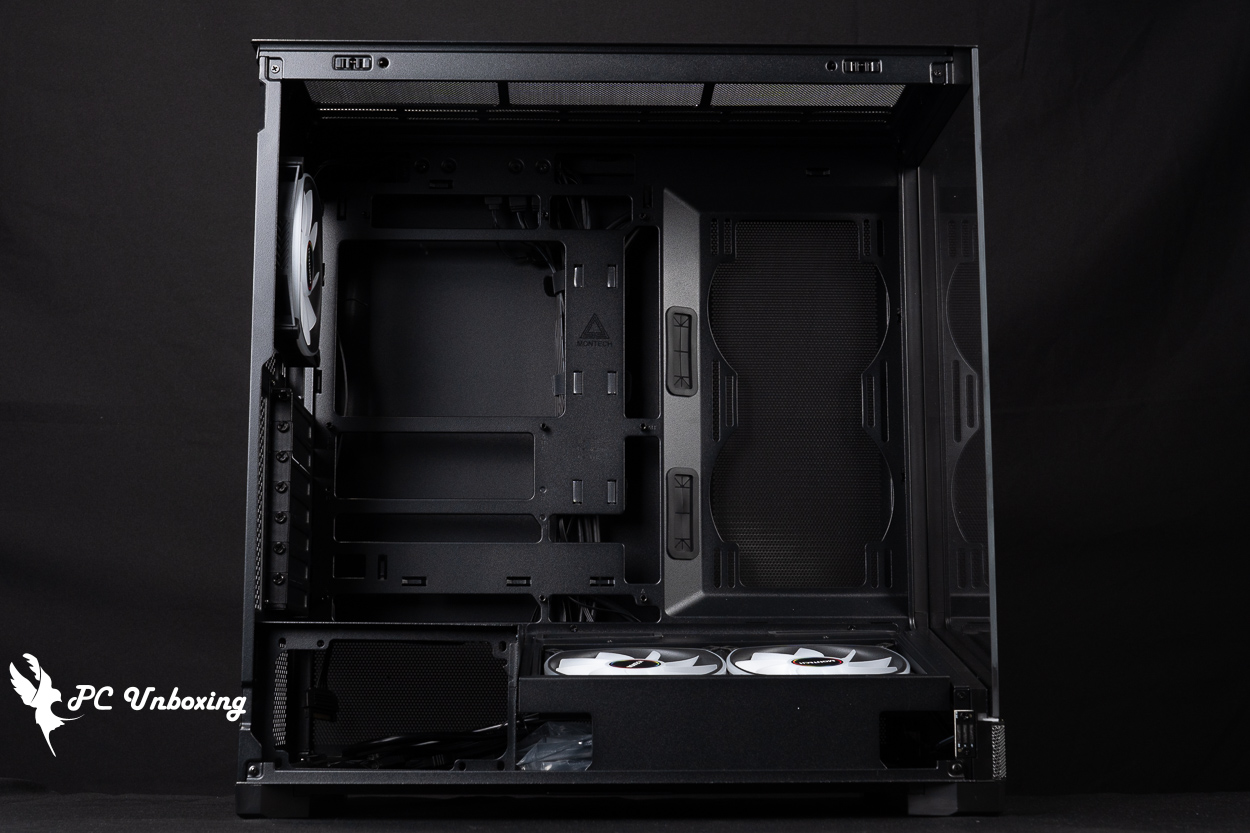
△ Modularization is easily changed to GPU Mode with the fan on the left side.
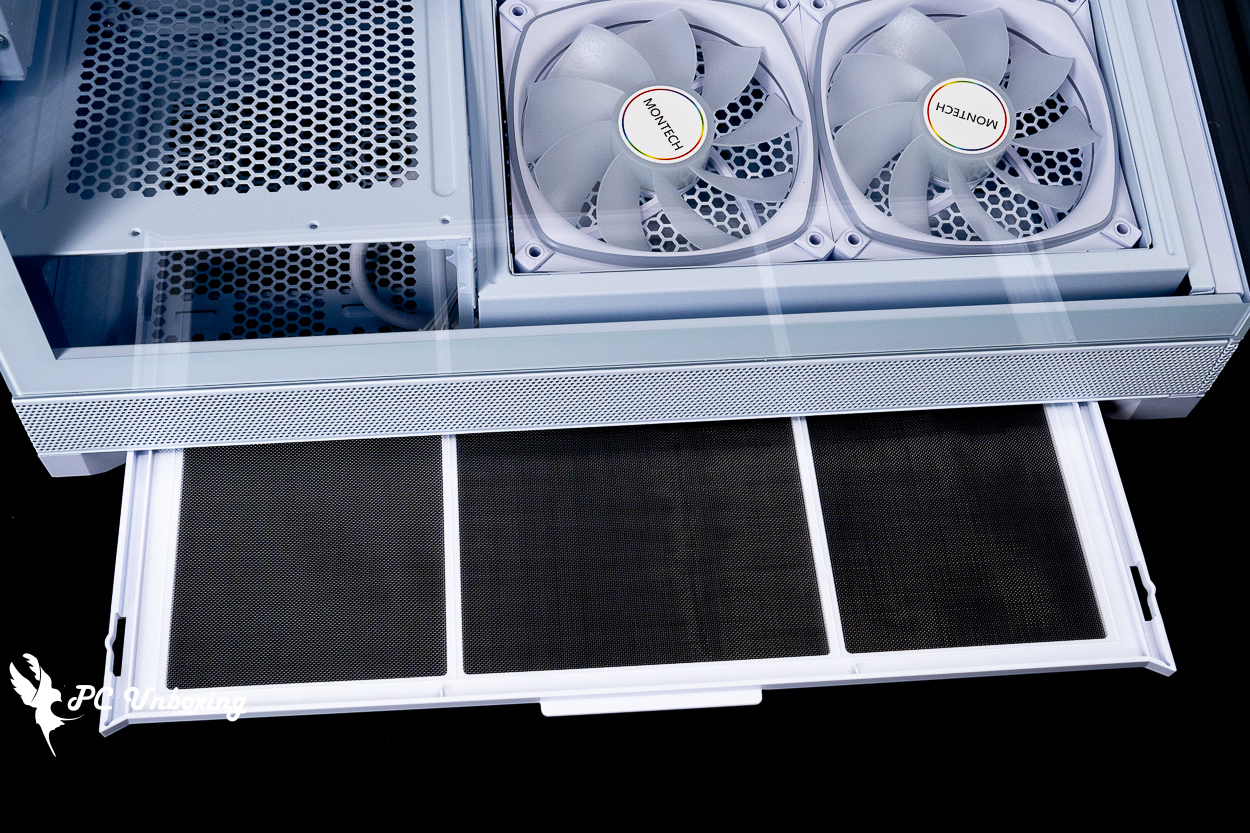
△ Side filters under the casing to reduce the amount of dust.
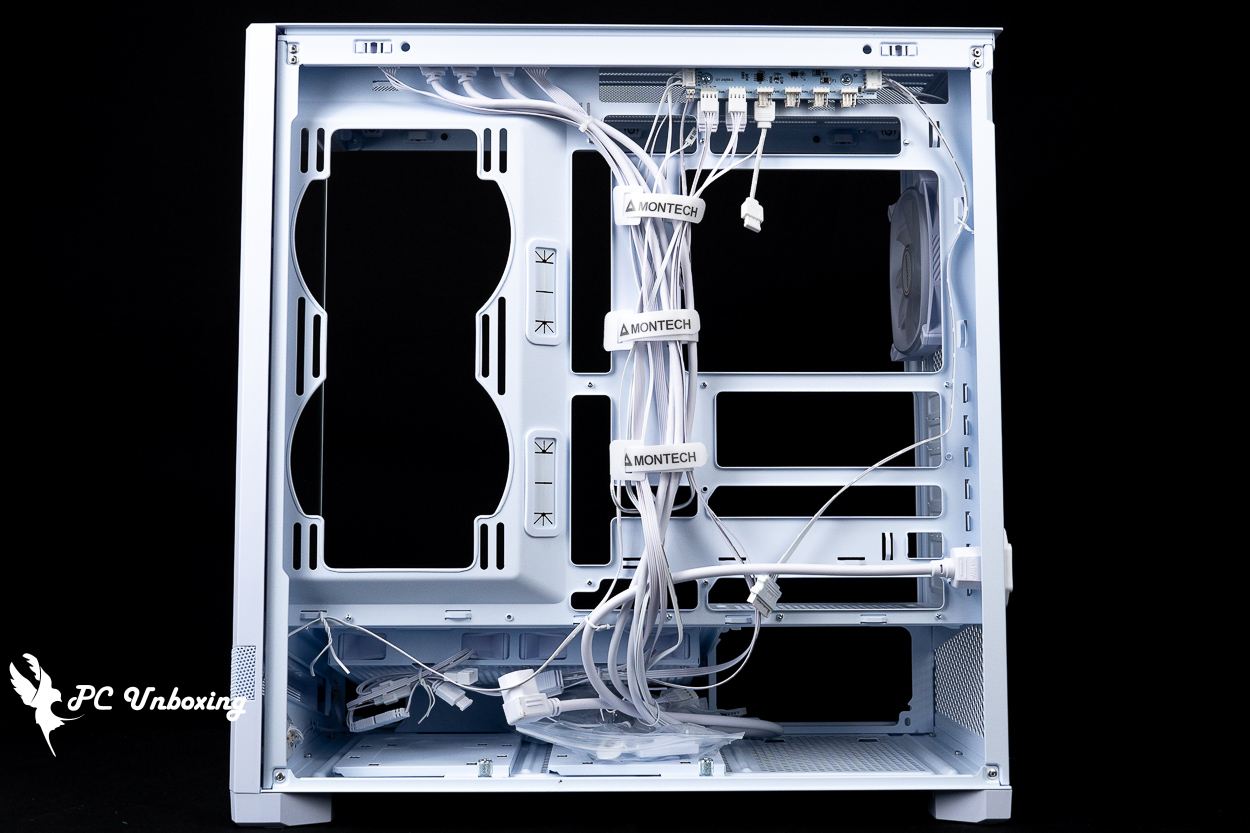
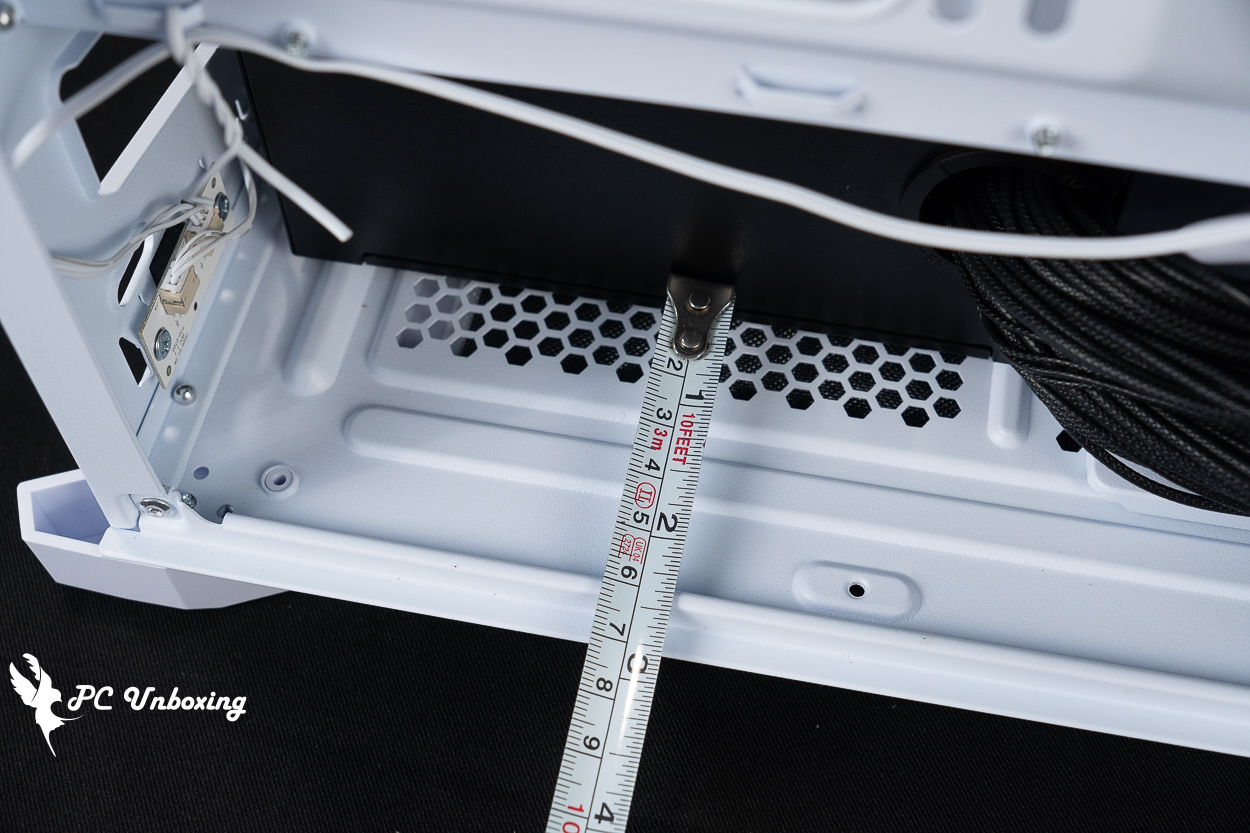
On the back of the motherboard, there is plenty of room for wiring, as there is a maximum of 3 cm of wiring space to provide depth for the AC extension cables, and there are a number of devil's felt harnesses on the inside to make the overall wiring experience quite acceptable.
An ARGB fan hub is included in the chassis, and after removing the slots for the pre-installed fans and light bars, the included ARGB hub allows for the installation of four PWM and three 5V 3-Pin ARGB devices.
Two composite drive bays on the bottom of the chassis allow for the installation of two 2.5 or 3.5-inch hard drives, and the entire chassis can be expanded by up to two 2.5 or 3.5-inch hard drives, for a total of two hard drives.
△ The entire space of the chassis is shown.

△ The depth of the alignment is up to 3 cm.
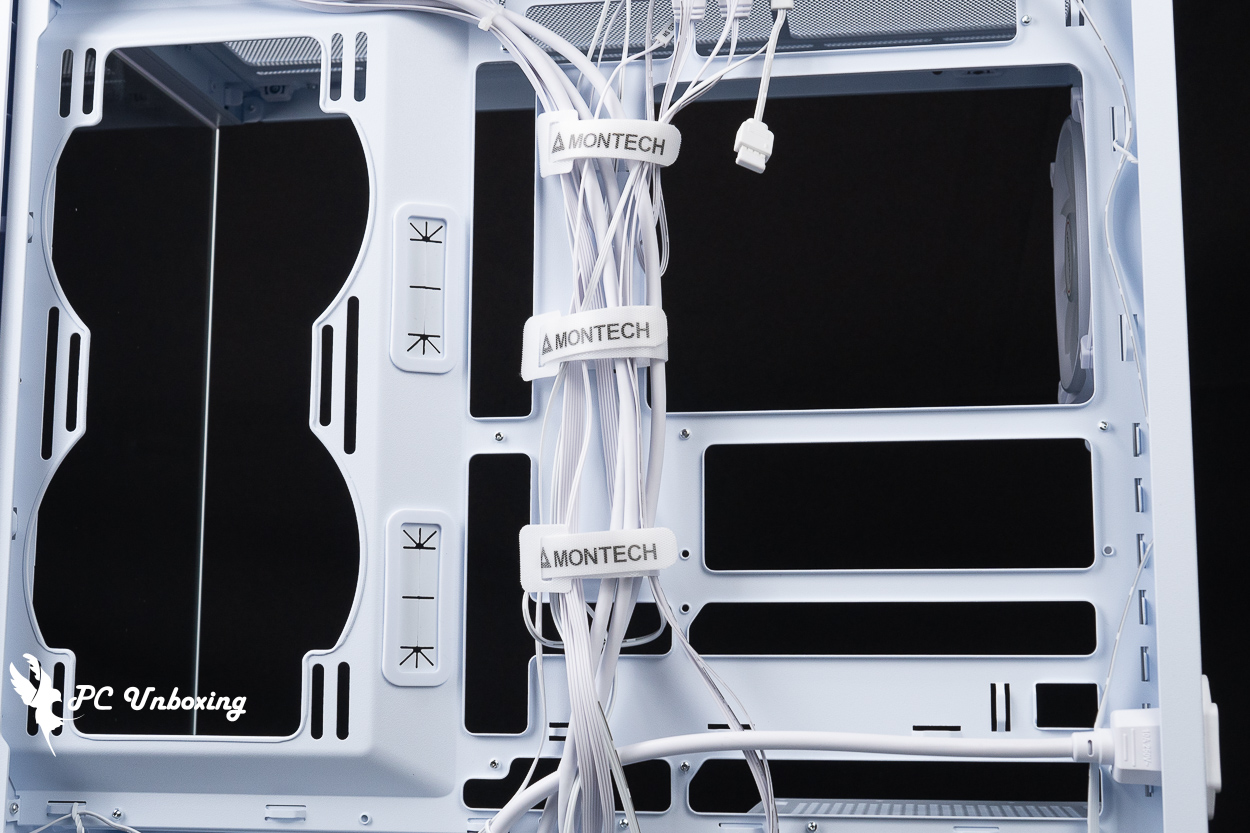
△ Devil's Felt Harness helps to straighten the line.
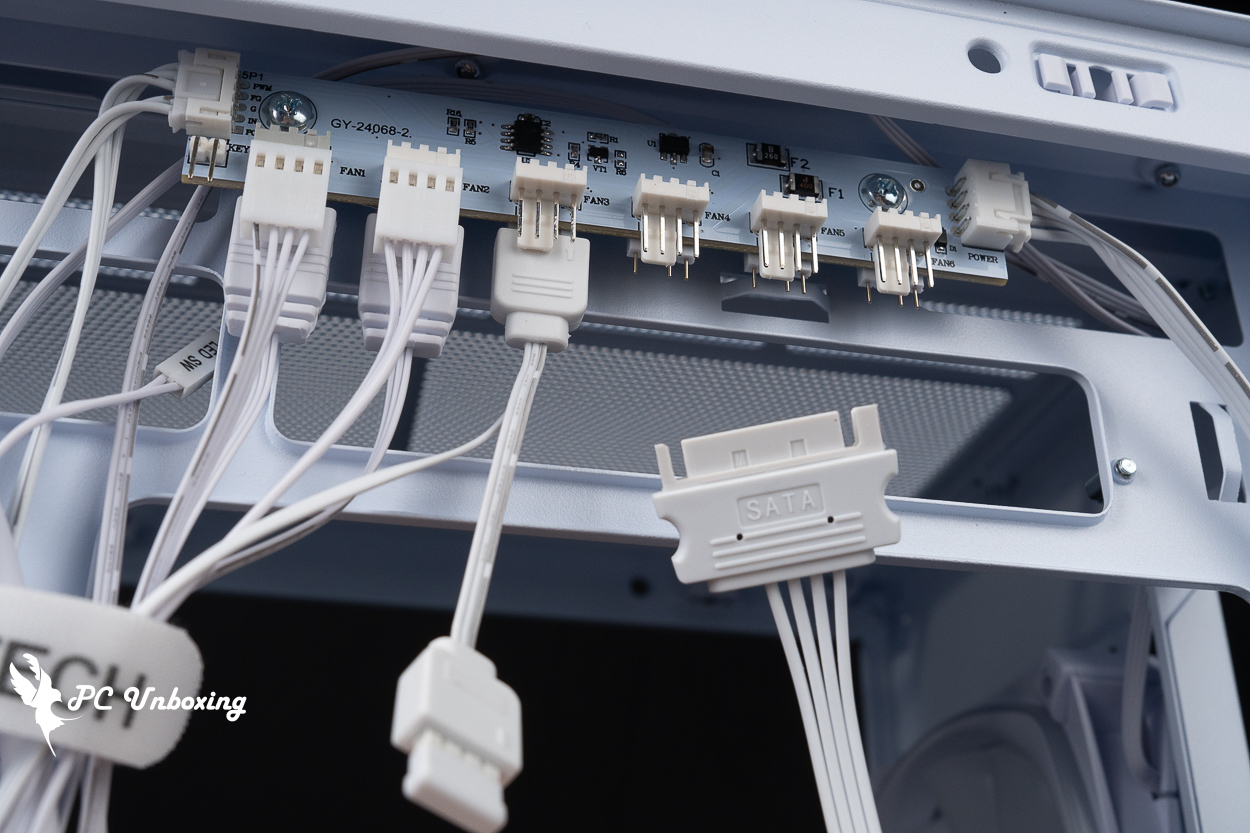
The included ARGB HUB hub requires a SATA power supply and provides PWM and a 5V 3-Pin ARGB connector to the motherboard slot for fan speed and lighting settings through the motherboard.
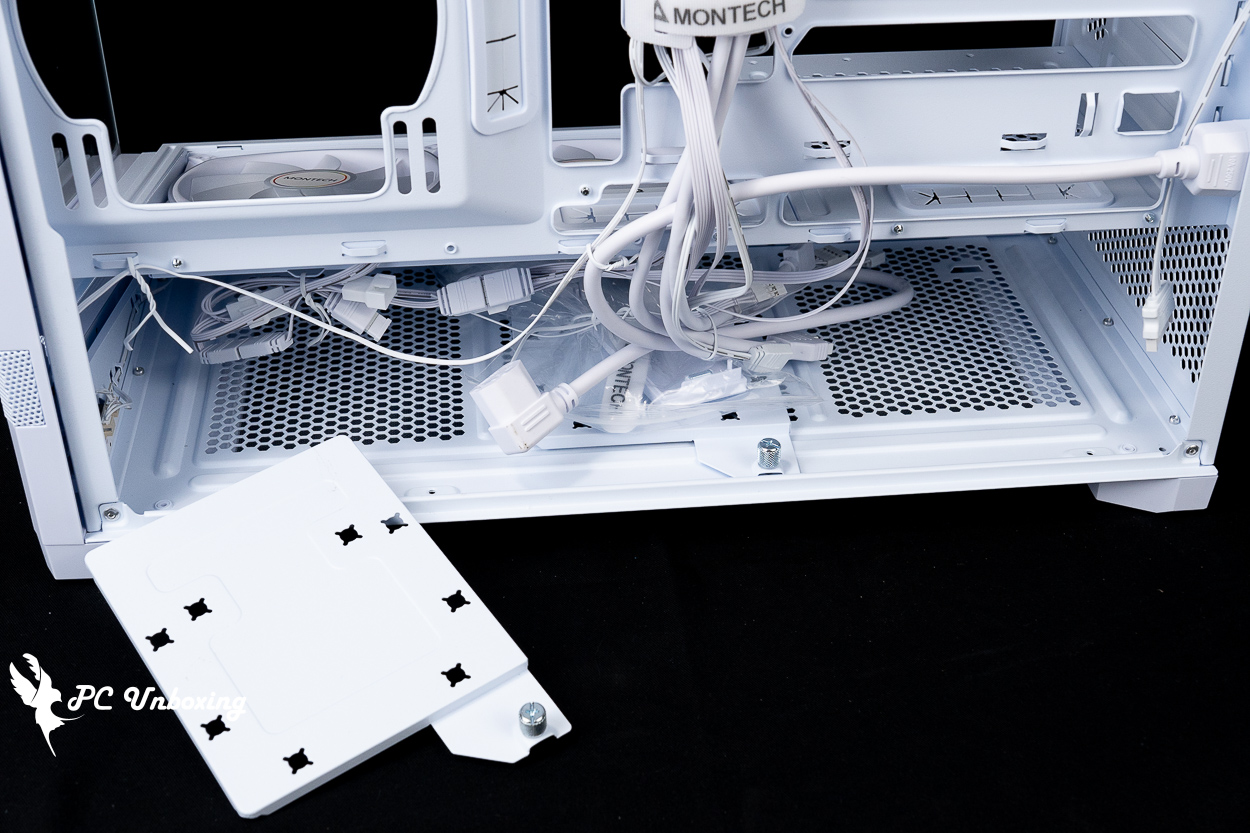
△ The two composite hard drive mounting plates are secured by hand screws, allowing you to change the mounting position according to the fan mode to avoid installation conflicts.
The power supply is compatible with the ATX specification of 160 mm in length, and actually with the BETA 2 850W power supply of 140 mm in length, there is about 6 cm of cable space available, and there are mesh holes at the top and bottom of the power supply mounting location, so it is possible to mount the PSU with the fan up or down at the same time.
△ Side-mounted power supply installation depth display.
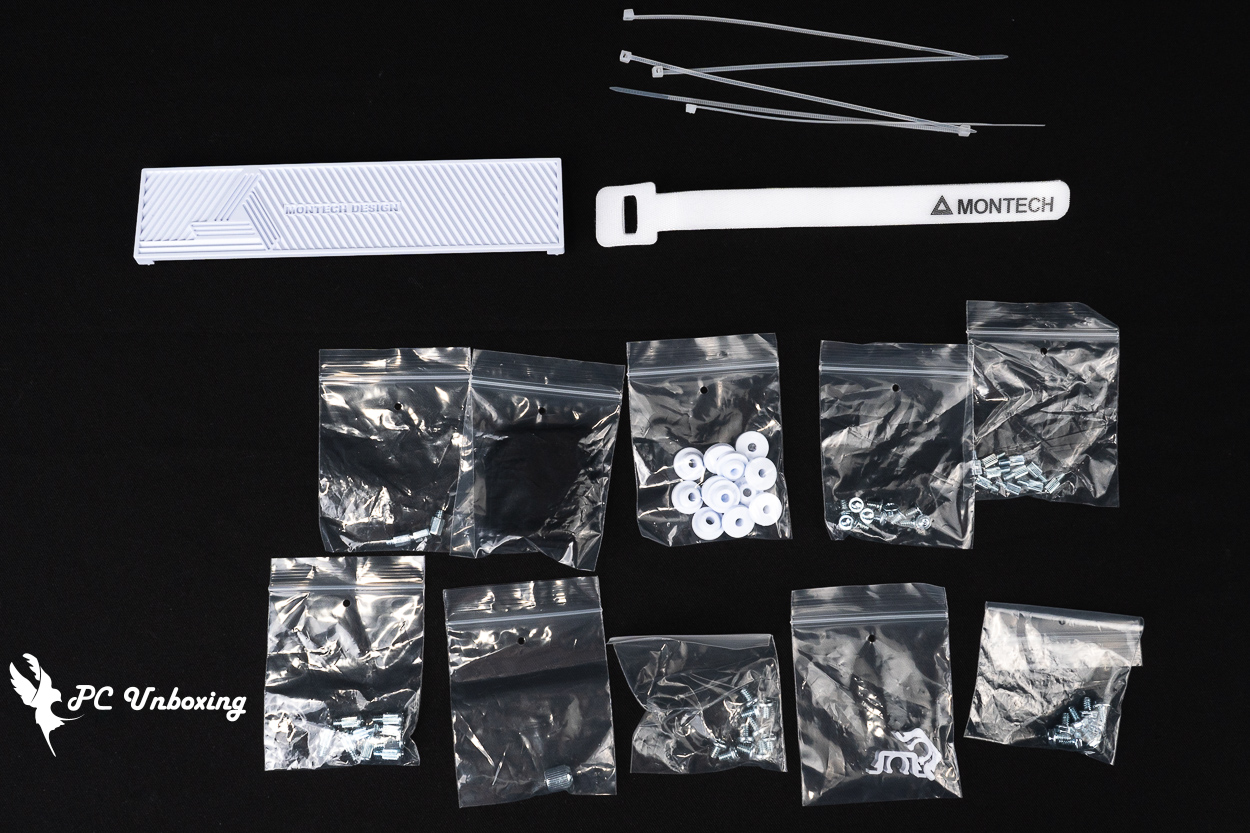
Accessories include disposable straps, assorted screws, devil's-felt cable ties, side-mounted power magnets, mirror wipes, and hard drive mounting cushions.
MONTECH BETA 2 850W Power Supply Unboxing|ATX 3.1, 12V-2X6 with Bronze Efficiency
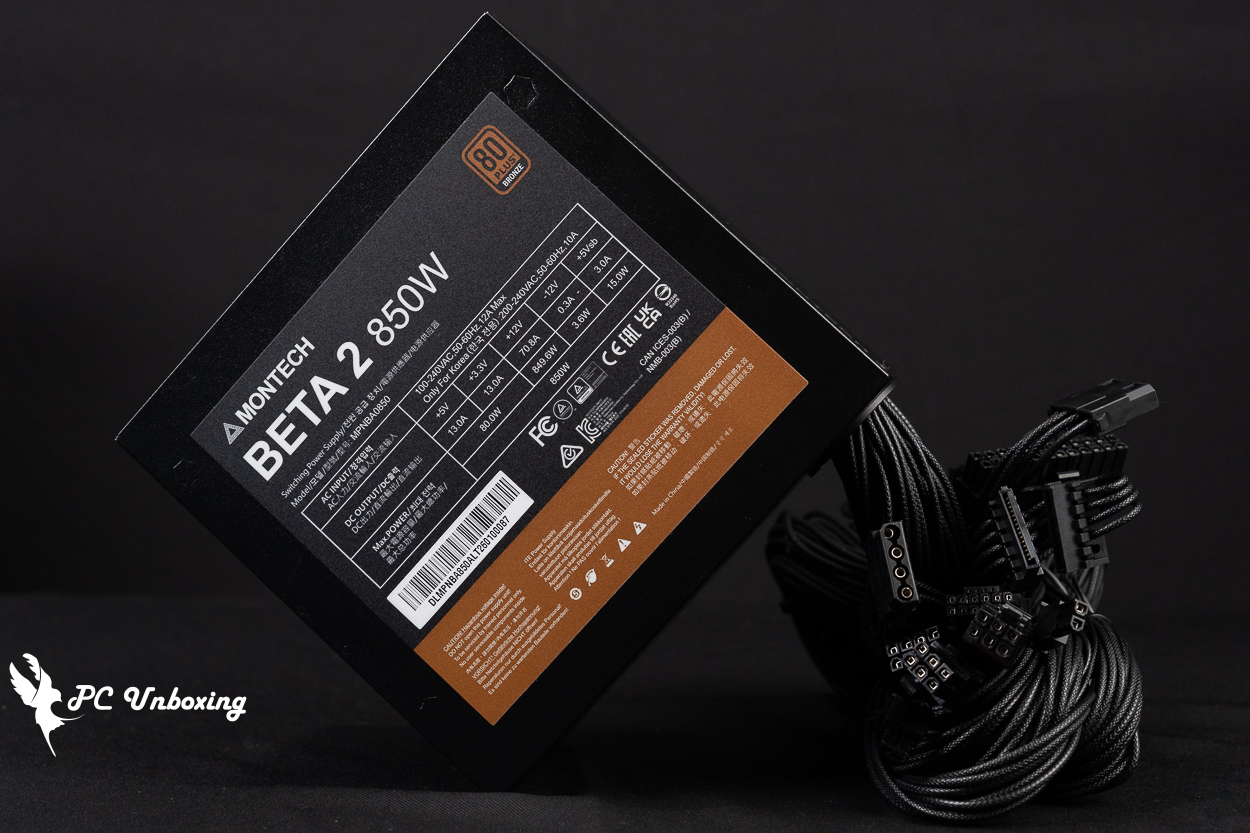
MONTECH's new BETA 2 series of power supplies, with direct cable, 80 Plus Bronze Conversion Rate Certification, Intel ATX 3.1 standard, 12V-2X6 power supply connector updated again, the series of power supplies synchronized with the launch of the 550W, 650W, 750W, 850W four kinds of wattage, from the specifications of the positioning of this power supply will be the price of the entry-level products, even if the most expensive 850W model is also two thousand one hundred dollars to find the price, the warranty is a five-year warranty time. Even the most expensive 850W model is also in the price of two thousand one hundred dollars to find, after-sales warranty is a five-year warranty time.

△ BETA 2 850W power supply.

△ Power supply specifications.

△ Number of wires.

△ Checking the model number through the Bureau of Standards and Inspection of the Ministry of Economic Affairs, it can also be seen that the model is manufactured by Hon-Kwang Electric(Philippines), Inc. on behalf of ShenZhen XinWeiYe Technology Co.
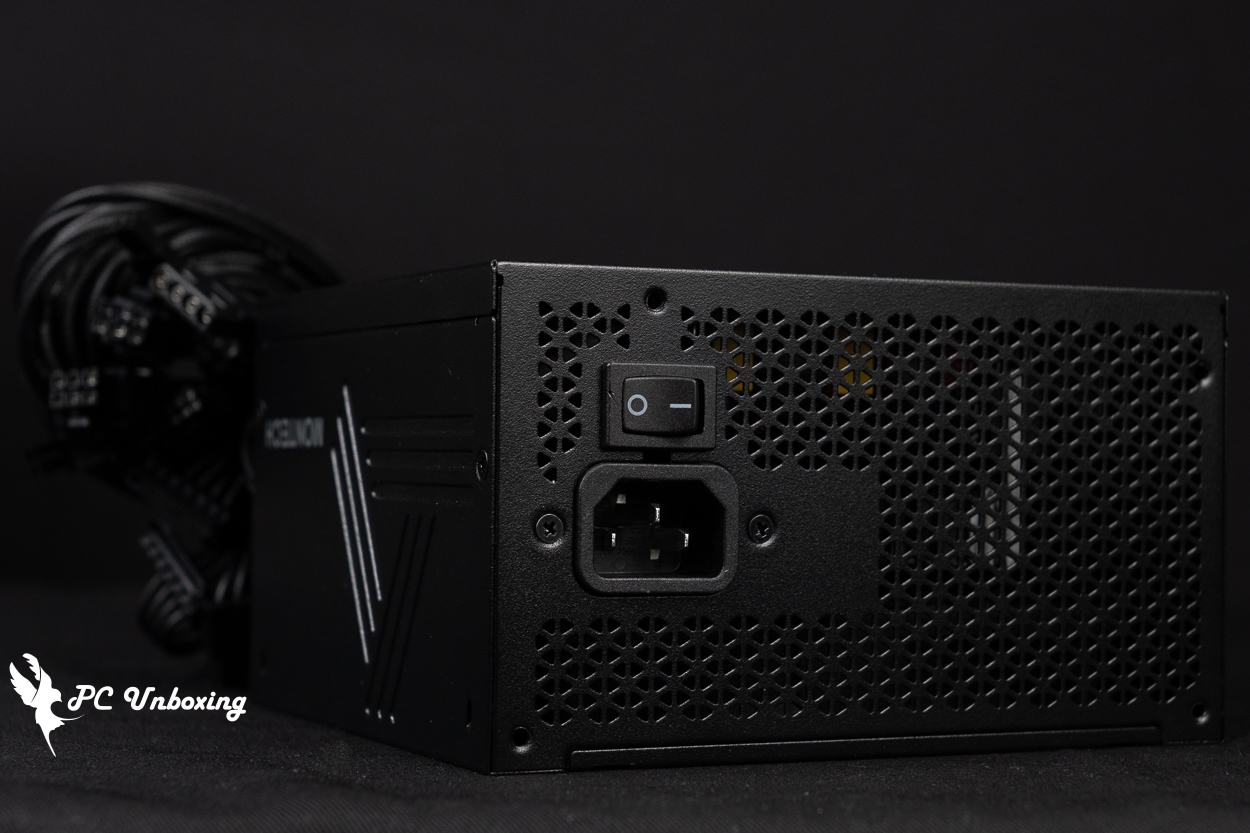
The BETA 2 850W power supply measures 140 x 150 x 86 mm and is only 140 mm long, which brings more space for cables to be hidden in the chassis. It has passed the Bronze conversion rate standard of 80 PLUS certification organization, and also complies with the ATX 3.1 specification, and is protected by OPP / OVP / UVP / SCP / OCP / OTP and other multi-protections. The power supply cable is a straight-out design, so the power supply can only use what it is given, and the power supply uses a Ø120 mm HDB fan for internal cooling.

△ Straight out of the line planning.
The length of the power supply is 140 mm.
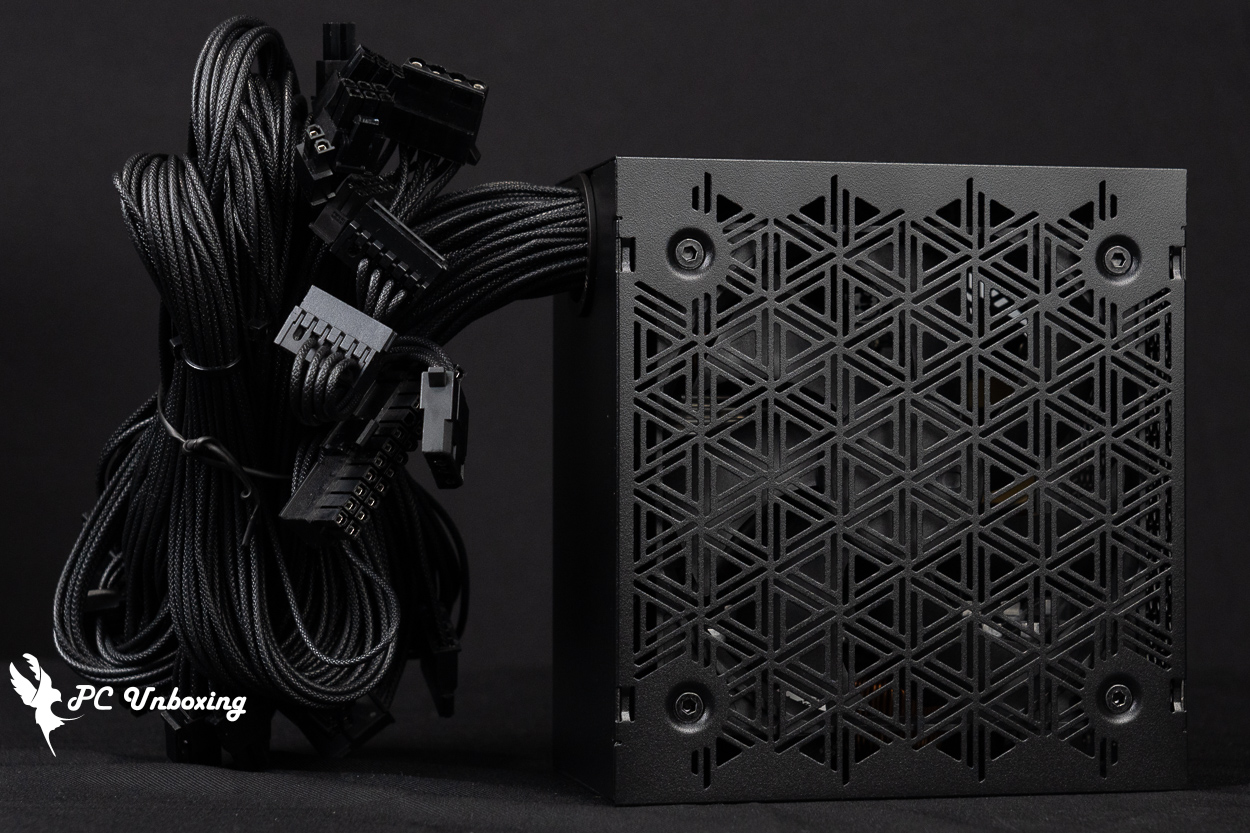
△ Use a 120 mm fan for cooling.
A large mesh is provided at the back to discharge the waste heat.
Although it's an entry-level price/performance ratio product, the BETA 2 850W power supply takes into account the appearance score in the cable, using soft embossing on the cable surface to bring a better appearance score, but there's no cable grooming comb that may have to be added on its own if you want to be more neat.
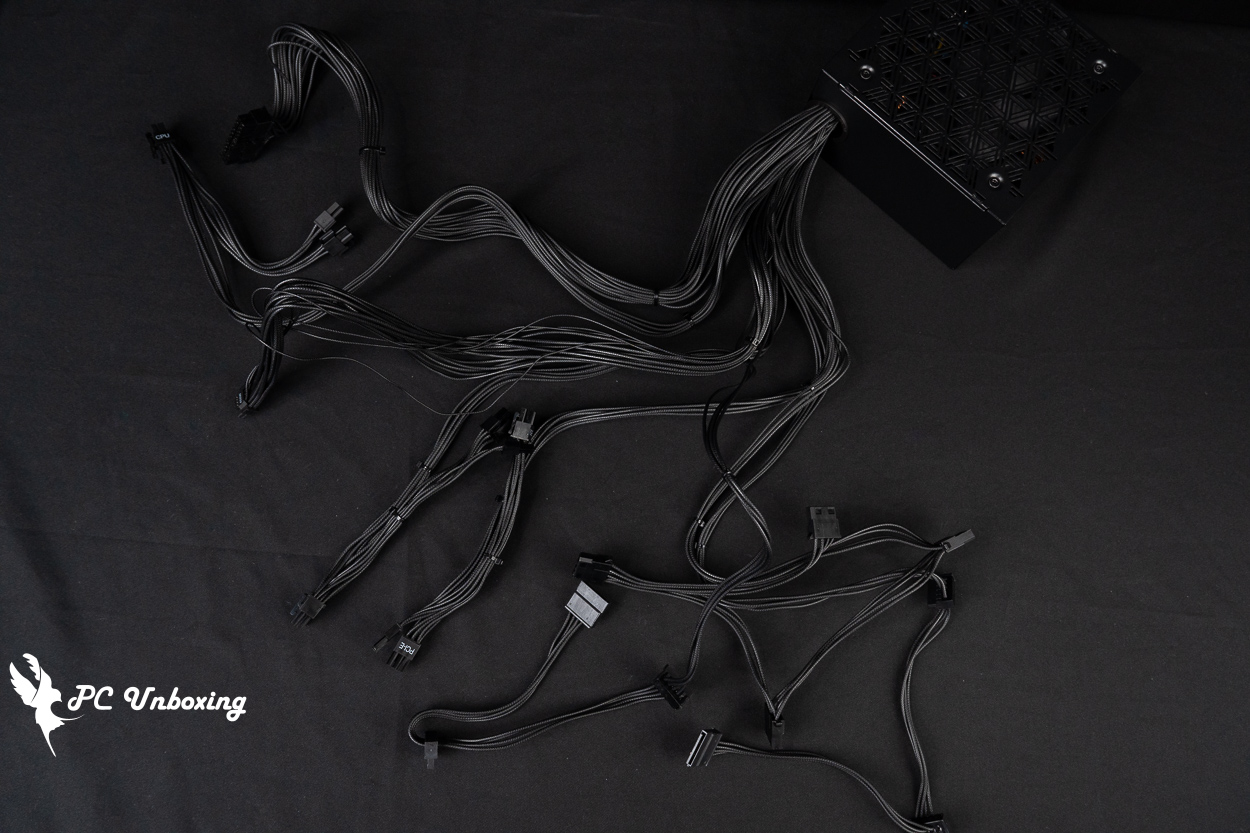
△ List of straight out lines.
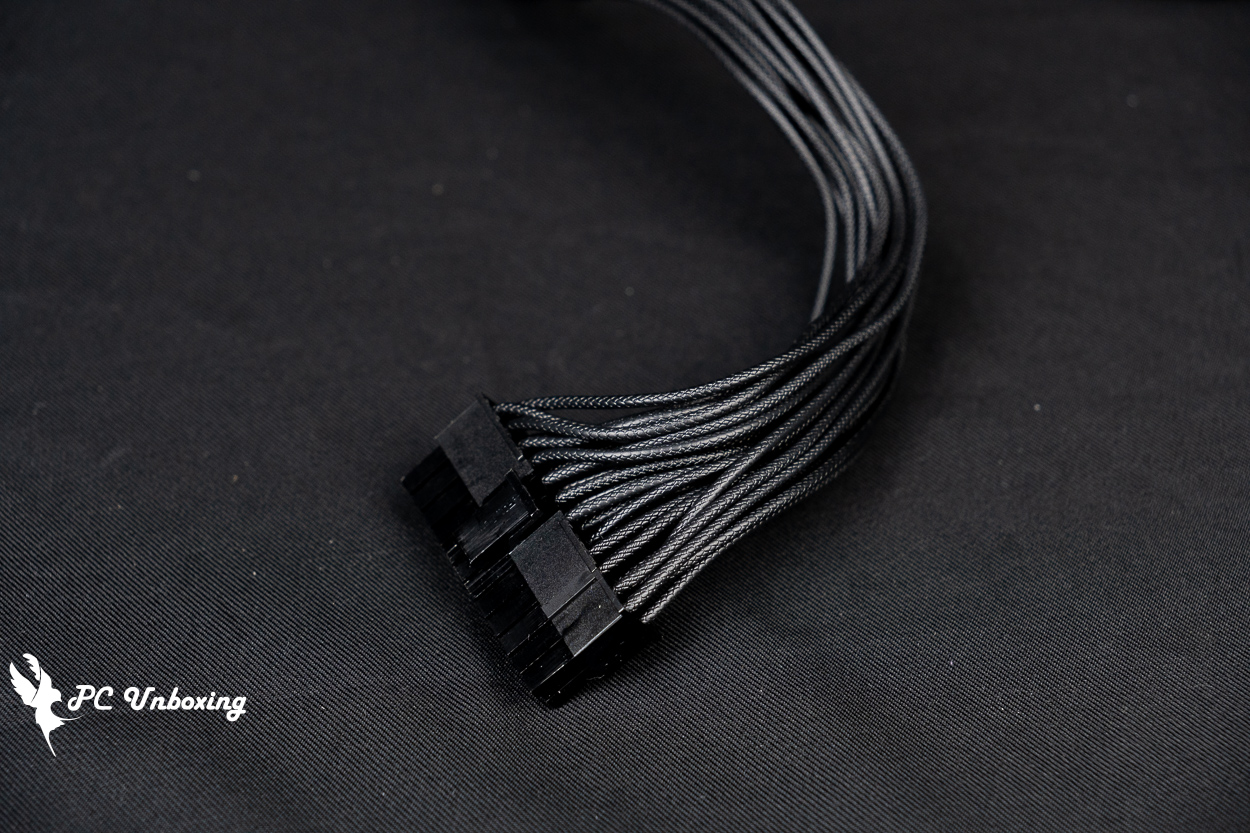
△ Motherboard 24 Pin power supply cable.

The CPU power supply cable is a y-shaped cable with two 4+4 pins, totaling 8 pins.
The BETA 2 850W power supply's native 12V-2×6 power supply cable is indeed a 12V-2X6 specification as evidenced by the H++ on the power supply connector, and the cable is labeled with a 450W power supply capacity.
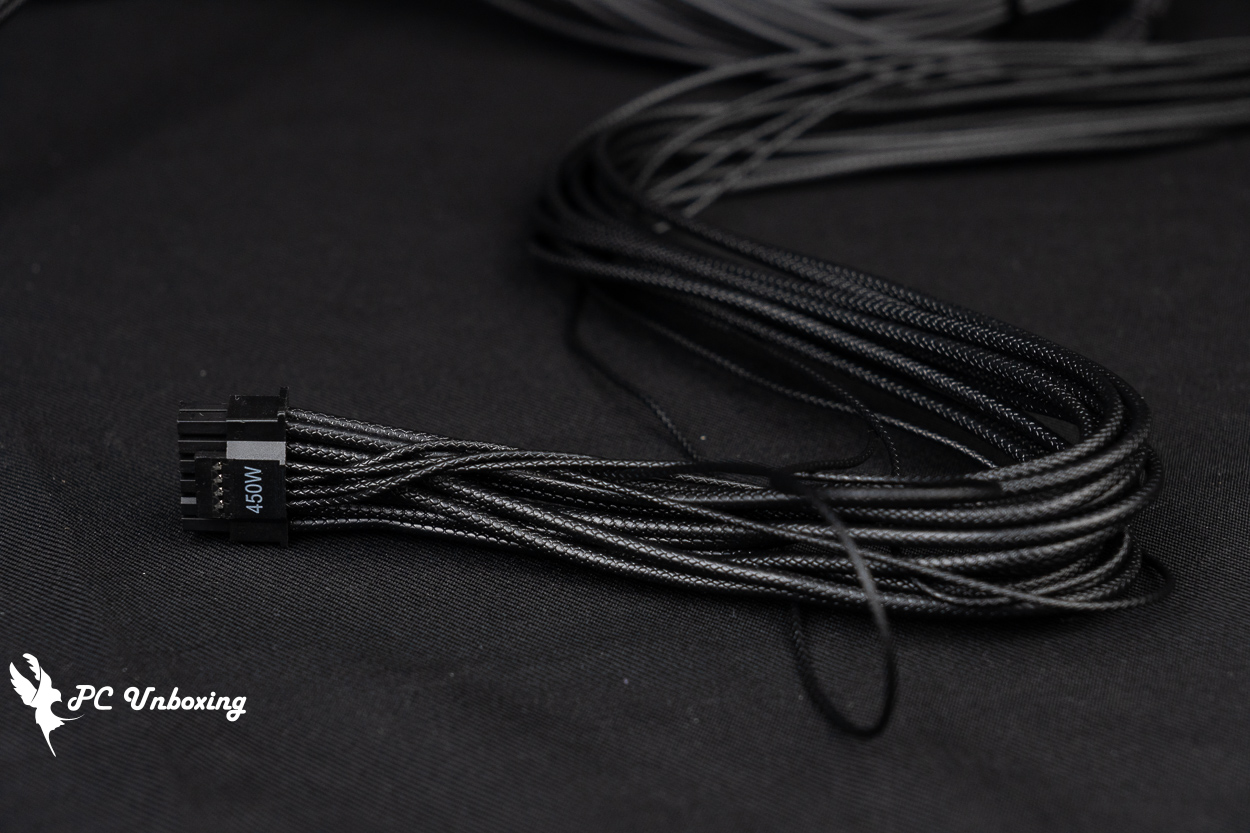
△ The maximum power supply of a single strip is 450W.
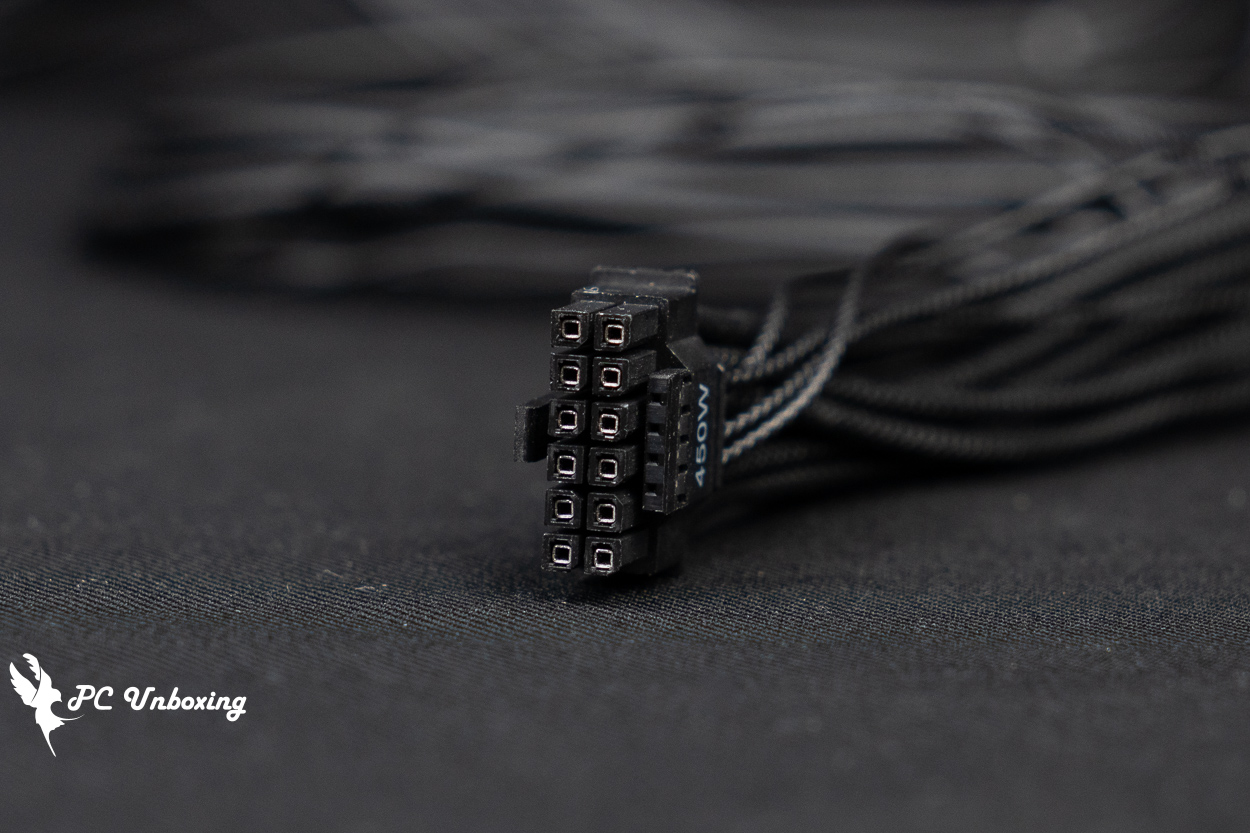
△ 12V-2X6 Interface.

△ Engraving H++ on the side to verify the authenticity.
There are two PCIe power cables for the graphics card, each providing two y-shaped 6+2 Pin power connectors, for a total of four PCIe 8-Pin connectors.
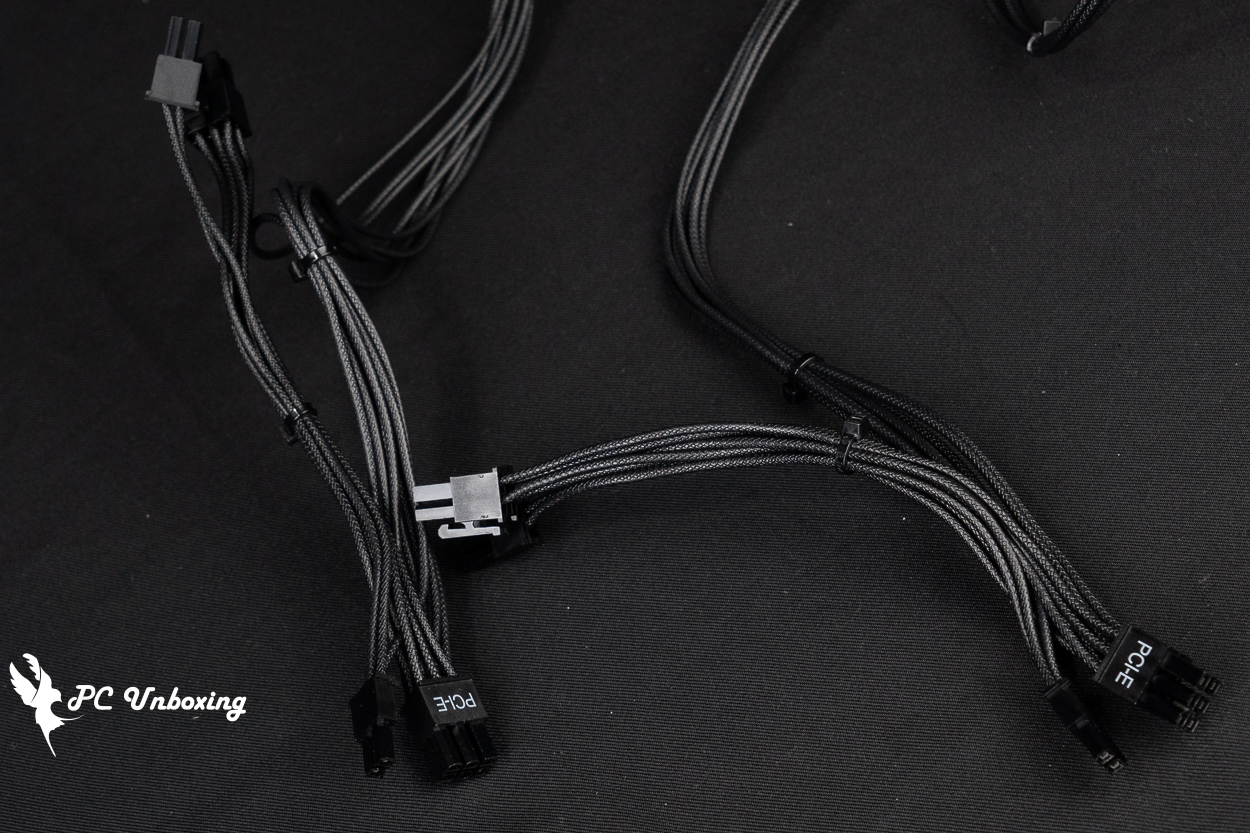
△ Two PCIE 6+2 Pin power cables in a y-shape providing a total of four PCIE 6+2 Pin power connectors.
Other device power cables include two SATA power cables with a total of six power connectors, two cables with 180-degree flat SATA connectors on the end, and one large 4-Pin power cable with a total of four large 4-Pin power connectors.

△ Two SATA power cables and one large 4-Pin power cable.
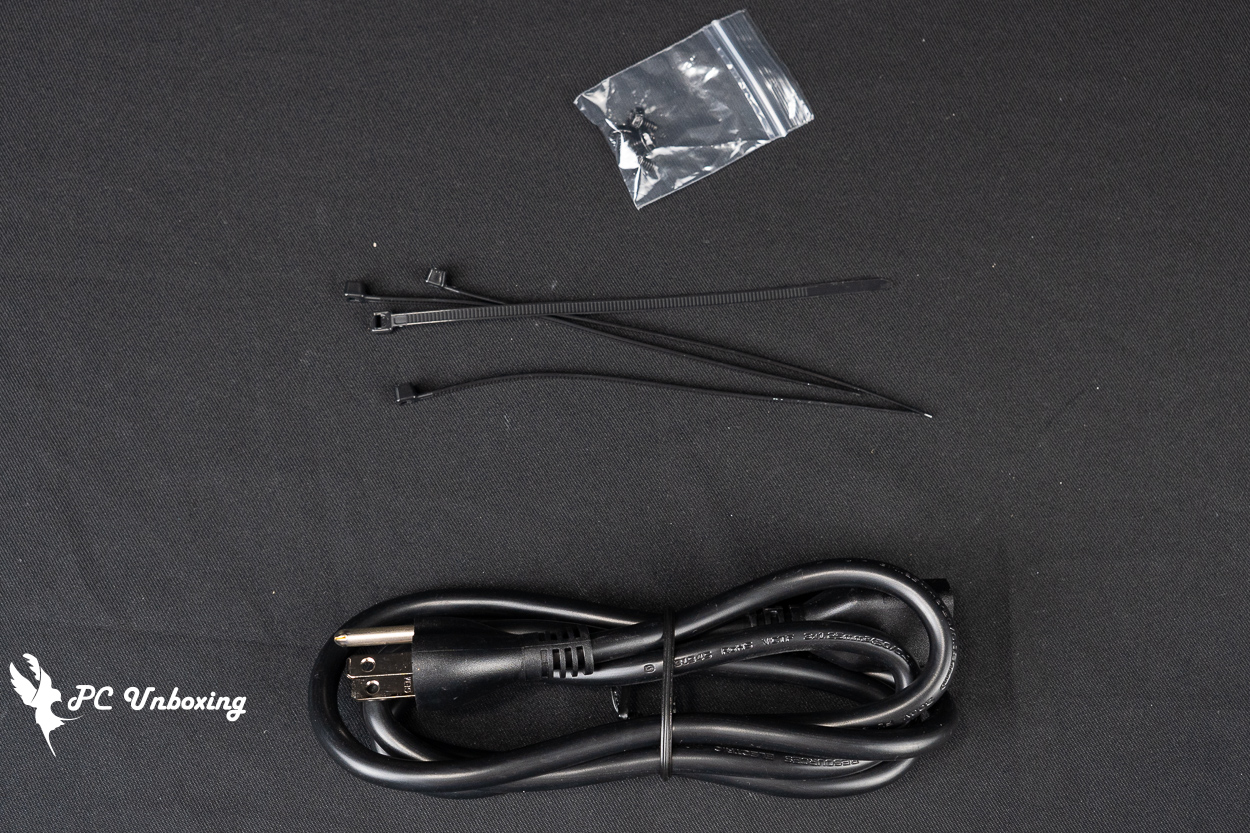
△ List of accessories.
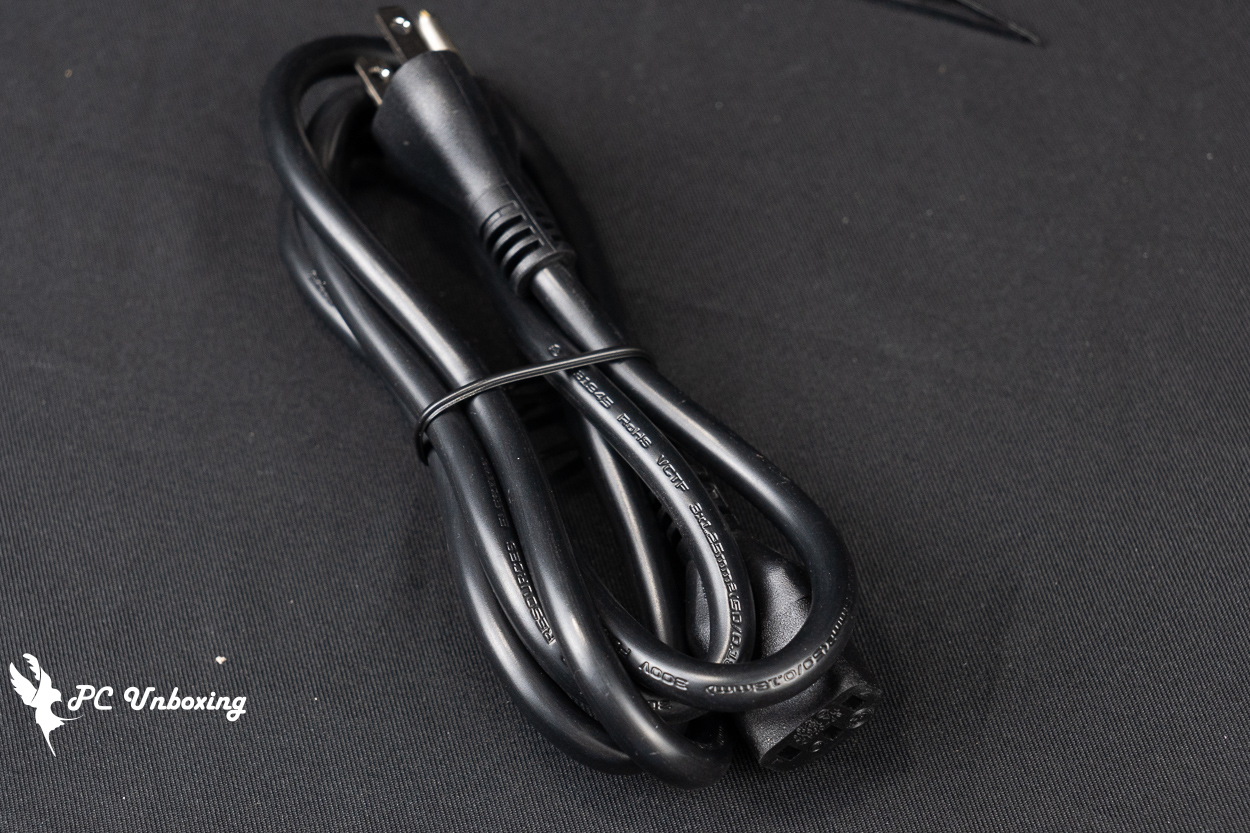
△ AC wire diameter.
MONTECH SKY 3 + BETA 2 850W Installation|Installation and configuration sharing
Then we will show you the actual installation of Monarch MONTECH SKY 3 chassis and BETA 2 850W power supply.
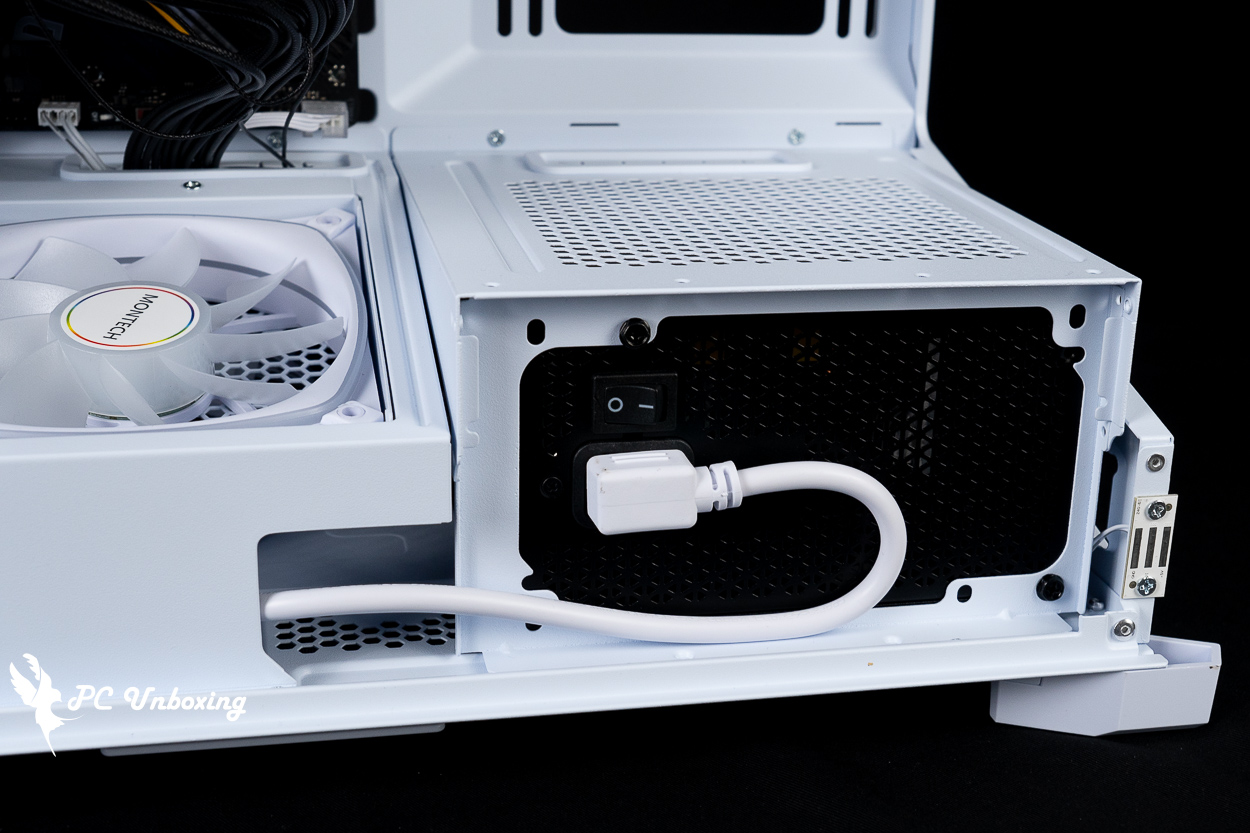
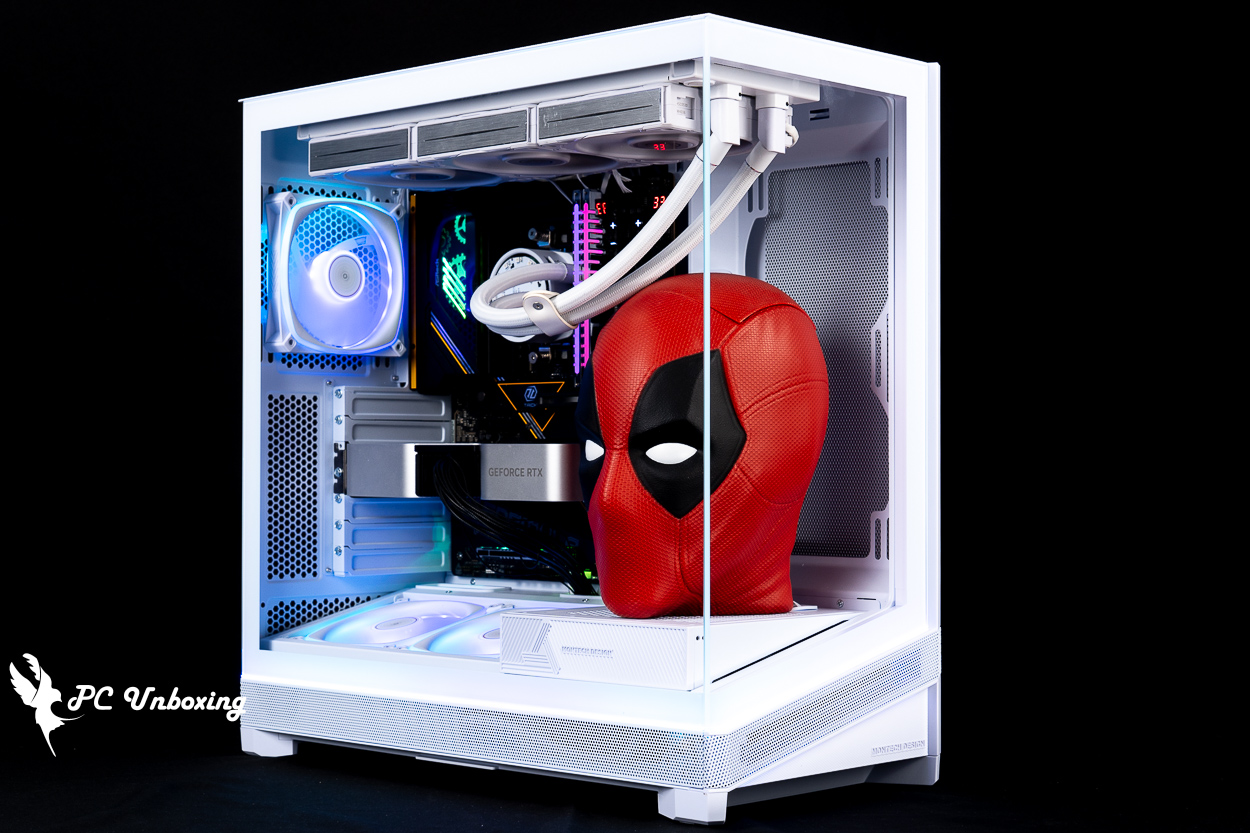
△ Demonstration of BETA 2 850W power supply installed on the side of SKY 3 chassis in GPU Mode, with AC extension cable installed.
△ Attach the magnetic cover of the accessory, but remember to turn on the power switch before attaching it.

△ Installation with ATX motherboard.
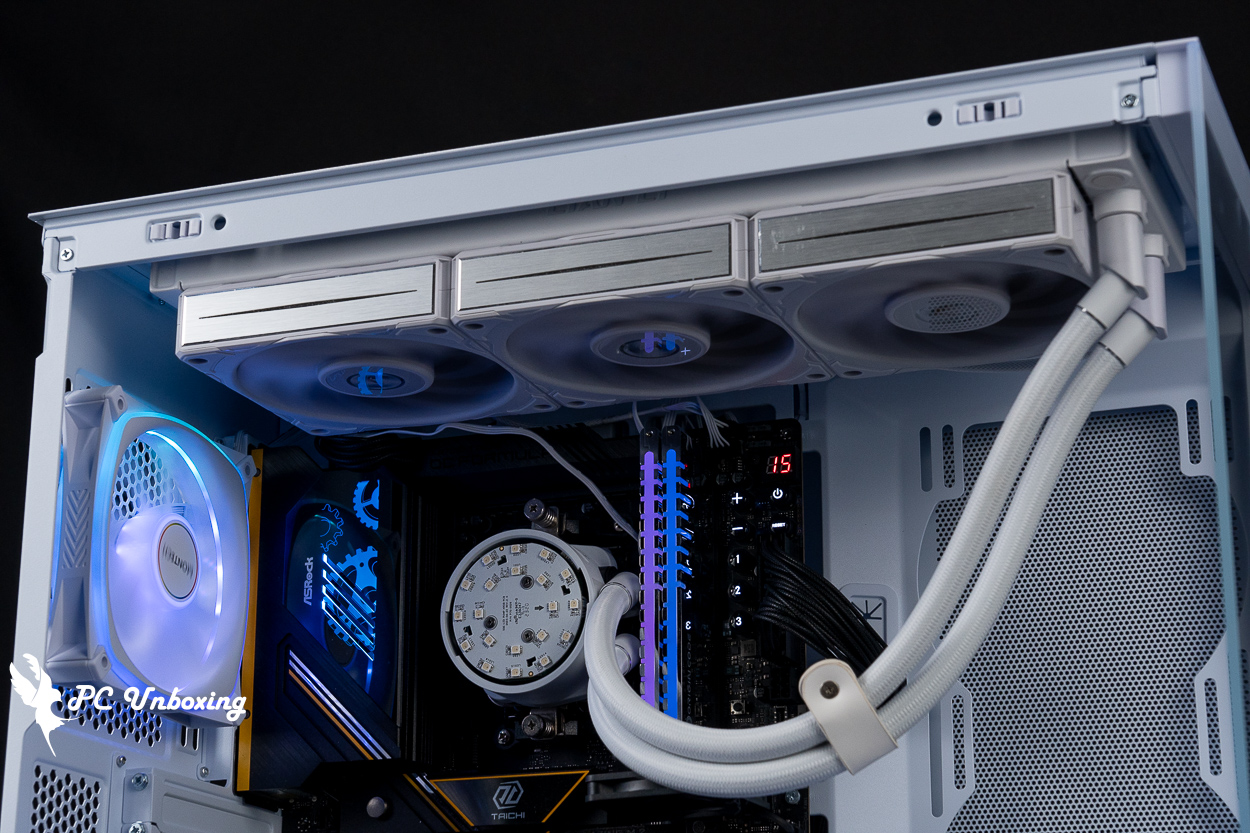
△ Top-mounted water cooling display, even with the thicker water cooling combination, there is still enough space for the motherboard.
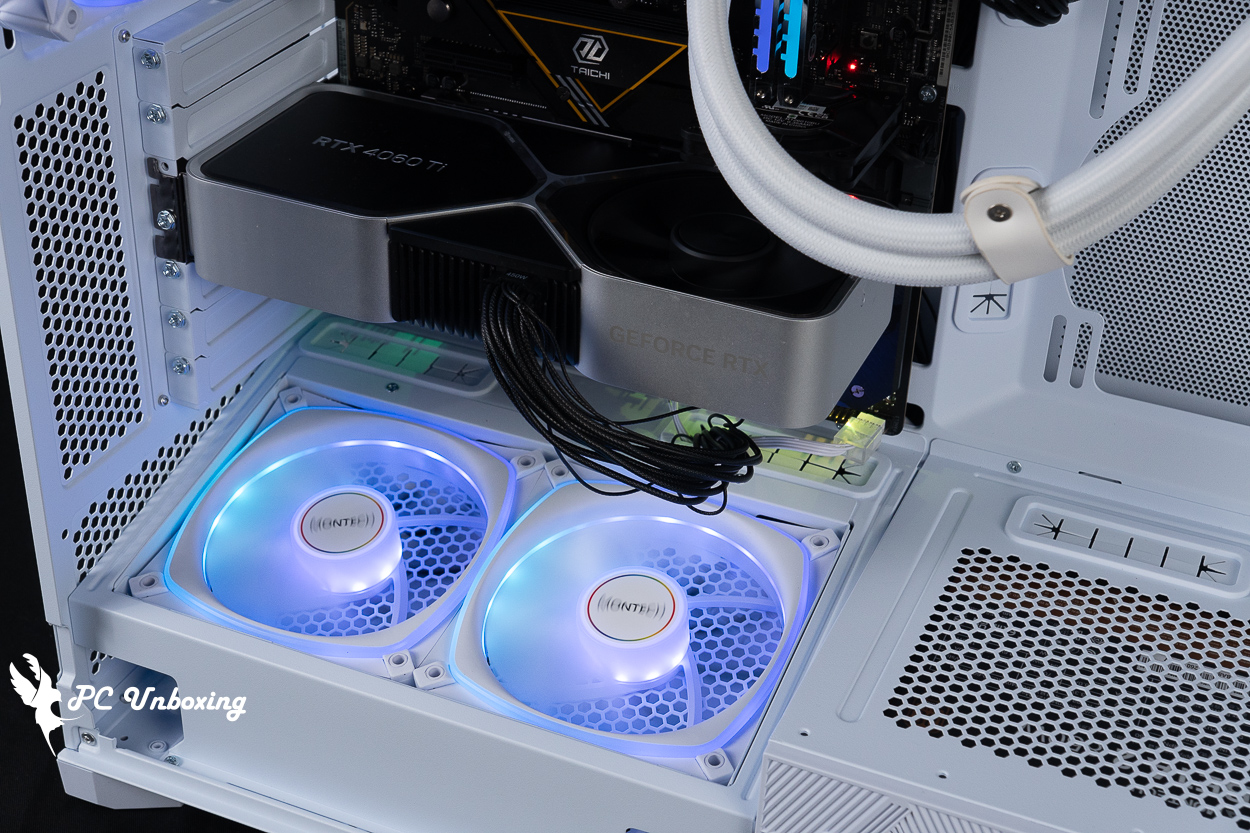
The fan in GPU Mode blows directly on the dual fans to extend the length of the graphics card.
△ Motherboard alignment display.
△ Side fans can be added on request.
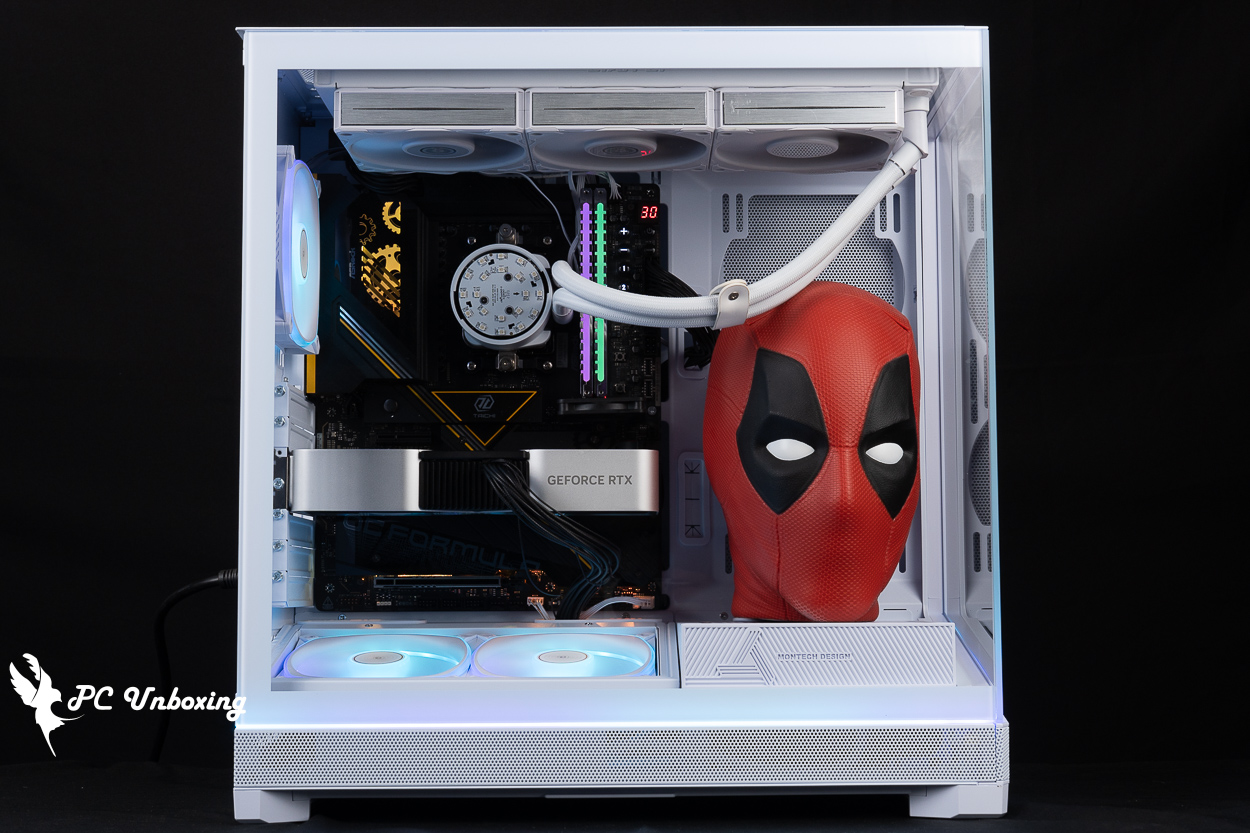
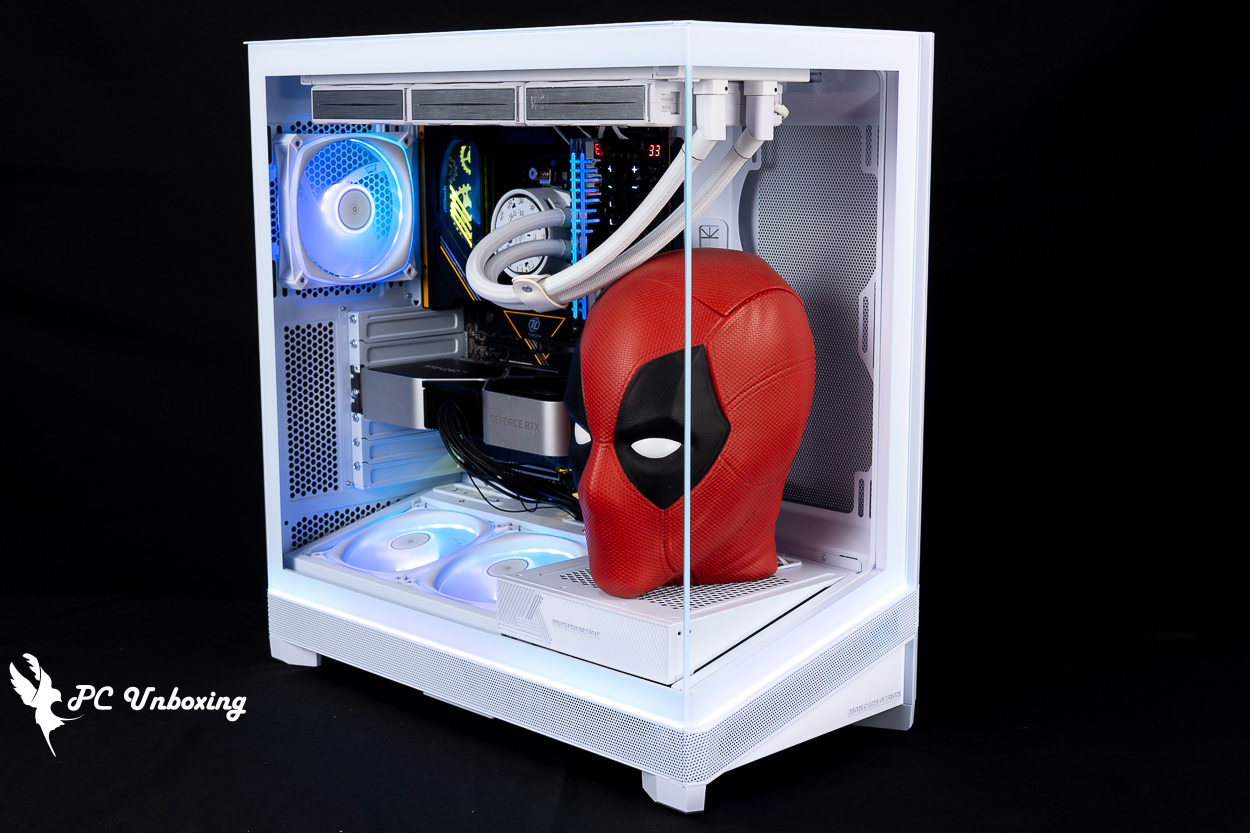
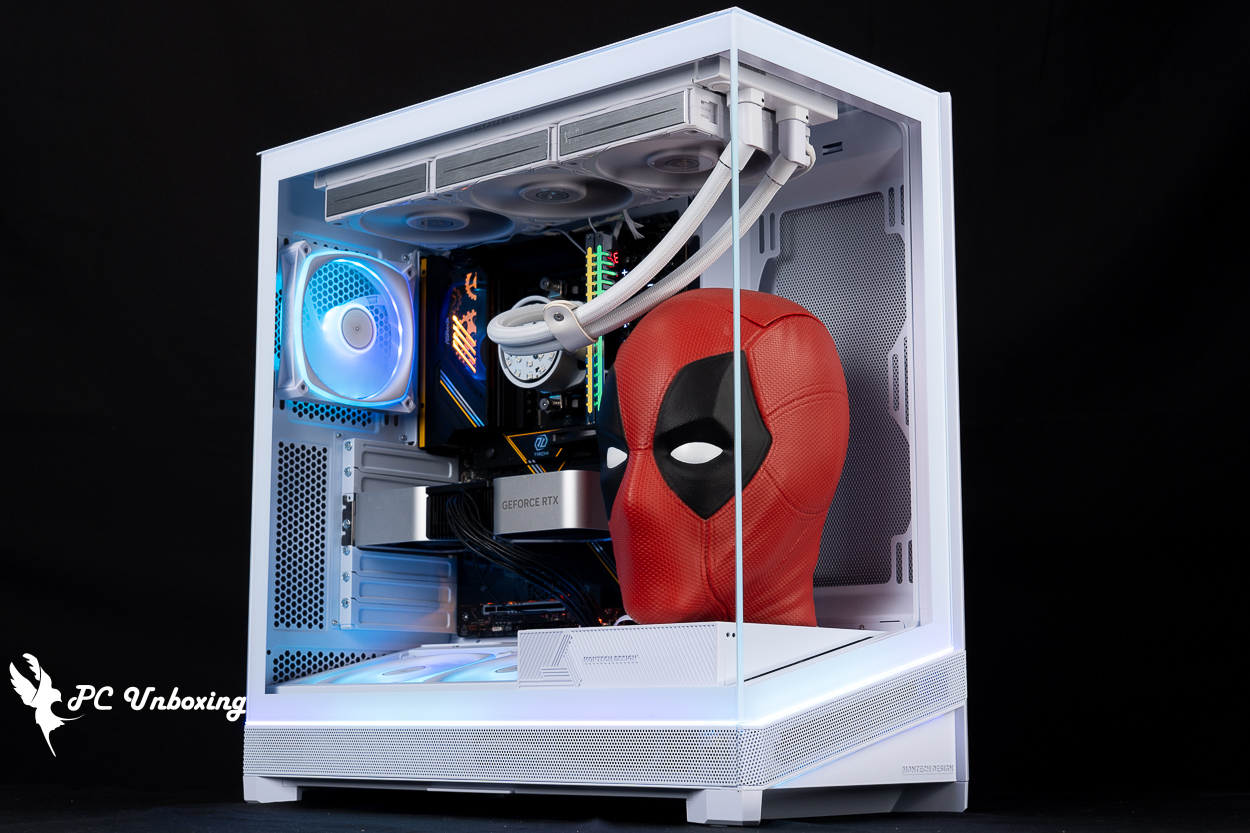
△ The side panel is covered and the model is placed. If it is equipped with a dual-fan graphics card, there is plenty of space on top of the power supply compartment to place a large model.
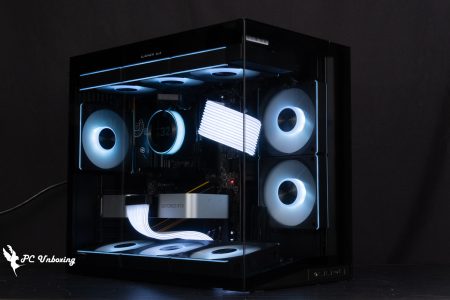
△ The lighting effect of the fan included in the case.
Close-up of the side panel light bar and bottom fan.

△ The chassis horizon light bar effect is shown.
△ Monarch MONTECH SKY 3 chassis, BETA 2 850W power supply installed.
MONTECH SKY 3 Chassis, BETA 2 850W Power Stress Test Measurement

Then we also tested the cooling performance of the chassis, with the AMD Ryzen 9 9950X3D processor and ASRock X870E Taichi OCF During the test, the fan slot was set to run at full speed in the motherboard BIOS, and the actual test was conducted in a closed room at 27°C. This is for reference only, as it is difficult to control the ambient temperature in a normal room.
The software uses AIDA64 FPU and Furmark 2 to simulate the temperature data of the processor and graphics card under high load stress, Black Myth: Wukong 1080P to run the test scenarios, and HWiNFO64 to collect and record the maximum temperature and power consumption.
Testing Platform
Processor:AMD Ryzen 9 9950X3D
Cooler: LIAN LI GA II Trinity SL-INF 360 (full speed)
Water-cooled fan: LIAN LI P28 (full speed)
Thermal paste: Cooler Master MASTERGEL MAKER 40g (thermal conductivity 11W/mK)
Motherboard:ASRock X870E Taichi OCF (BIOS version: 4.03 )
Memory:Origin code vortex DDR5 48 GB (24 GBx2)
Graphics: NVIDIA GeForce RTX 4060 Ti Founders Edition 8GB
Power Supply: MONTECH BETA 2 850W
Chassis:MONTECH SKY 3
I would like to add a few things to you, the first one is that the author will be ASRock X870E Taichi OCF The BIOS version is updated to 4.03 with the remaining settings: EXPO_on, all fan slots set to full speed.
In the double-bake test program AIDA64 FPU, the processor package temperature peaked at 76 °C, and the RTX 4060 Ti FE graphics card peaked at 67.4 °C in the Furmark 2 test.
The maximum temperature of the processor package and graphics card during the gameplay of Black Myth: Wukong is 73.9 °C and 65.5 °C. The maximum temperature of the graphics card during the gameplay of Black Myth: Wukong is 73.9 °C and 65.5 °C, respectively.
- Black Myth: Wukong_Black Myth: Wukong_Performance Test Tool 1920 x 1080(FHD)_1 round
- Graphics Test Furmark 2_30 Minute
- Processor Test AIDA64 CPU_30 Minute
- CPU (Tctl/Tdie) temperature is the actual maximum temperature of the CPU sensors in the chip, and is used as a reference point for overheating and downclocking of the processor.

△ Chassis thermal performance chart.

△ Dual-bake test screenshot, maximum CPU temperature is 62 °C; and maximum CPU (Tctl/Tdie) processor package temperature is 76 °C.
Tests were continued after the burn-in test logs on the platform, using the FLIR ONE PRO Thermal Imaging Camera to view the temperature of the power supply cables for your reference.
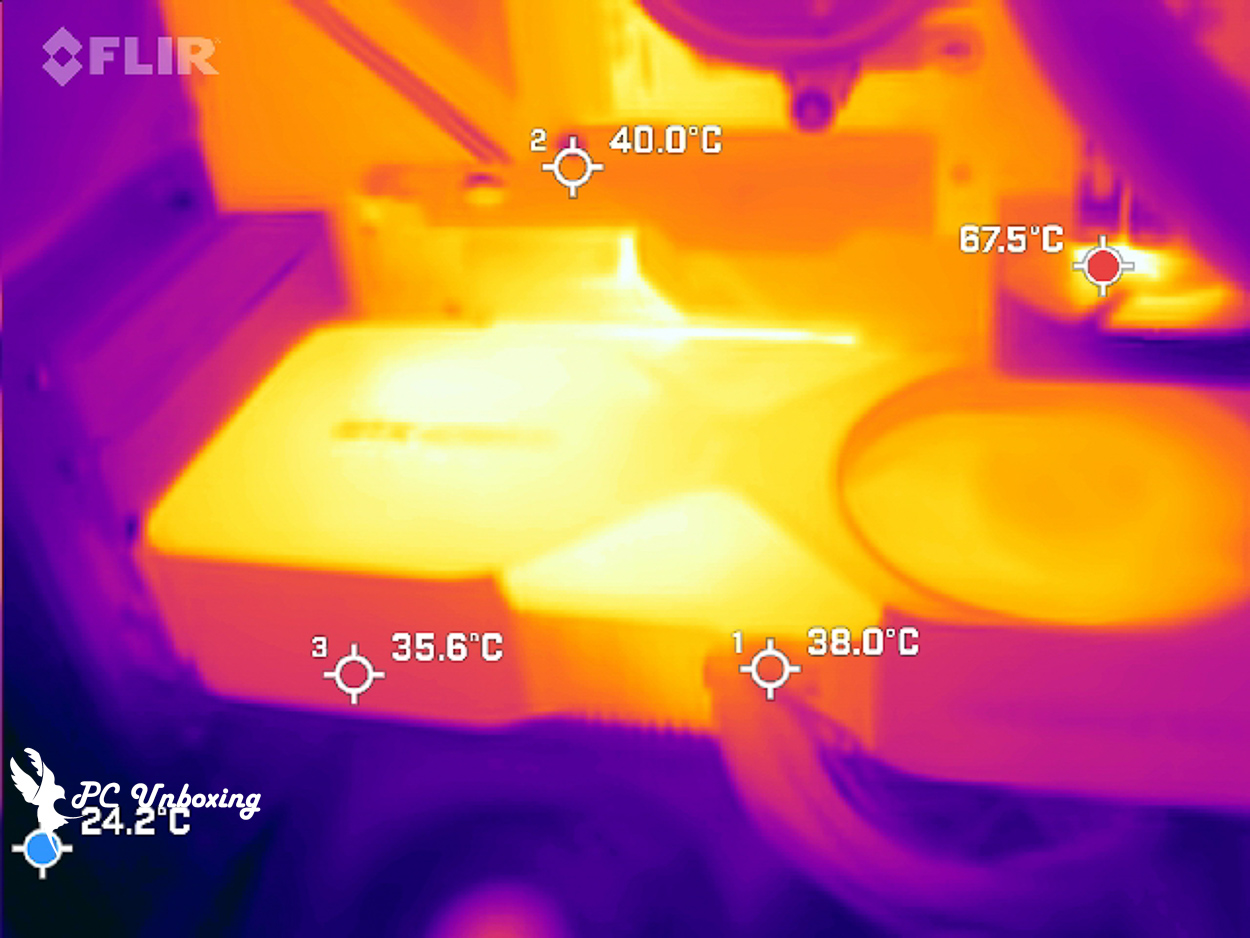
△ Test procedure 12V-2X6 Temperature of the wire is about 38 °C.
MONTECH SKY 3 vs BETA 2 850W Evaluation Summary

First of all, let's talk about the MONTECH SKY 3 chassis, this time using a side-mounted power supply installation planning in this site previously unboxed! LANCOOL 217 Infinity 和 LANCOOL 207 I've seen the SKY 3 on the web, but what's better than the competing SKY 3 is that it can be modularized into CPU Mode or GPU Mode according to the thermal planning requirements, and the process of changing is not that difficult and troublesome, making it more flexible and complete in terms of practicality.
The whole chassis has up to eight fan mounting positions, with 360/280 mm water cooler on top, up to 185 mm air cooler tower, 445 mm long graphics card mounting space, and supports up to ATX motherboards and back-pluggable motherboards, which is compatible with common consumer high-end hardware, and the chassis has a horizon light bar that the author likes, and the top of the power compartment can also be used to hold model scenery when it is in GPU mode. The top of the power compartment can also be used to hold model scenery when in GPU mode.
BETA 2 850W power supply is the main entry-level models to update, the maximum 850W models to provide consumers with a choice, natively provide 12V-2X6 cable up to 450W power supply limit, the most recommended with RTX 5080 can be used, higher-end 5090 recommended with a larger wattage models to use, because it is an entry-level product positioning so the warranty is five years, but five years to replace a computer! The warranty is five years because it's an entry-level product, but five years is about the length of time that an average person would replace a computer, and it's also in line with the consumer habits of those who choose to pay more for their computers than those who disassemble and use them for DIY upgrades. Although the power supply is straight out of the cable, the embossed cable is really nice to touch and look good.
Yun
Drinks with less than full sugar are colored water. Crossing Turbid Creek, full sugar is not a crime!